

Shop and Book an Order
This guide walks you through searching for flights, comparing airline offers, and creating a booking on NuFlights.
Prerequisites
- You are logged in to your NuFlights agency account.
- Your agency has an active subscription with at least one airline.
Step 1: Set Up Your Search
From the flight search screen, configure the following search criteria:
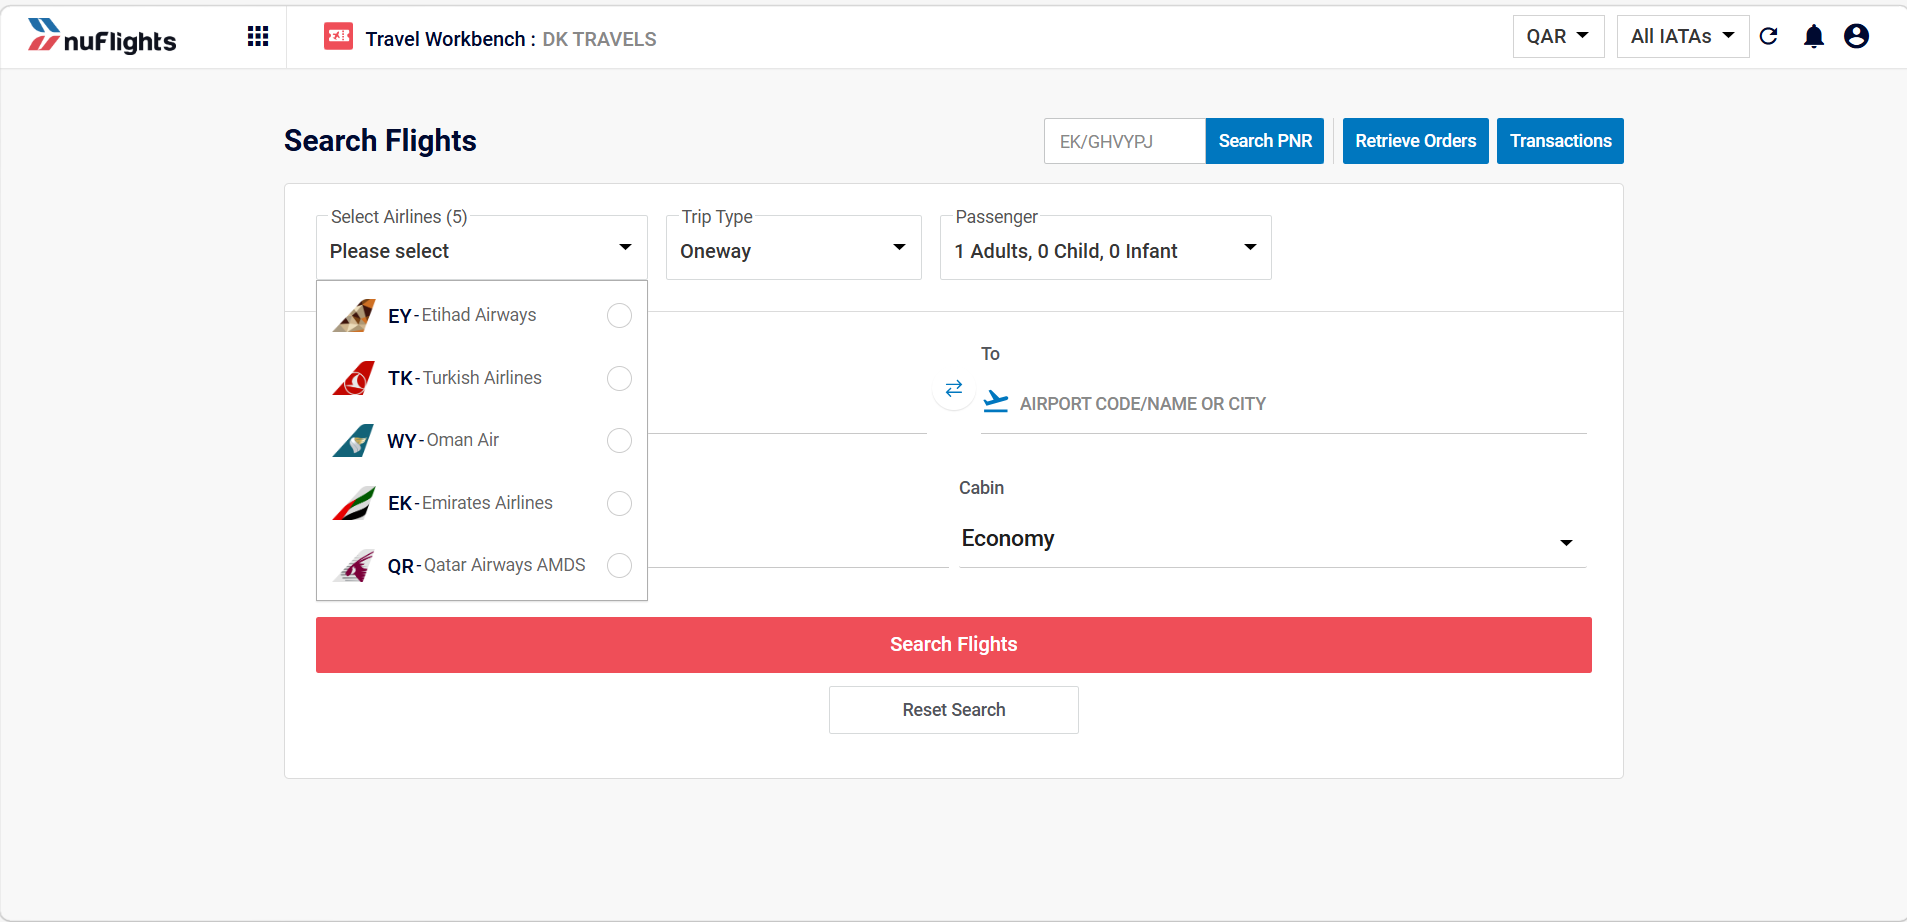
- Select an airline (Optional) -- You do not need to select a specific airline to perform a search. By default, leaving this blank will query your itinerary against all active airline subscriptions connected to your agency.
Search All Airlines In Agency
- If you strictly want offers from a specific airline, select them from the list.
- If you search against all airlines, you can always filter the results down to a specific airline on the Results page.
To search and book your agency's Local Inventory flights exclusively, you must select the NF – NF LOCAL INV carrier from the list. The selected airline will show a green tick.
Applying a Special Fare Code: If you have a negotiated rate or corporate fare to apply, you must first select the airline it belongs to. Once an airline is explicitly selected, an optional Special Fare Code dropdown will appear allowing you to apply your configured code to the flight search.
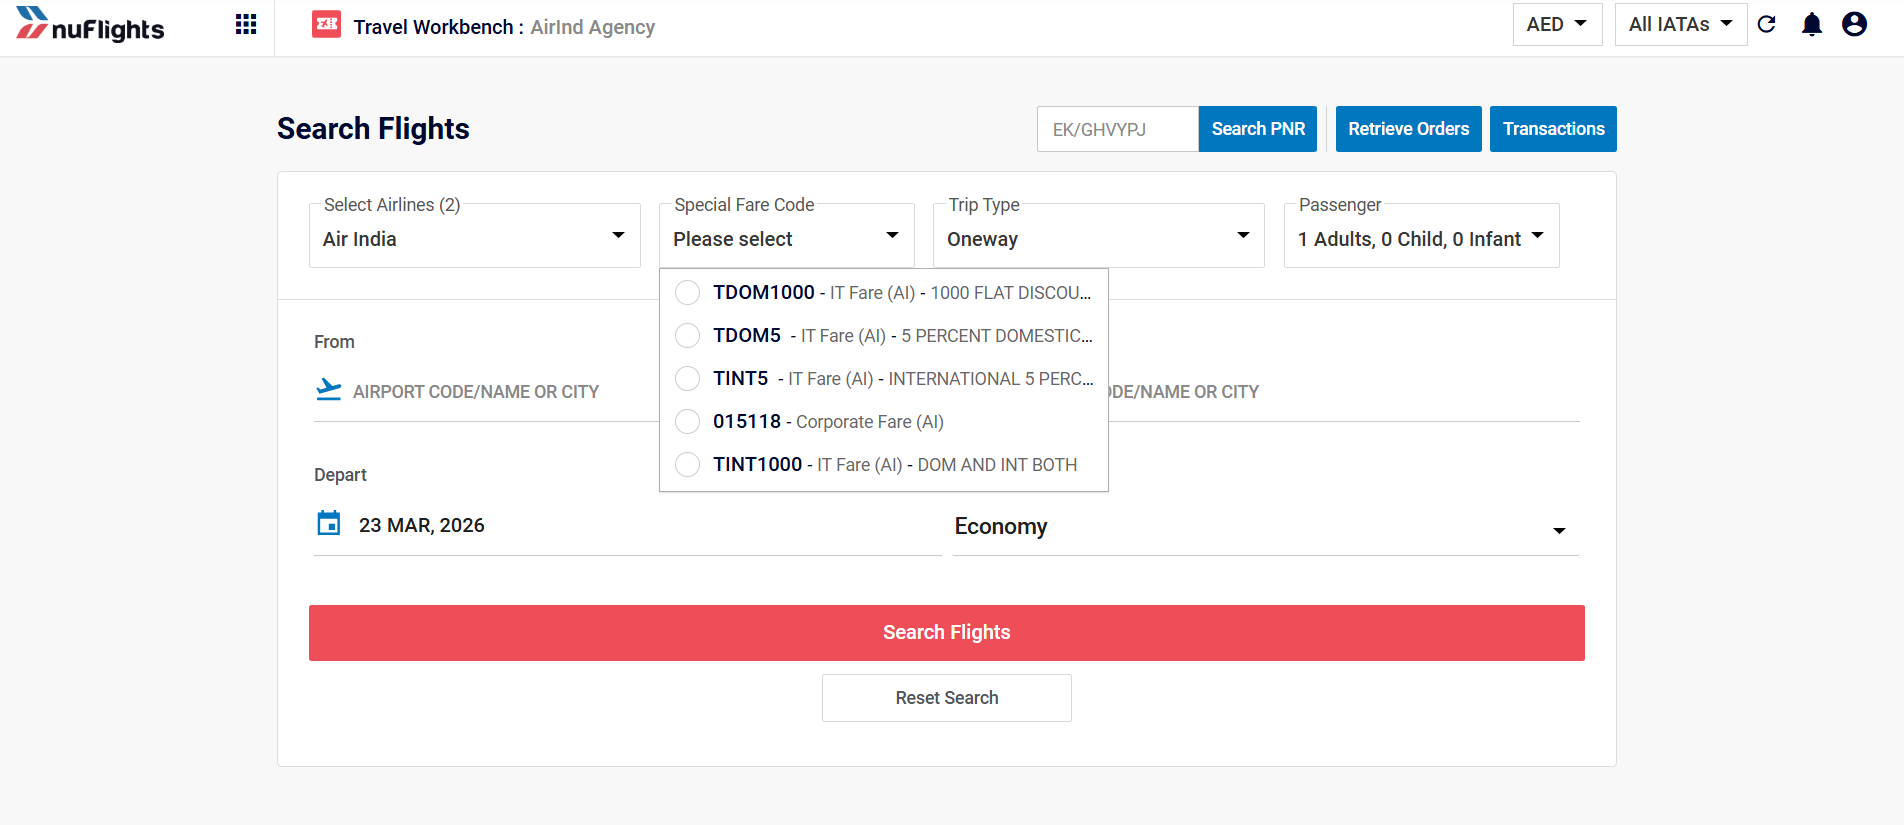
Apply the configured Special Fare Code to a search in Travel Workbench
In order to use Special Fare Codes, they must first be configured in the Agency Admin portal. Refer to the Special Fare Codes guide for setup instructions.
- Trip type -- Select Return for a round trip, Select Multi-City for a multi-city journey, or One Way for a single-leg journey.
- Origin and Destination -- Type an airport code (e.g.
LHR) or city name. Airport details will appear as you type to help you confirm your selection. - Dates -- Pick your departure date and, for return trips, your return date.
- Passengers -- Set the number of adults, children, and infants.
- Cabin type -- Choose the desired cabin class (e.g. Economy, Business).

Search form with all fields filled in
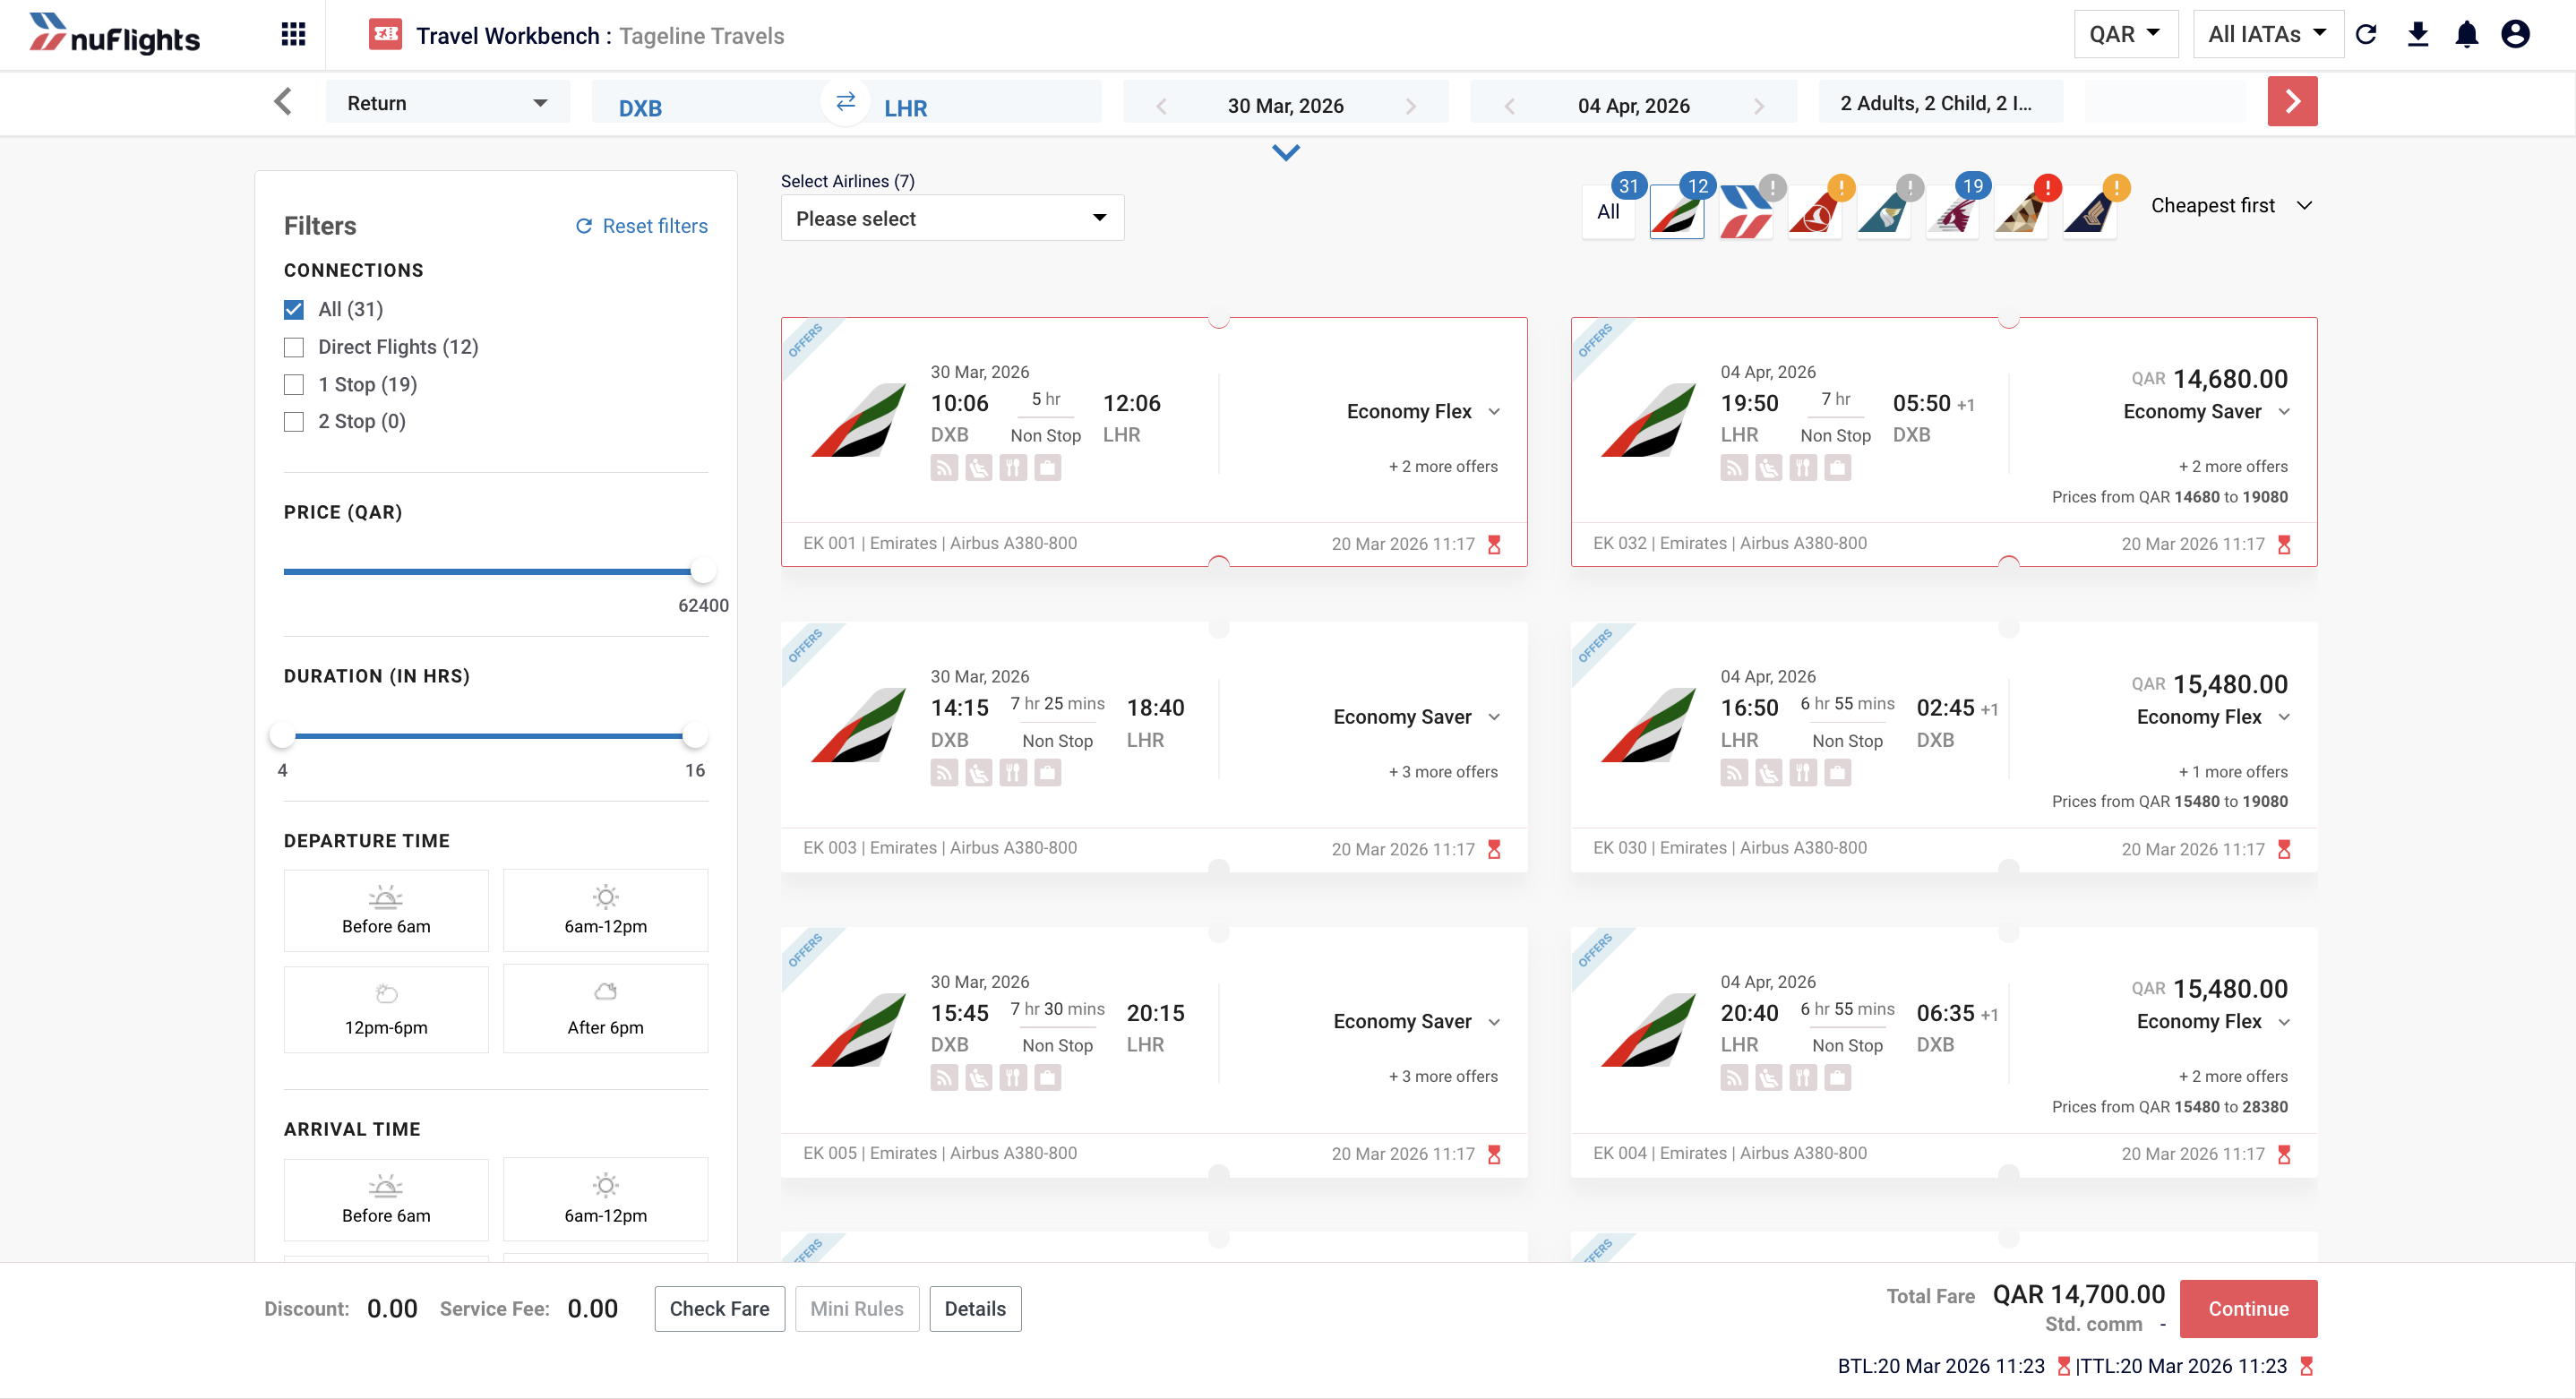
Click Search to find available flights.Step 2: Browse Offers
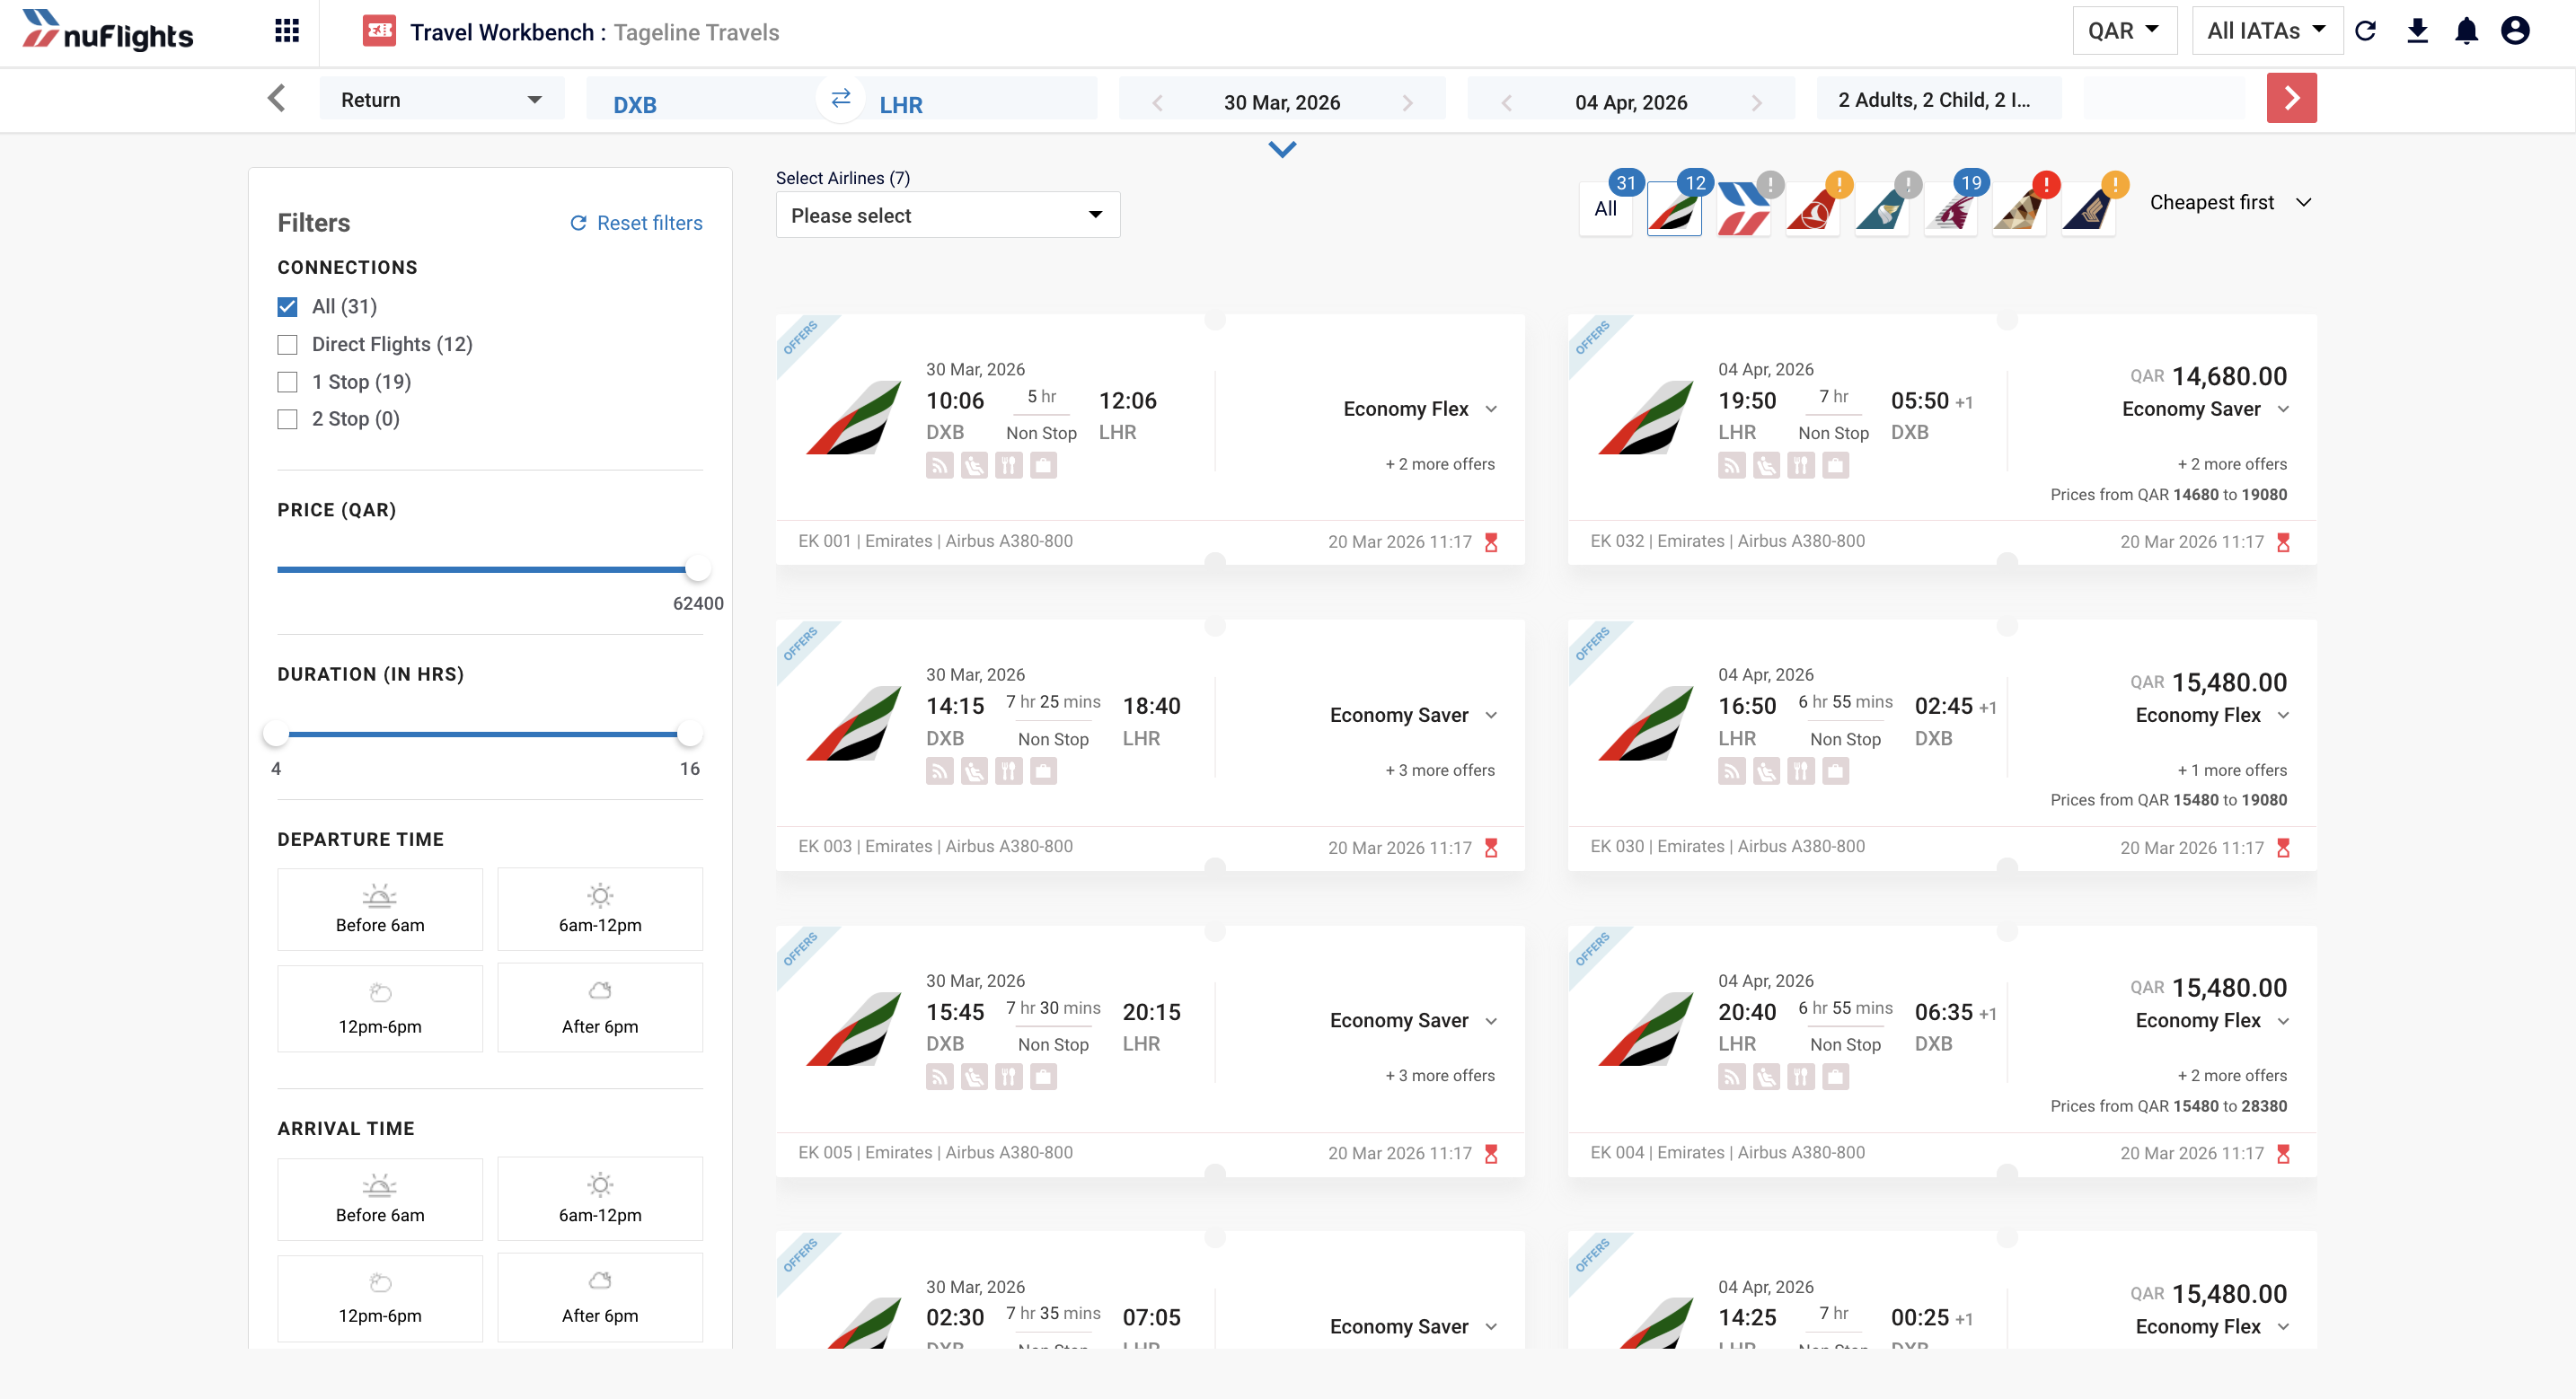
After the search completes, NuFlights queries all your subscribed airlines and displays the results.
- Airlines that returned offers show the number of available offers next to their logo.
- Airlines with no matching offers are visually indicated so you can see at a glance which airlines had availability.
Offers are sorted Cheapest first by default. You can switch to Fastest first to see the shortest travel time at the top.
Search results page showing airline offer counts and the sort toggle
Filter Results
Use the filter panel on the left to narrow down results by:
- Airline -- View offers from a specific airline.
- Number of connections -- Direct flights, one stop, etc.
- Price range -- Set a minimum and maximum price.
- Trip duration -- Filter by total travel time.
- Departure and arrival time -- Restrict results to specific time windows.
Step 3: Select an Offer
Expand an itinerary to view its branded fare options. Each branded fare shows:
- Amenities and inclusions
- Fare basis code and RBD (Reservation Booking Designator)
- Price per passenger and total price
For a round trip, select an offer for the outbound leg first, then select an offer for the inbound leg.
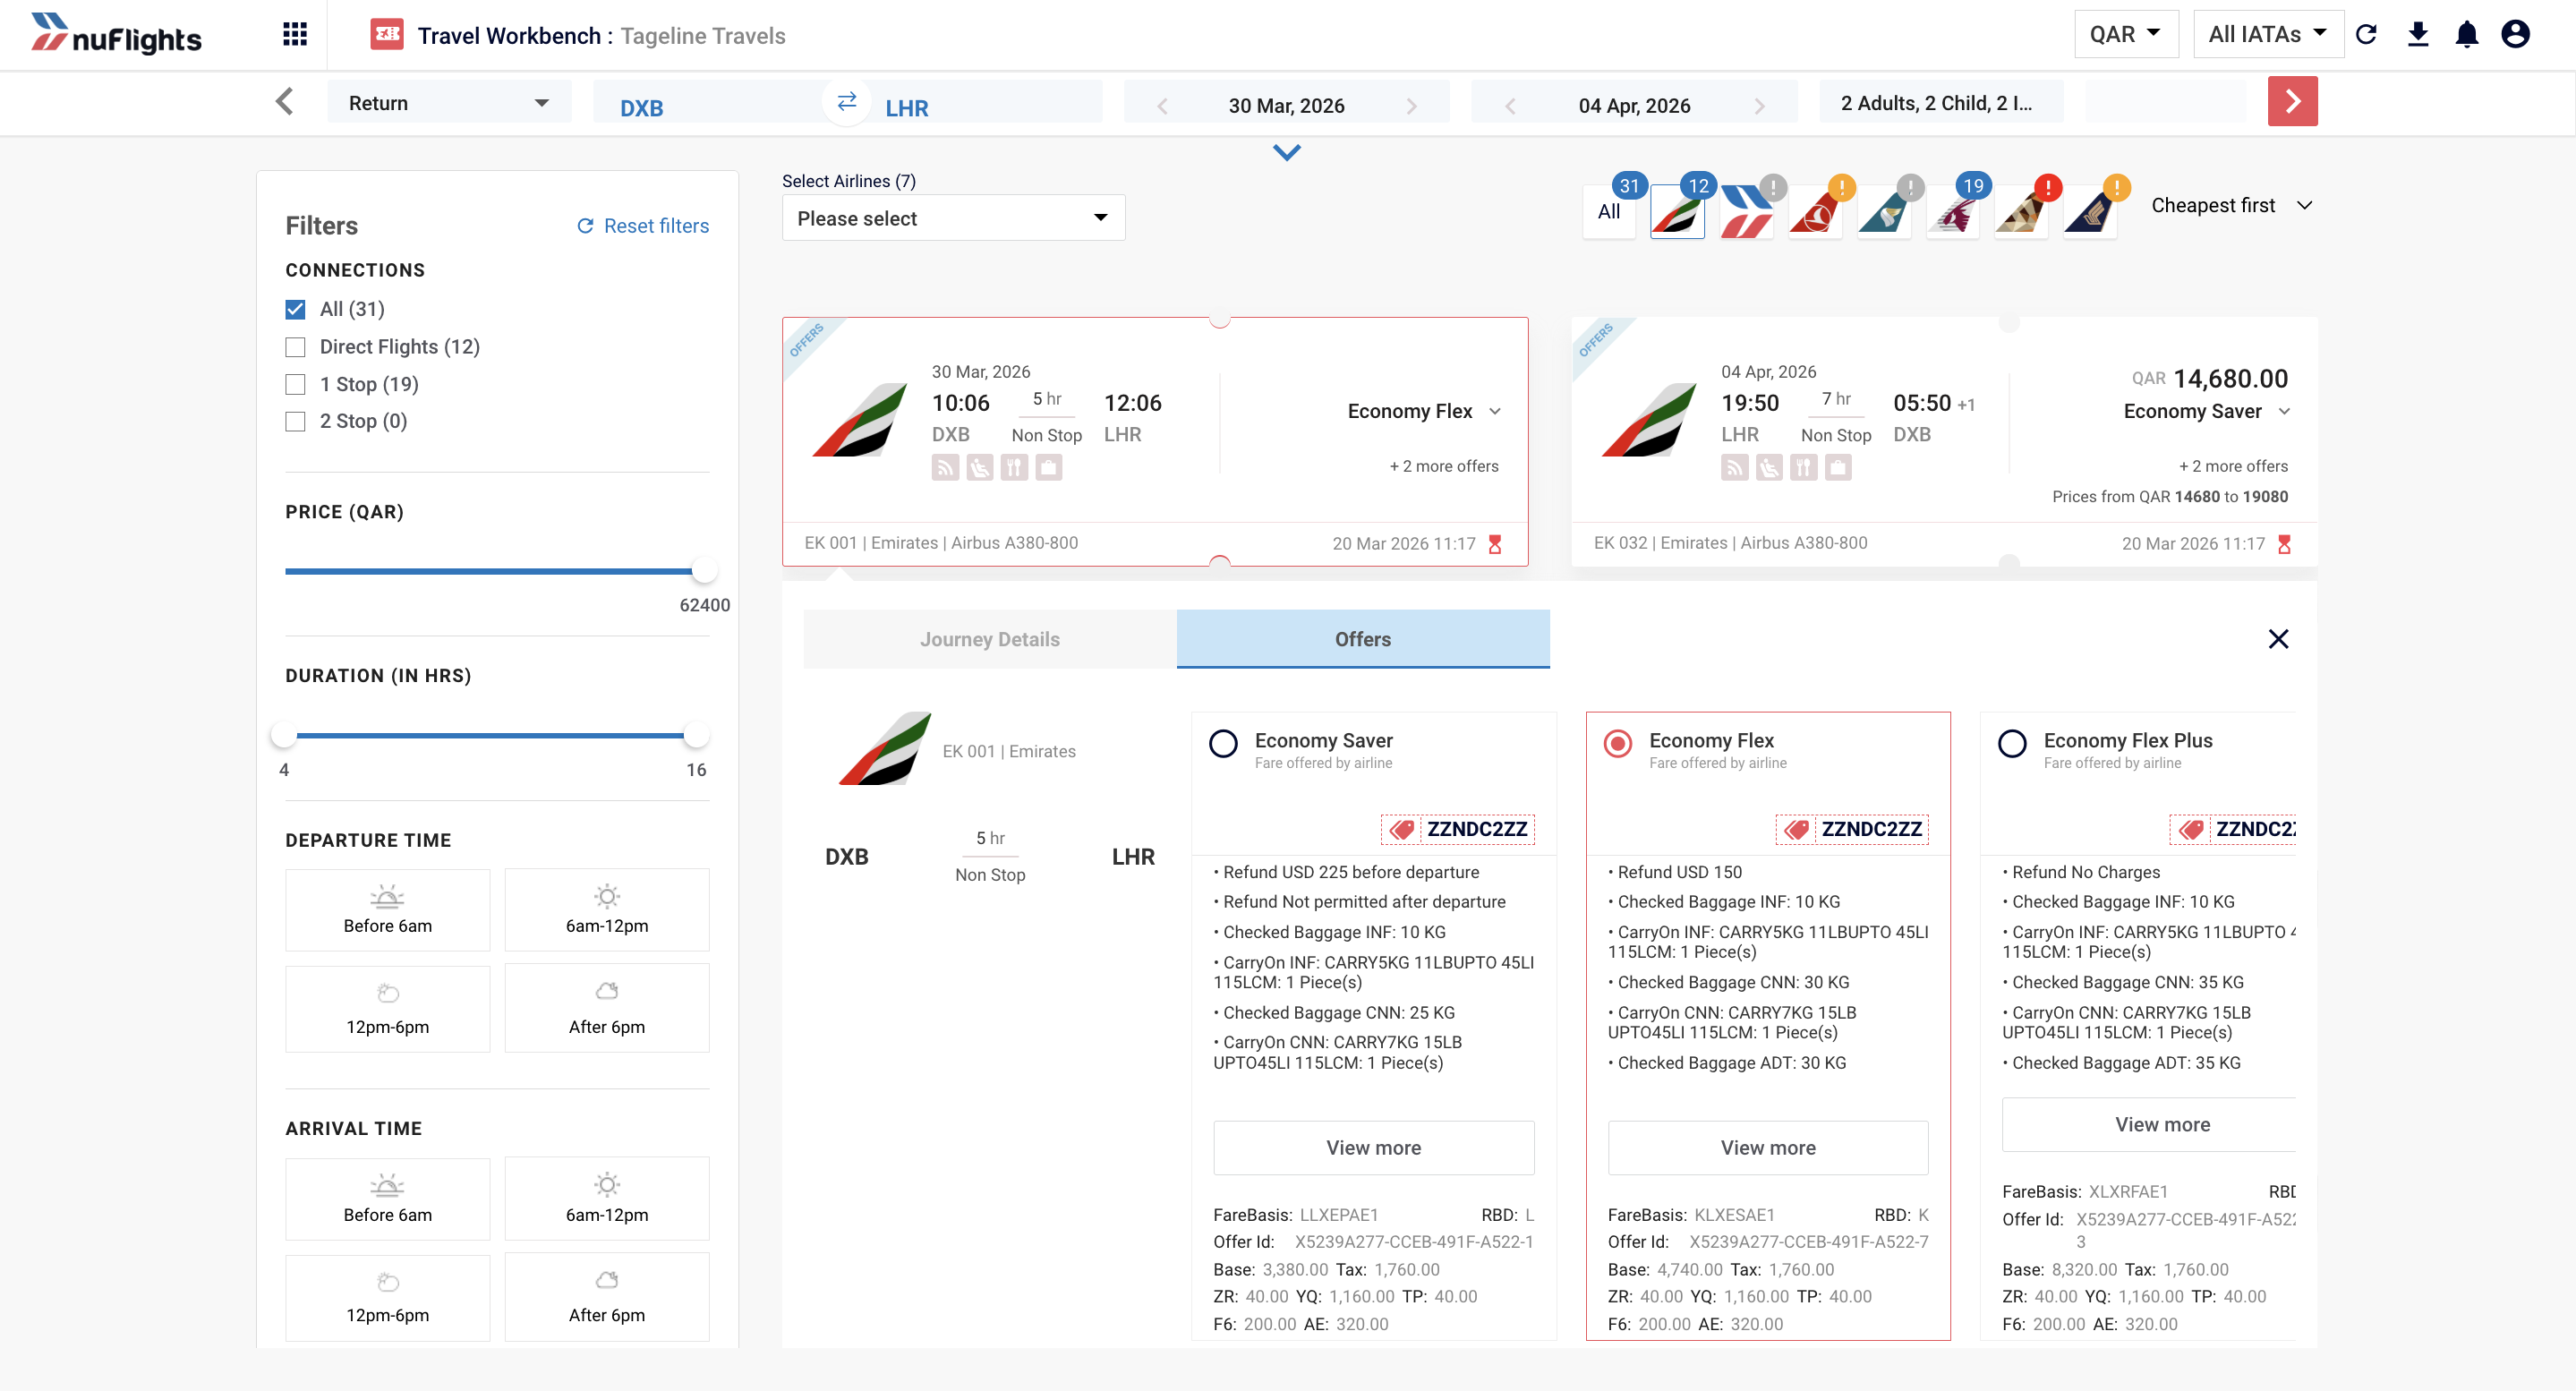
Expanded branded fare options for an itinerary
Step 4: Review Pricing
Once you select your offers, NuFlights automatically prices the combined itinerary with the airline. The confirmed price is displayed along with:
- Booking Time Limit (BTL) -- The deadline by which the booking must be completed (typically around 20 minutes, but varies by airline).
- Ticketing Time Limit (TTL) -- The deadline by which payment must be made after the order is booked.
You can review the offer details at this stage:
- Flight details -- Segments, departure and arrival times, aircraft information.
- Fare details -- Base fare, taxes, and a detailed fare breakdown.
- Fare rules -- Cancellation, change, and refund policies applicable to the offer.
Click Continue to proceed.
Pricing summary showing BTL, TTL, and fare breakdown
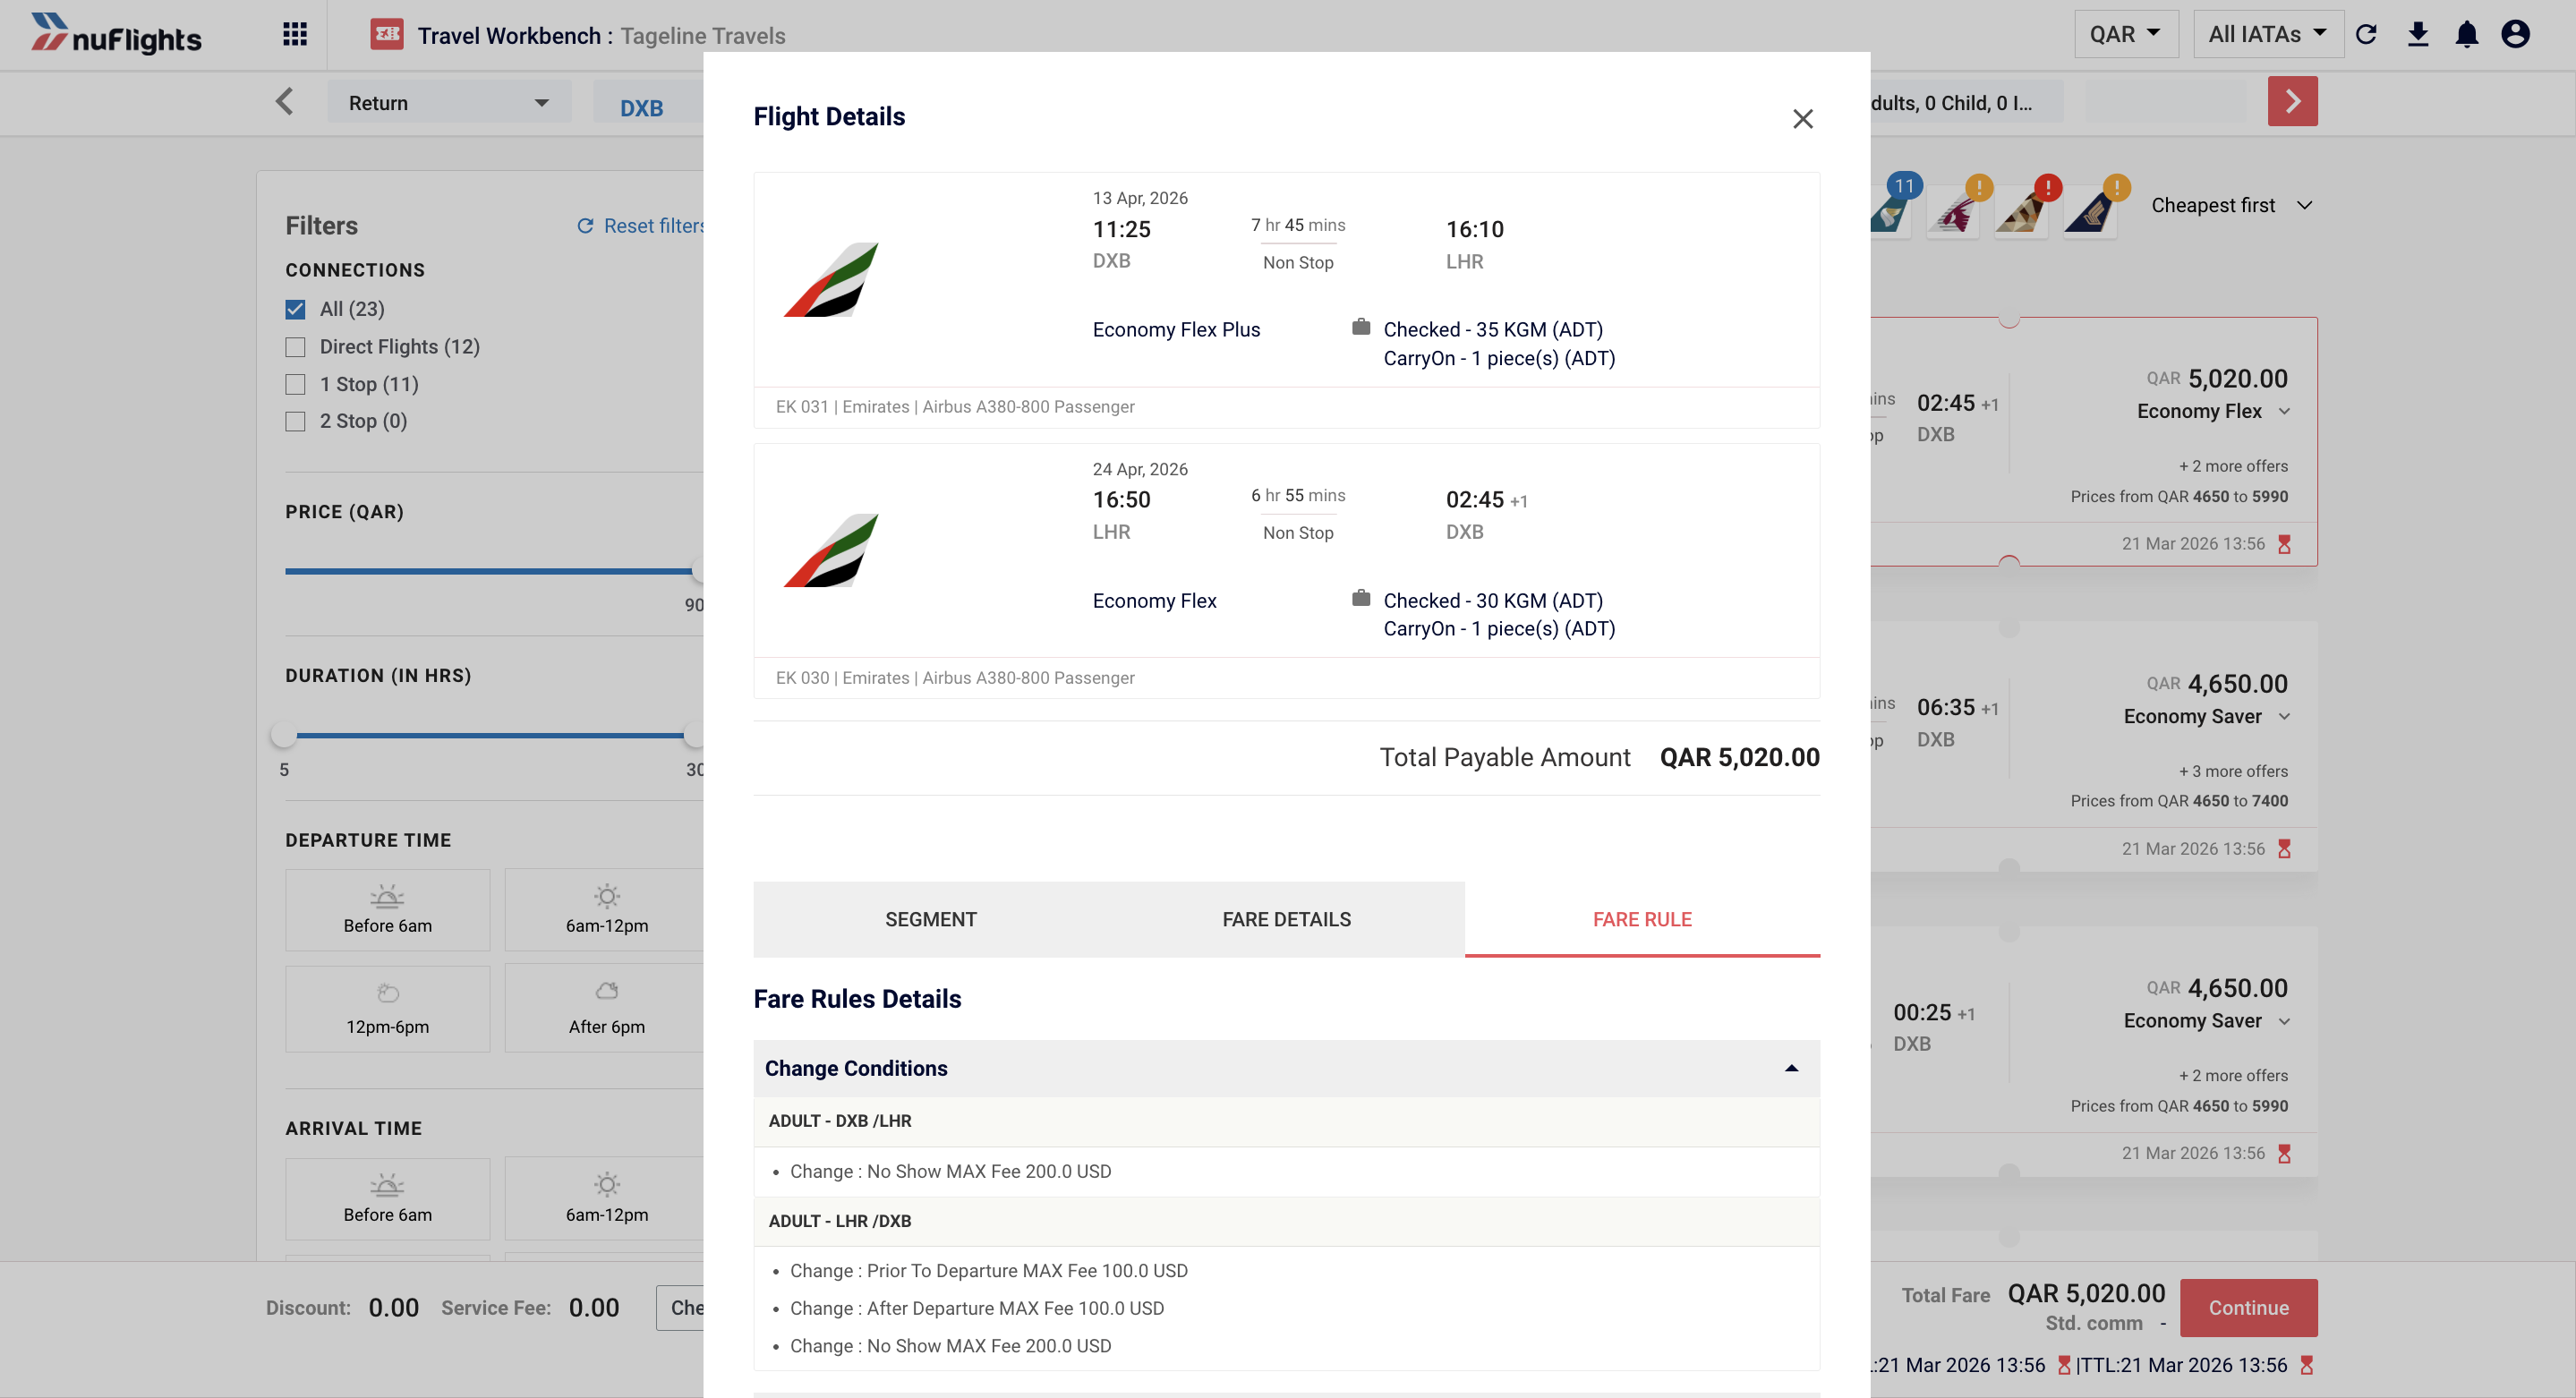
Fare rules
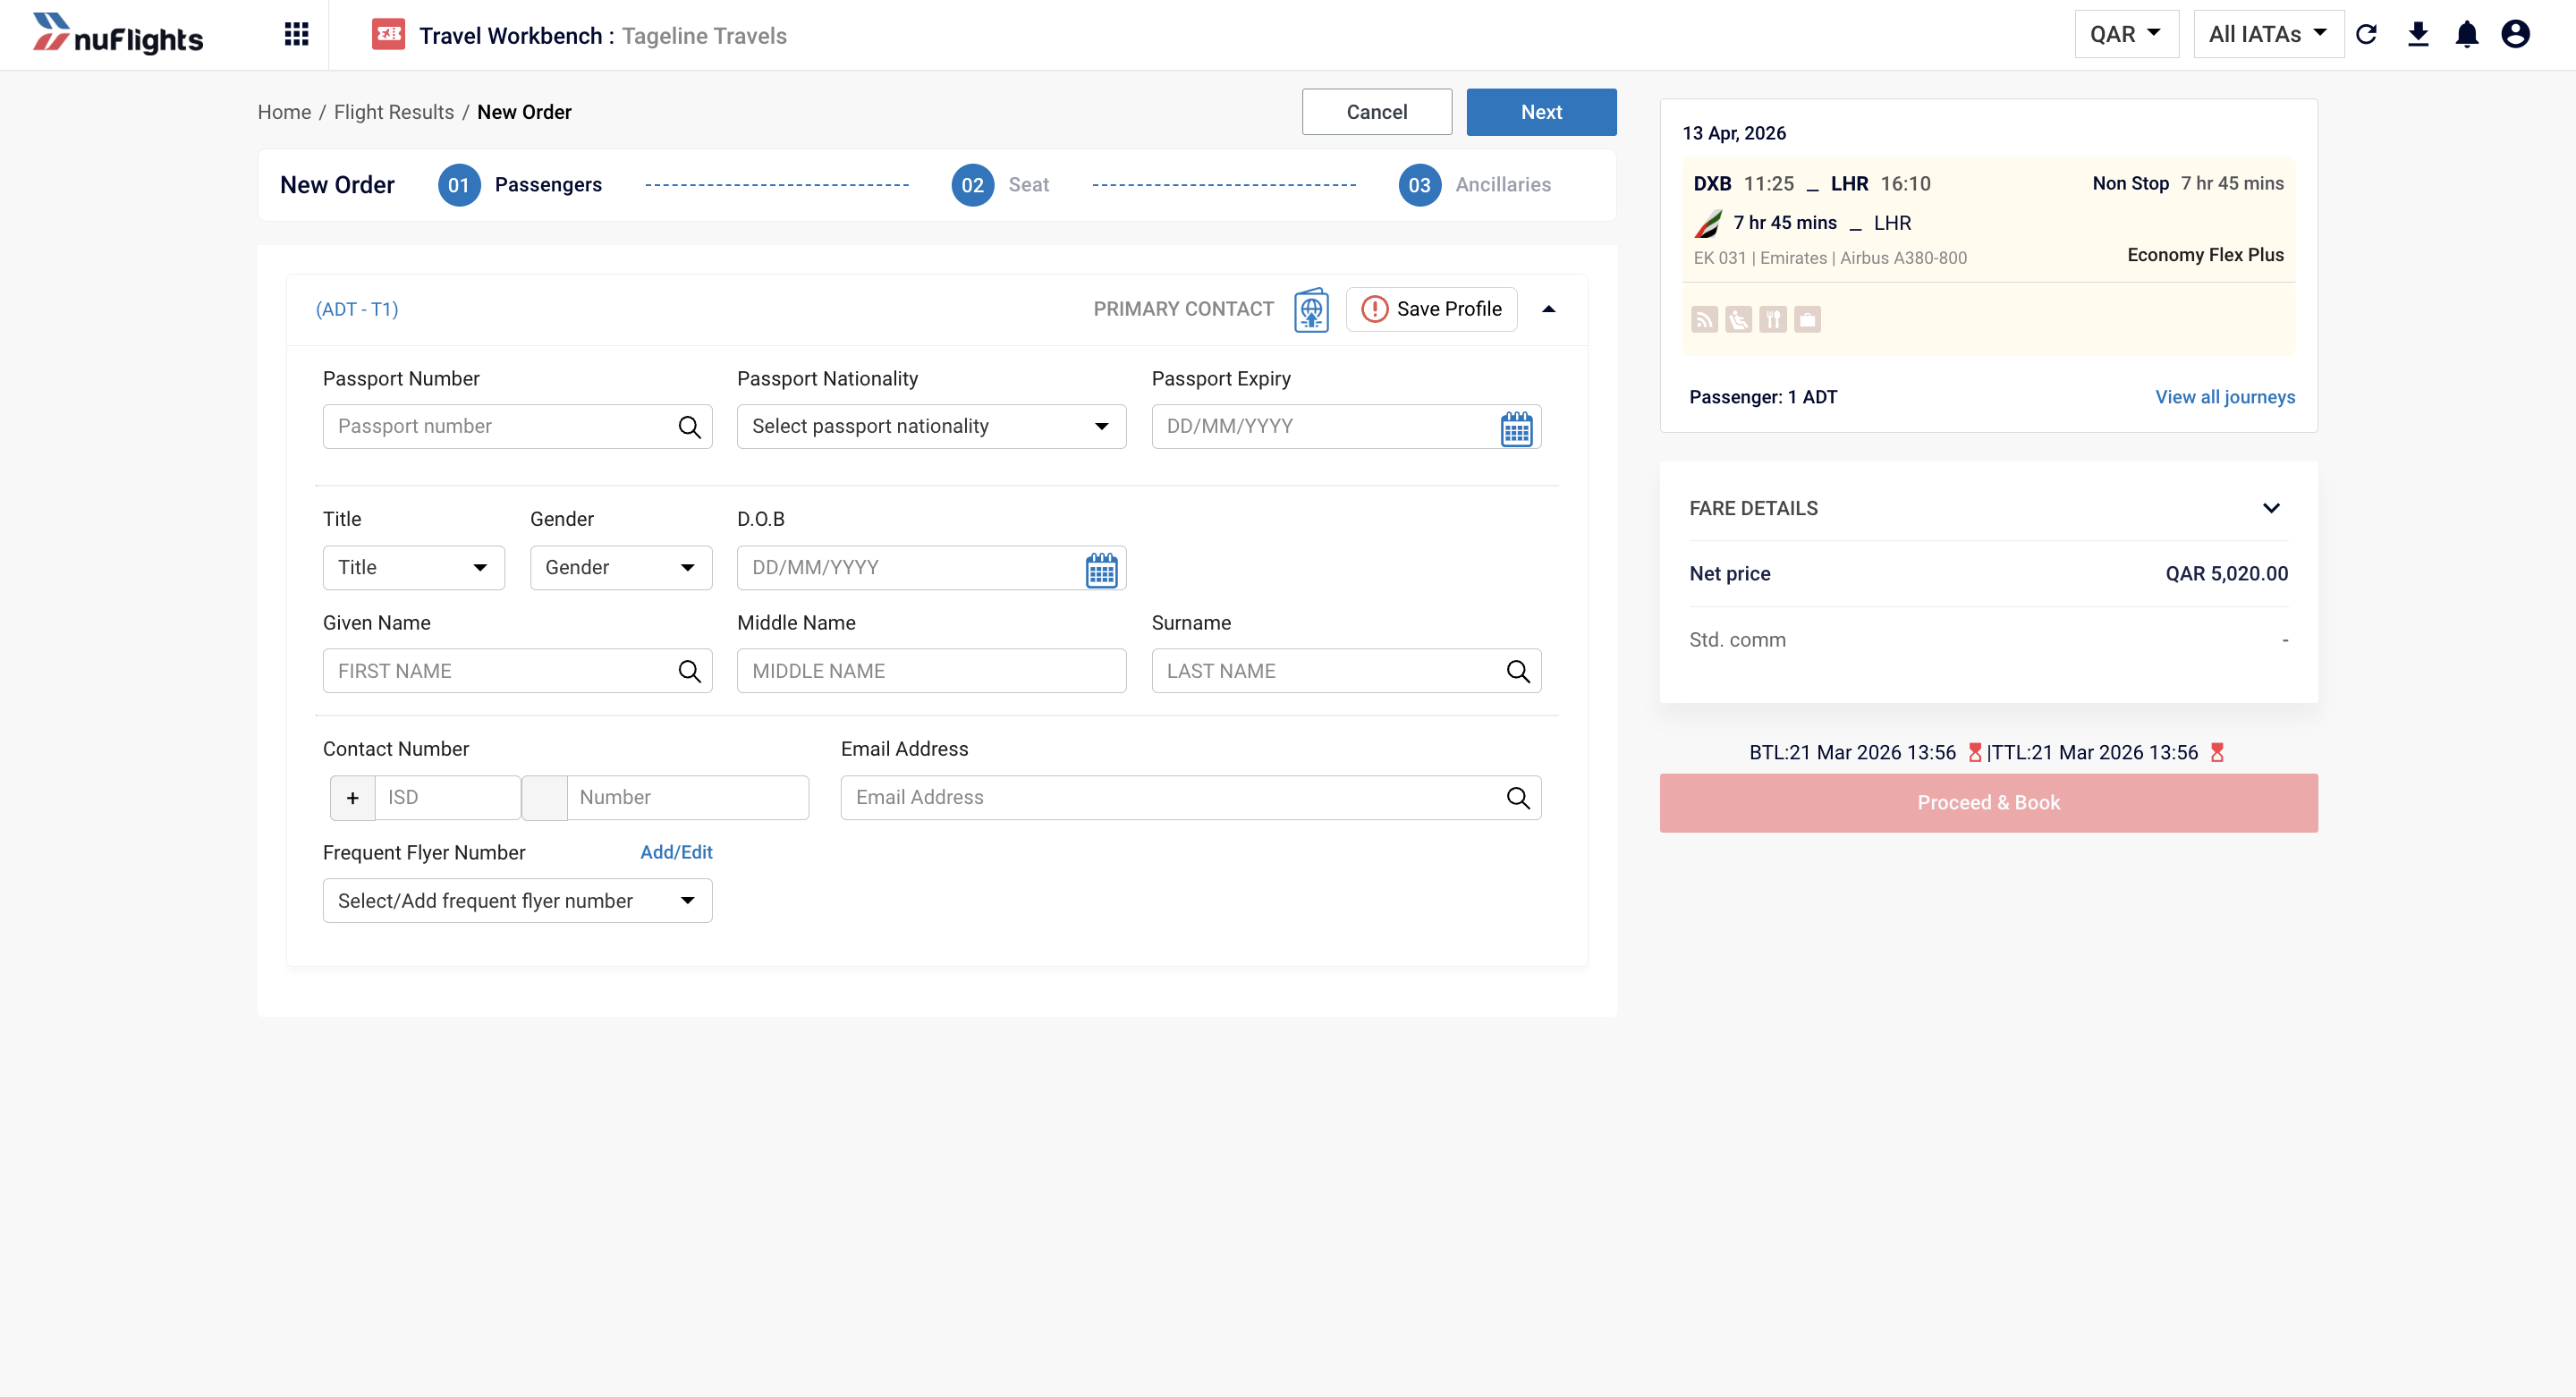
Step 5: Enter Passenger Details
The Passenger Details screen allows you to enter information for each passenger and optionally include a secondary contact — the agent's or agency's contact details — for additional booking communications.
Include Agency Contact (Secondary Contact) New
The Passenger Details screen now supports a secondary contact. Agents can include their own contact details or their agency's contact for booking notifications, in addition to the passenger's details.
At the top of the Passenger Details screen, you will see the Include Agency Contact panel. This allows you to add a secondary contact to the booking for notification purposes.
Passenger details screen showing the Include Agency Contact panel
You can choose one of the following options using the toggle:
| Option | Description |
|---|---|
| My Contact | Uses the logged-in agent's contact number and email address as the secondary contact for the booking. |
| Agency Contact | Uses the agency's contact number and email address as the secondary contact. |
When My Contact or Agency Contact is selected, the passenger's own contact details (Passenger Contact Number and Passenger Email Address) are not required. The agent or agency contact will be used for all booking notifications.
Passenger Profile Options
For each passenger, you can:
- Search for an existing passenger profile to auto-fill their details.
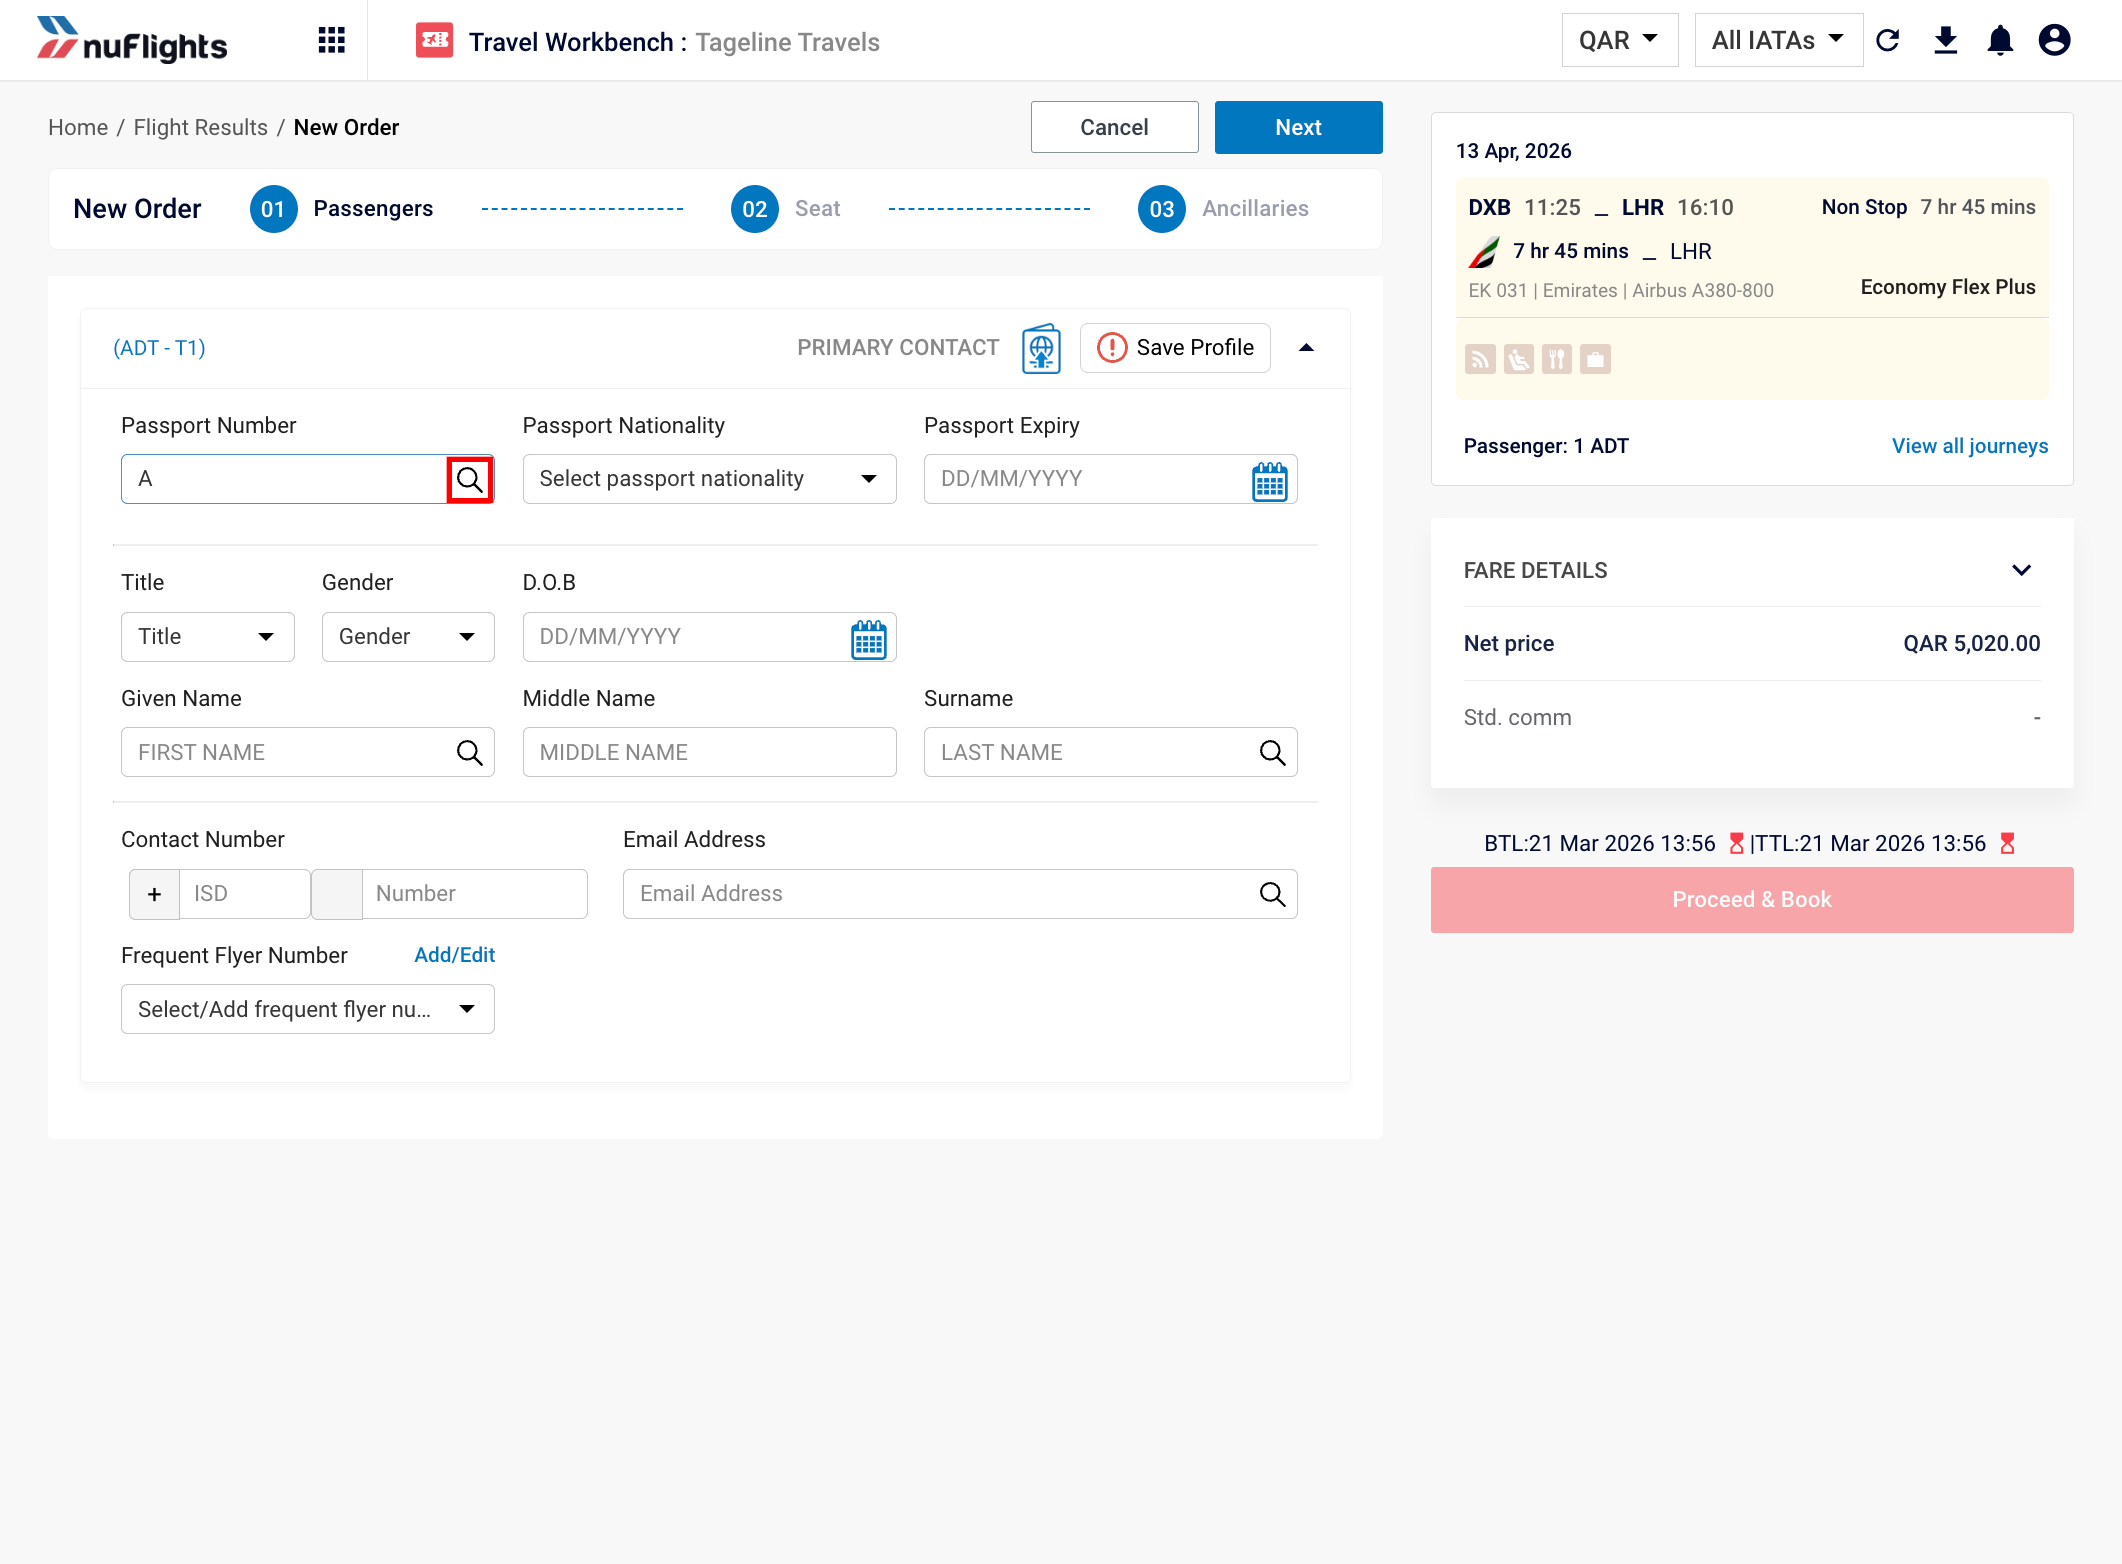
Search Passenger details
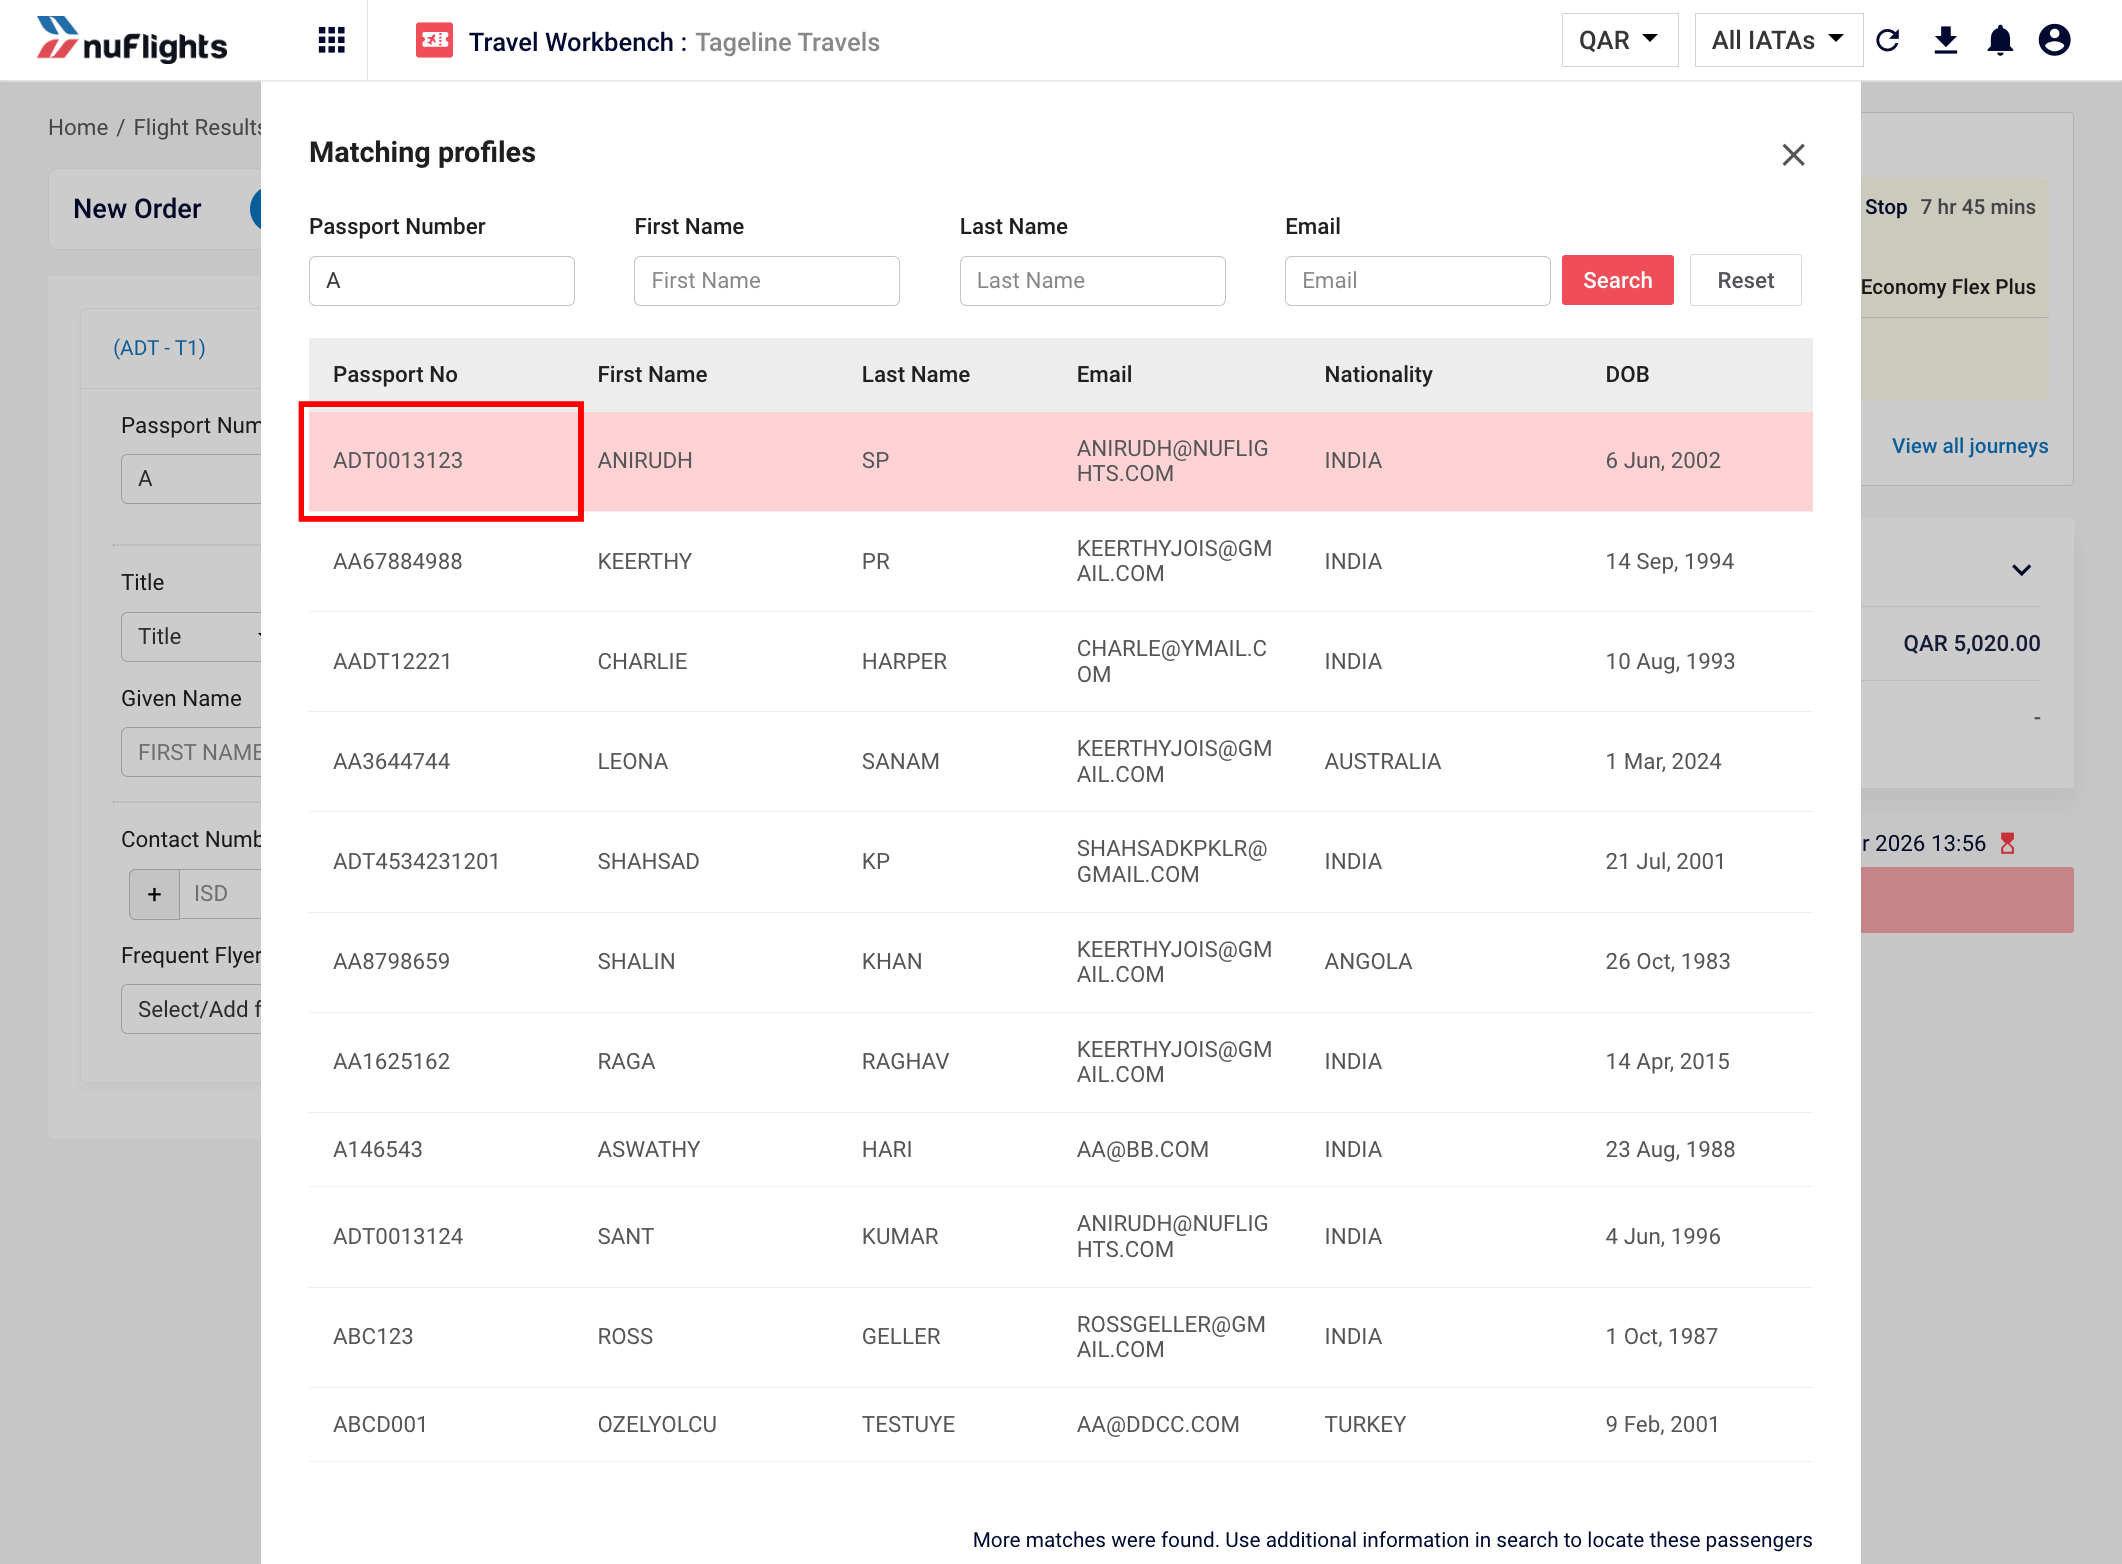
Select Passenger profile
- Enter details manually and optionally save the profile for future bookings.
Identity Document Requirements
The supported identity document types depend on the type of journey:
| Journey Type | Supported Documents |
|---|---|
| International Travel | Only Passport is allowed |
| Domestic Travel | National ID or Passport can be used |
Supported document types may vary by airline based on system configuration.
Steps to Enter Passenger Details
- Select Identity Document Type: Choose the appropriate document type (Passport / National ID) based on the journey.
- Enter Mandatory Information: Provide the following details for each passenger:
- Identity document type & nationality
- Document expiry date
- Title (Mr/Ms/Mrs, etc.)
- First name & Last name
- Gender & Date of birth
- Passenger Contact Number & Passenger Email Address
- Enter Optional Information (if available):
- Middle name
- Frequent flyer number
- Add Details for All Passengers: Repeat the above steps for each passenger included in the booking.
- Infant Passenger Requirement: For infant passengers, you must:
- Associate the infant with an adult passenger.
- Select or enter the corresponding adult passenger name.
Saving Passenger Details
To save the entered information for future use:
- Click the Save Profile button.
- The passenger details will be stored in Agency Admin > Passenger Profiles and can be reused in future bookings.
After filling in all passenger details, click Next.
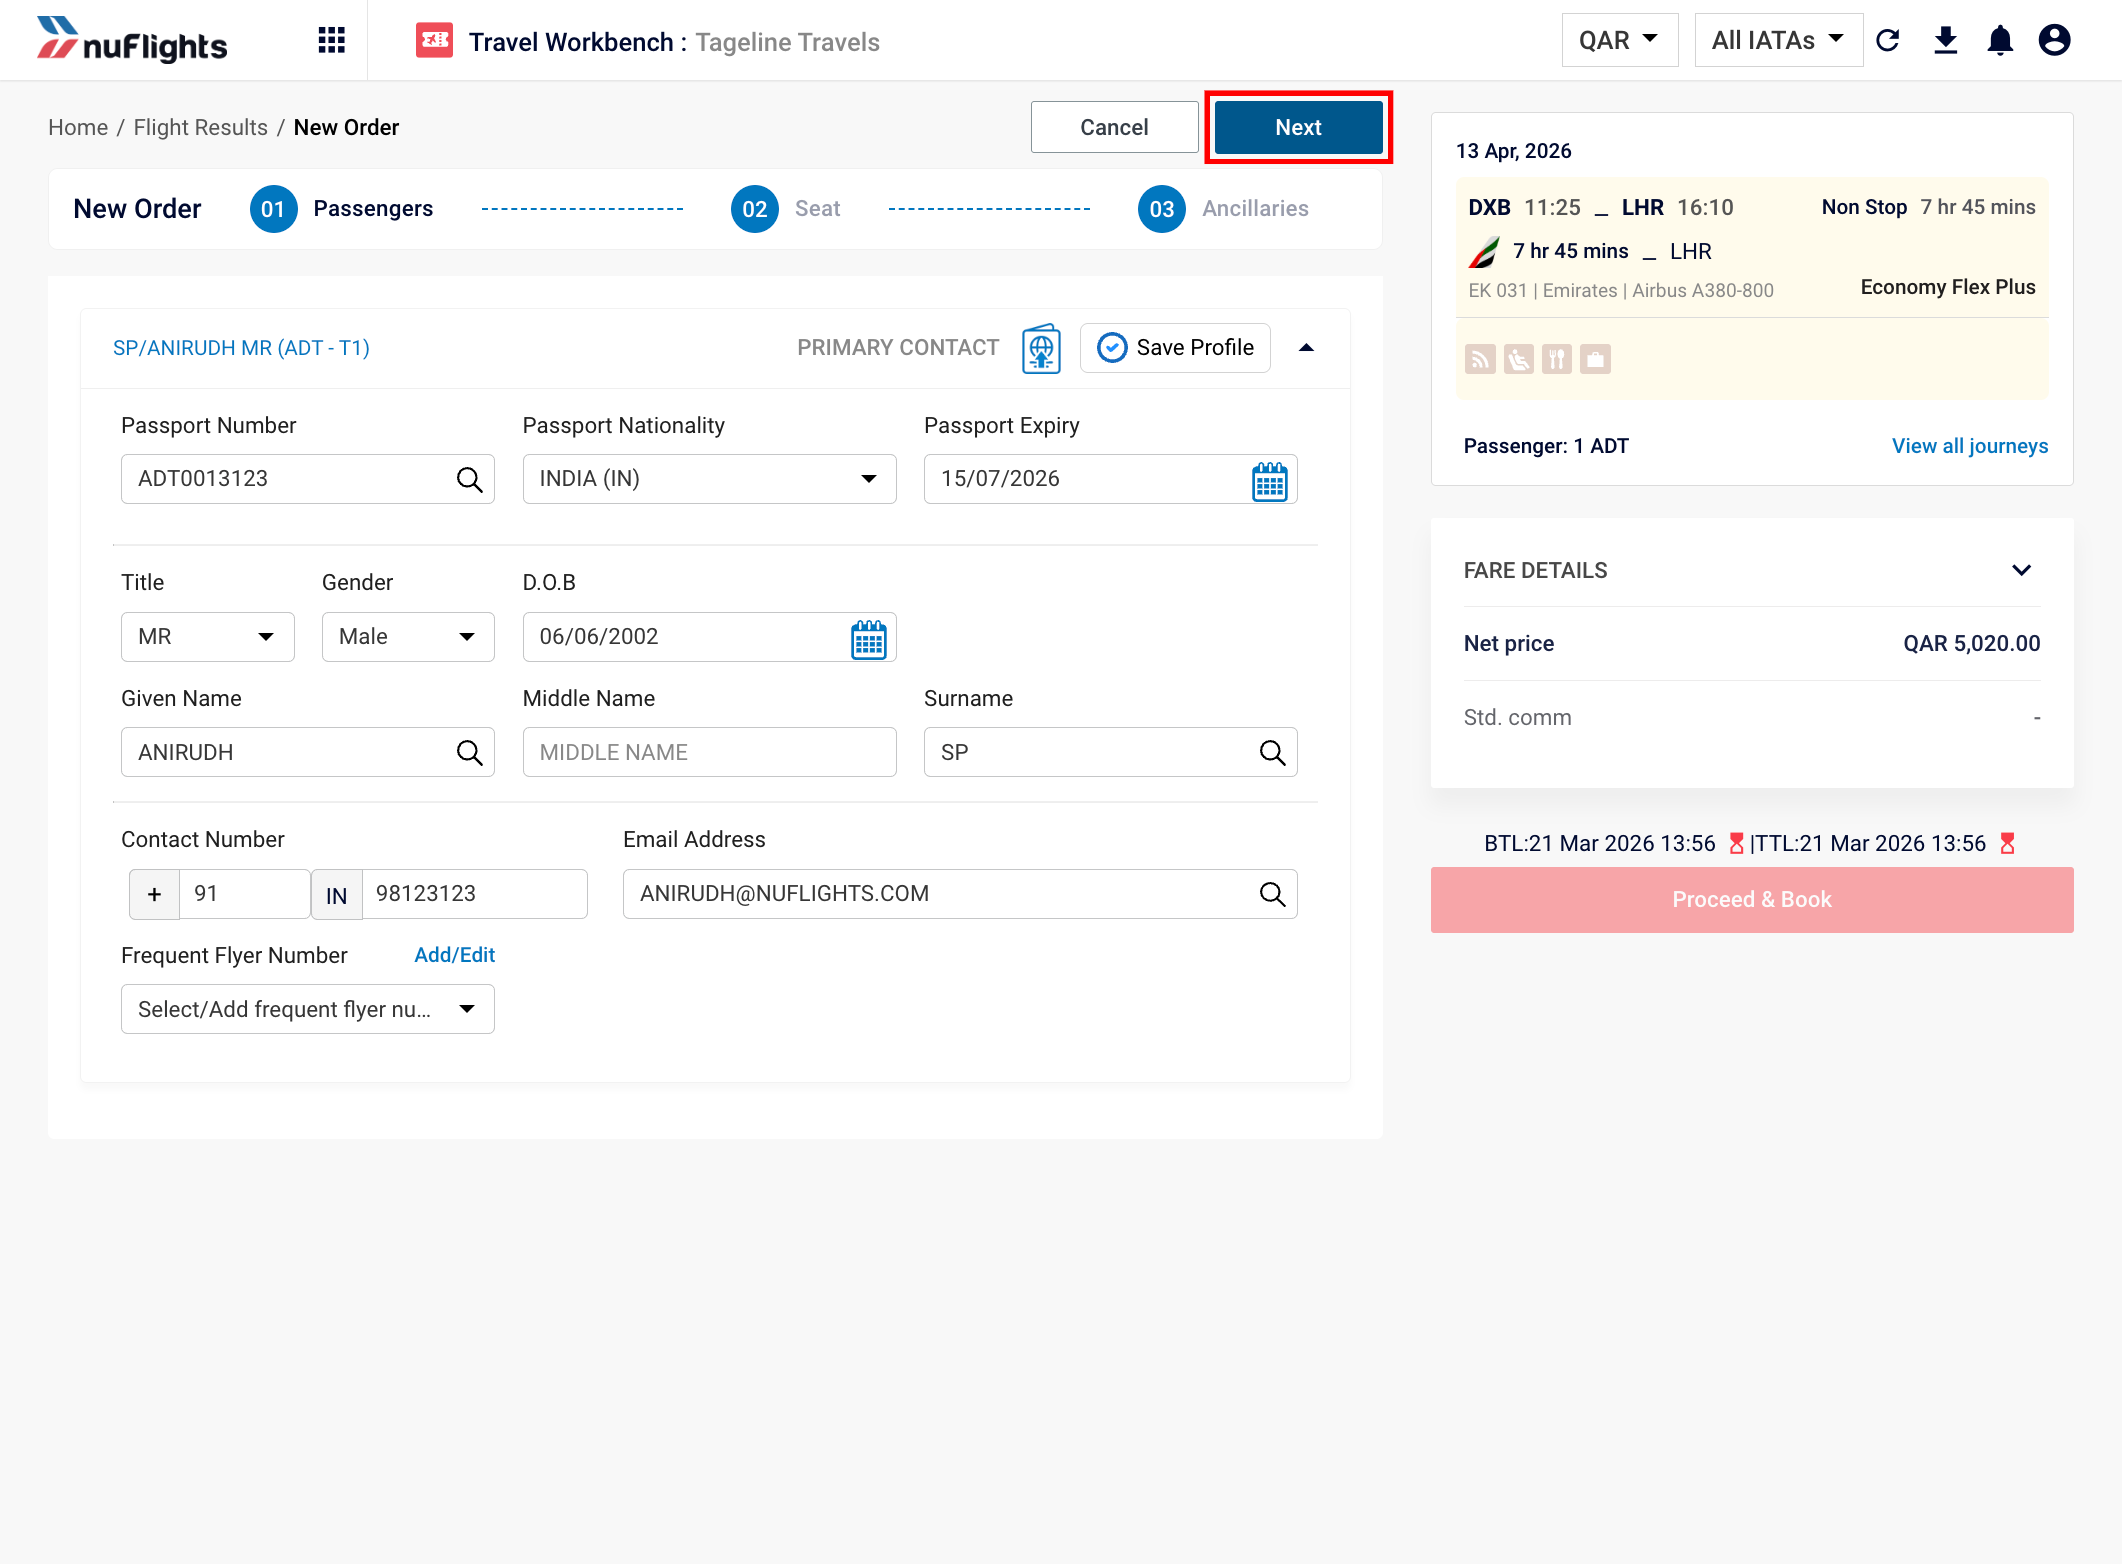
Passenger details click next
When adding an infant passenger, you must select an associated adult who will be travelling with the infant.
Step 6: Confirm and Book
On the final confirmation screen, review all the details of your booking -- itinerary, passengers, and pricing. When everything looks correct, click Proceed and Book to create the order with the airline.
Proceed and Book
Step 7: Booking Confirmation
Once the order is successfully created, NuFlights displays the booking reference from the airline. The order status will show as Booked, which means it is awaiting payment within the ticketing time limit.
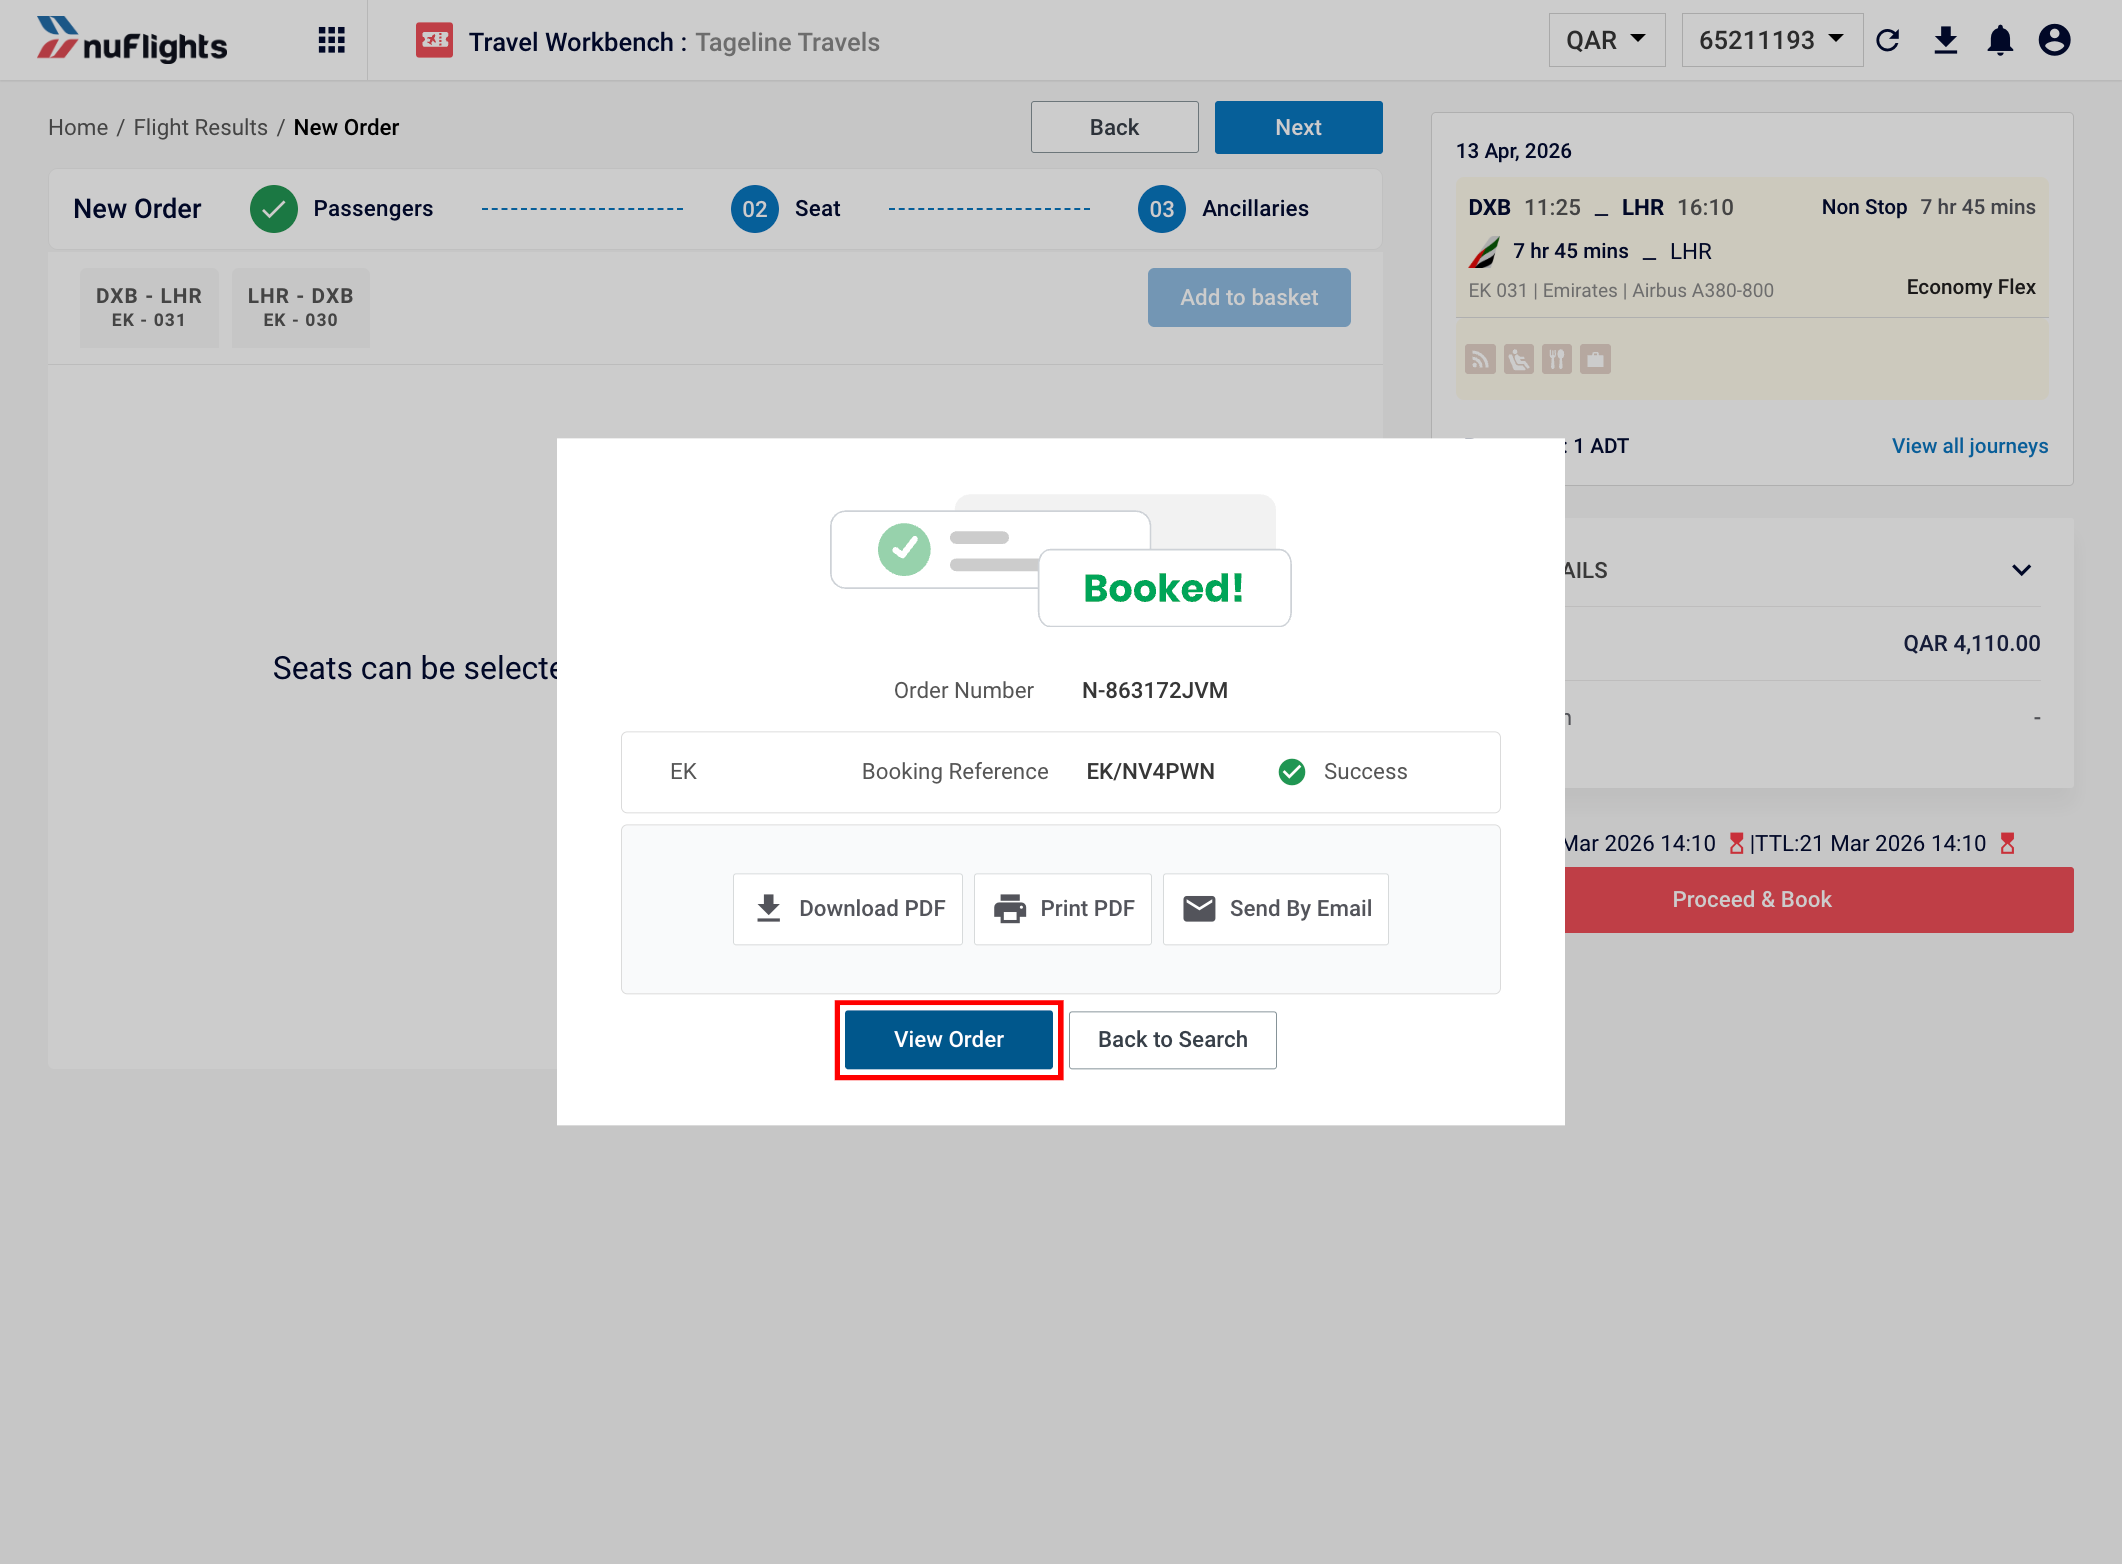
Booking confirmation
View Order
From the confirmation screen, you can:
- Download the itinerary as a PDF.
- Print the itinerary directly.
- Email the itinerary PDF to the passenger.
- View Order to see the full order details.
What's Next?
After booking, the order must be paid and tickets issued within the ticketing time limit. See the Pay and Issue Tickets guide for details.
Additional Guidance
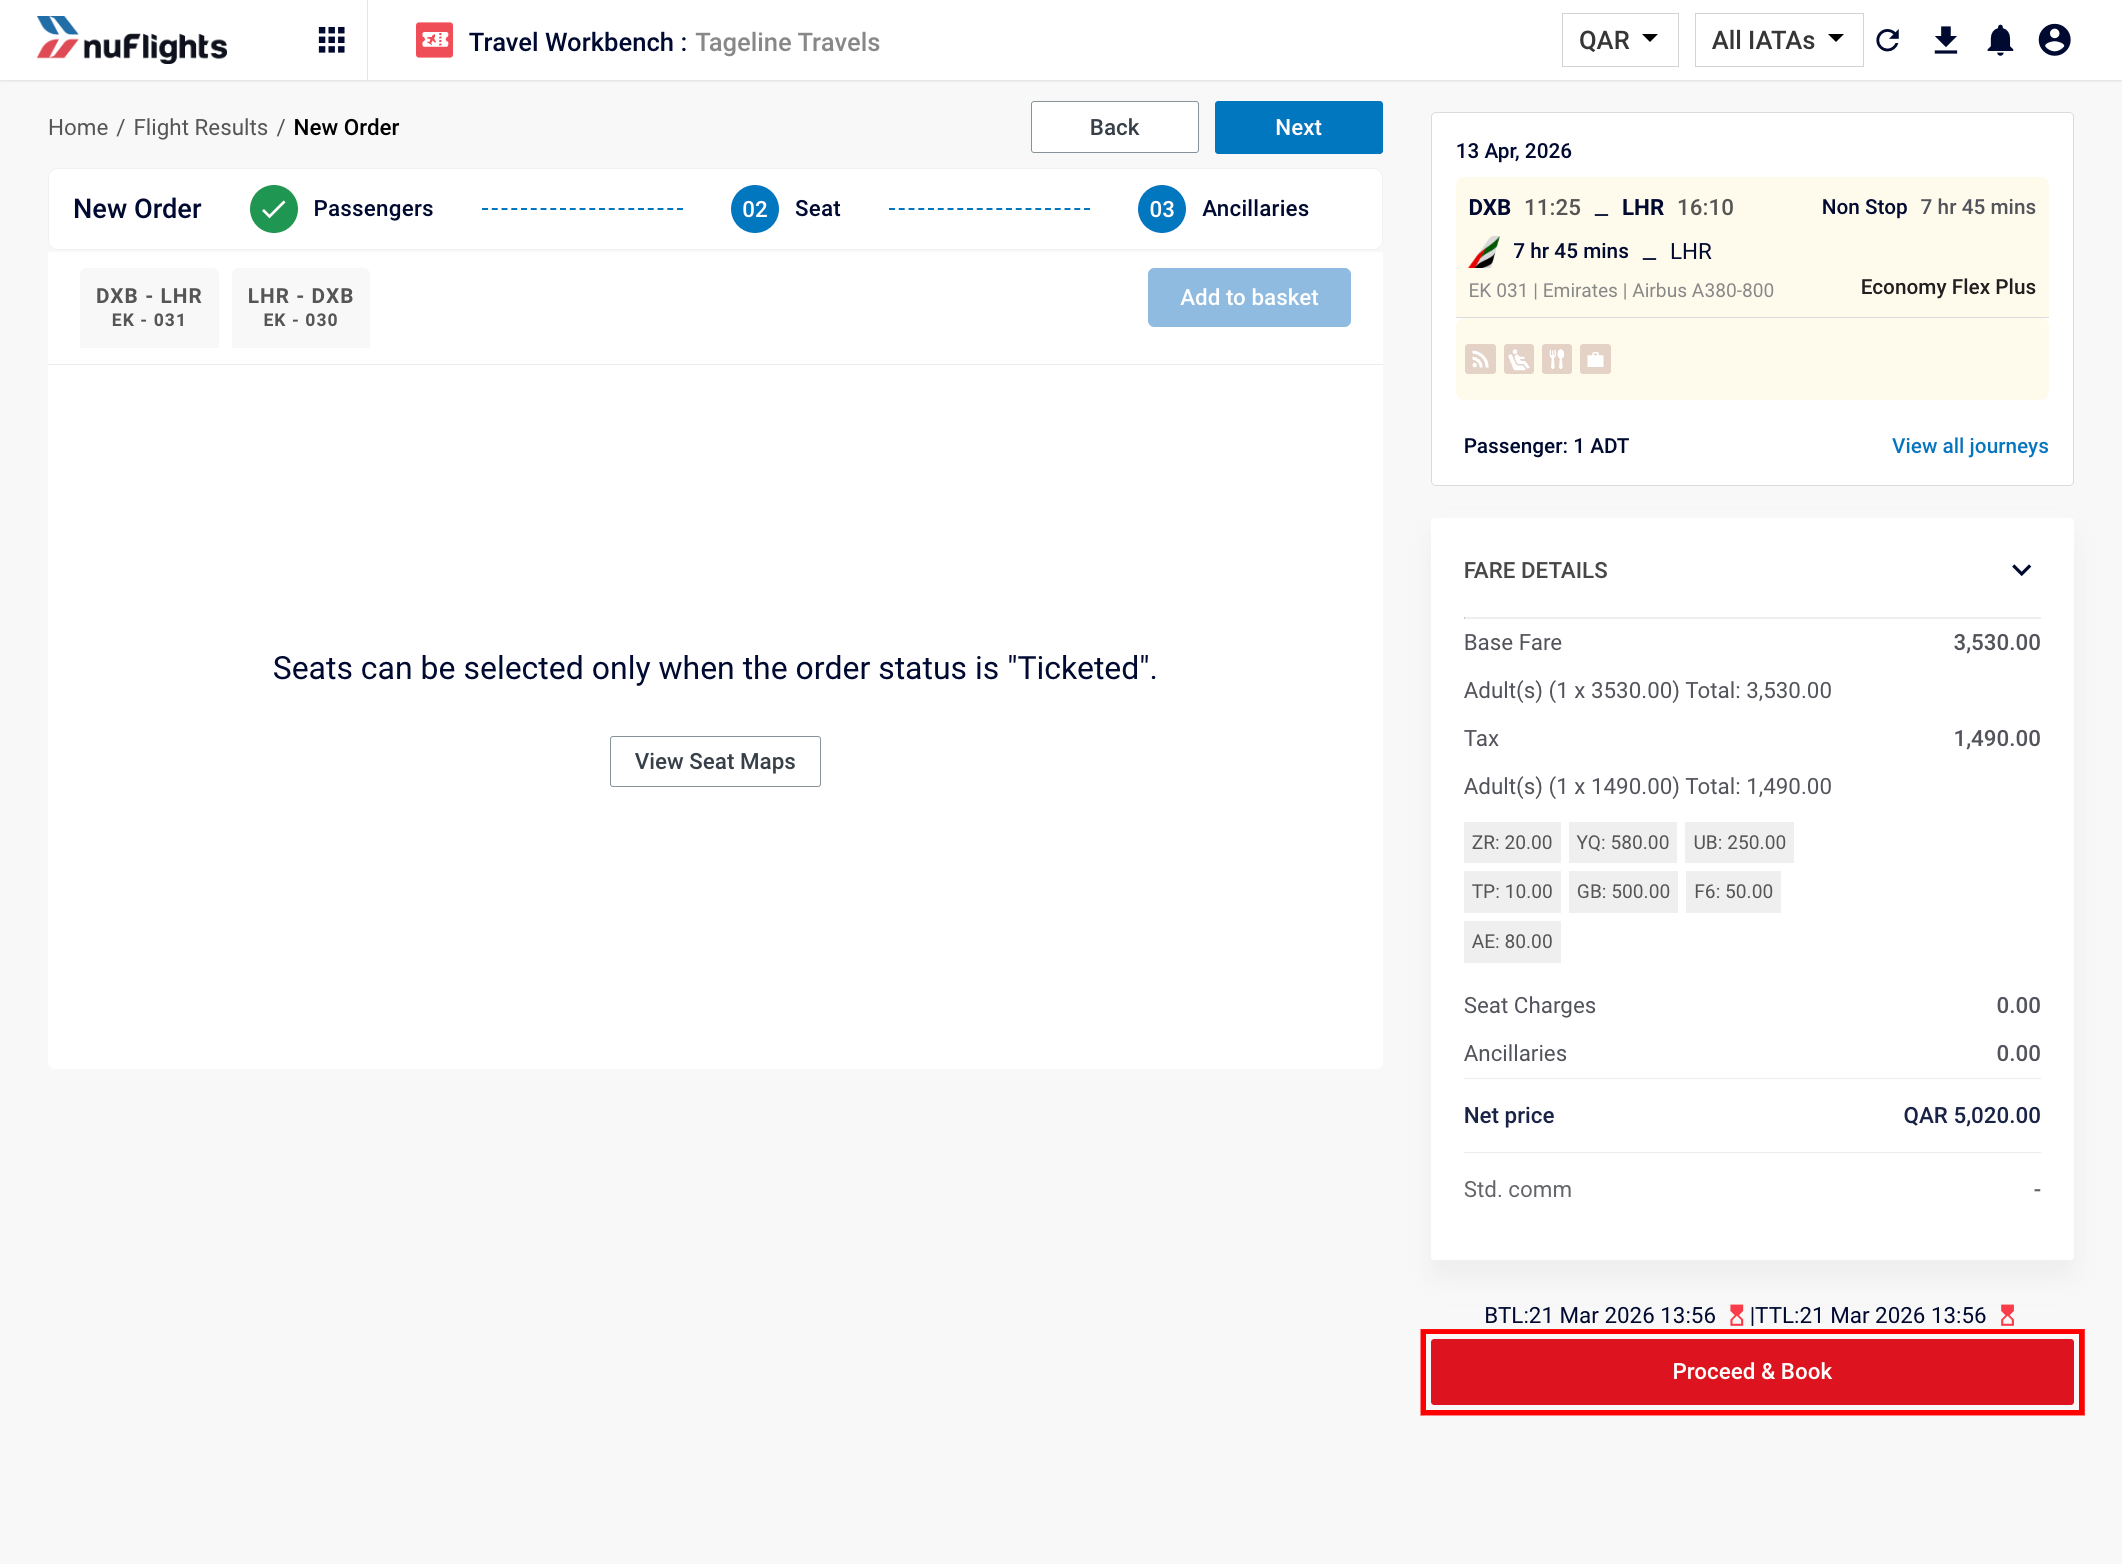
Seat Selection
After entering passenger details, NuFlights will show available seat options if the airline supports seat selection at the time of booking. If the airline does not support pre-booking seat selection, this will be indicated on screen and you can skip this step.
For more details on selecting seats, refer to the Seat Management guide.
Ancillary Services
NuFlights also displays available ancillary services (e.g. extra baggage, meals) if the airline offers them during the booking process. Not all airlines provide ancillary selection before ticketing -- the screen will indicate whether this option is available.
For more details on managing ancillaries, refer to the Ancillary Services guide.
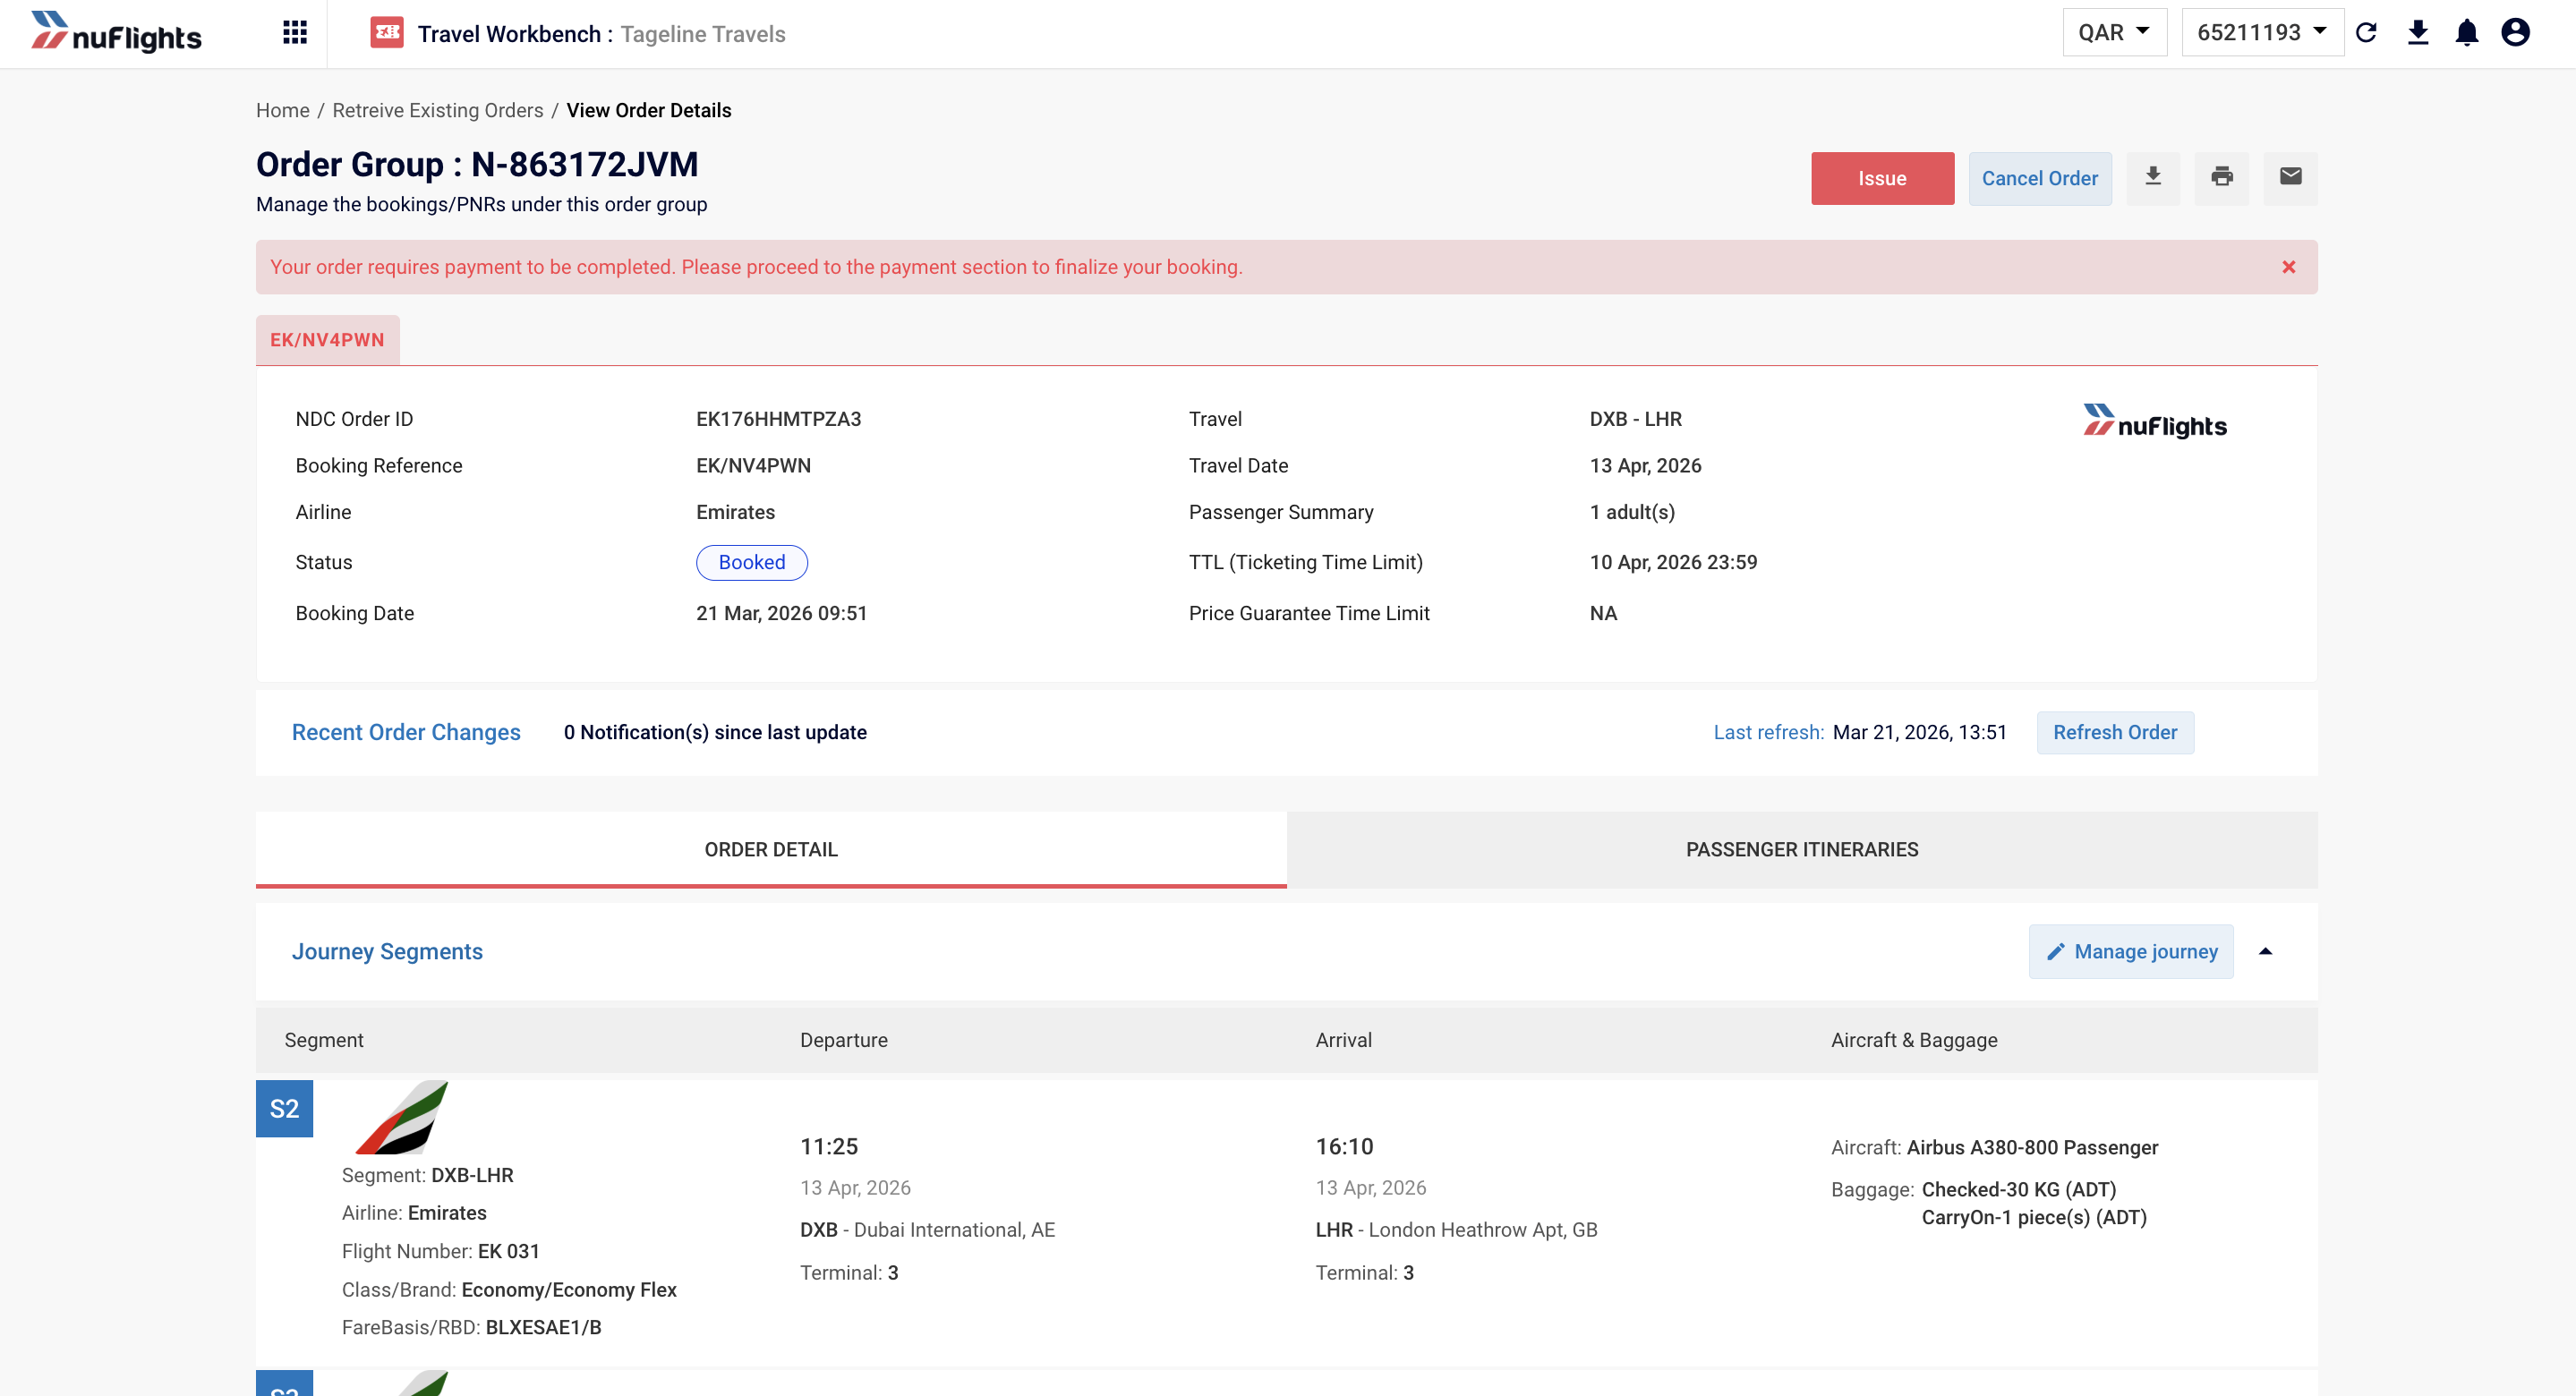
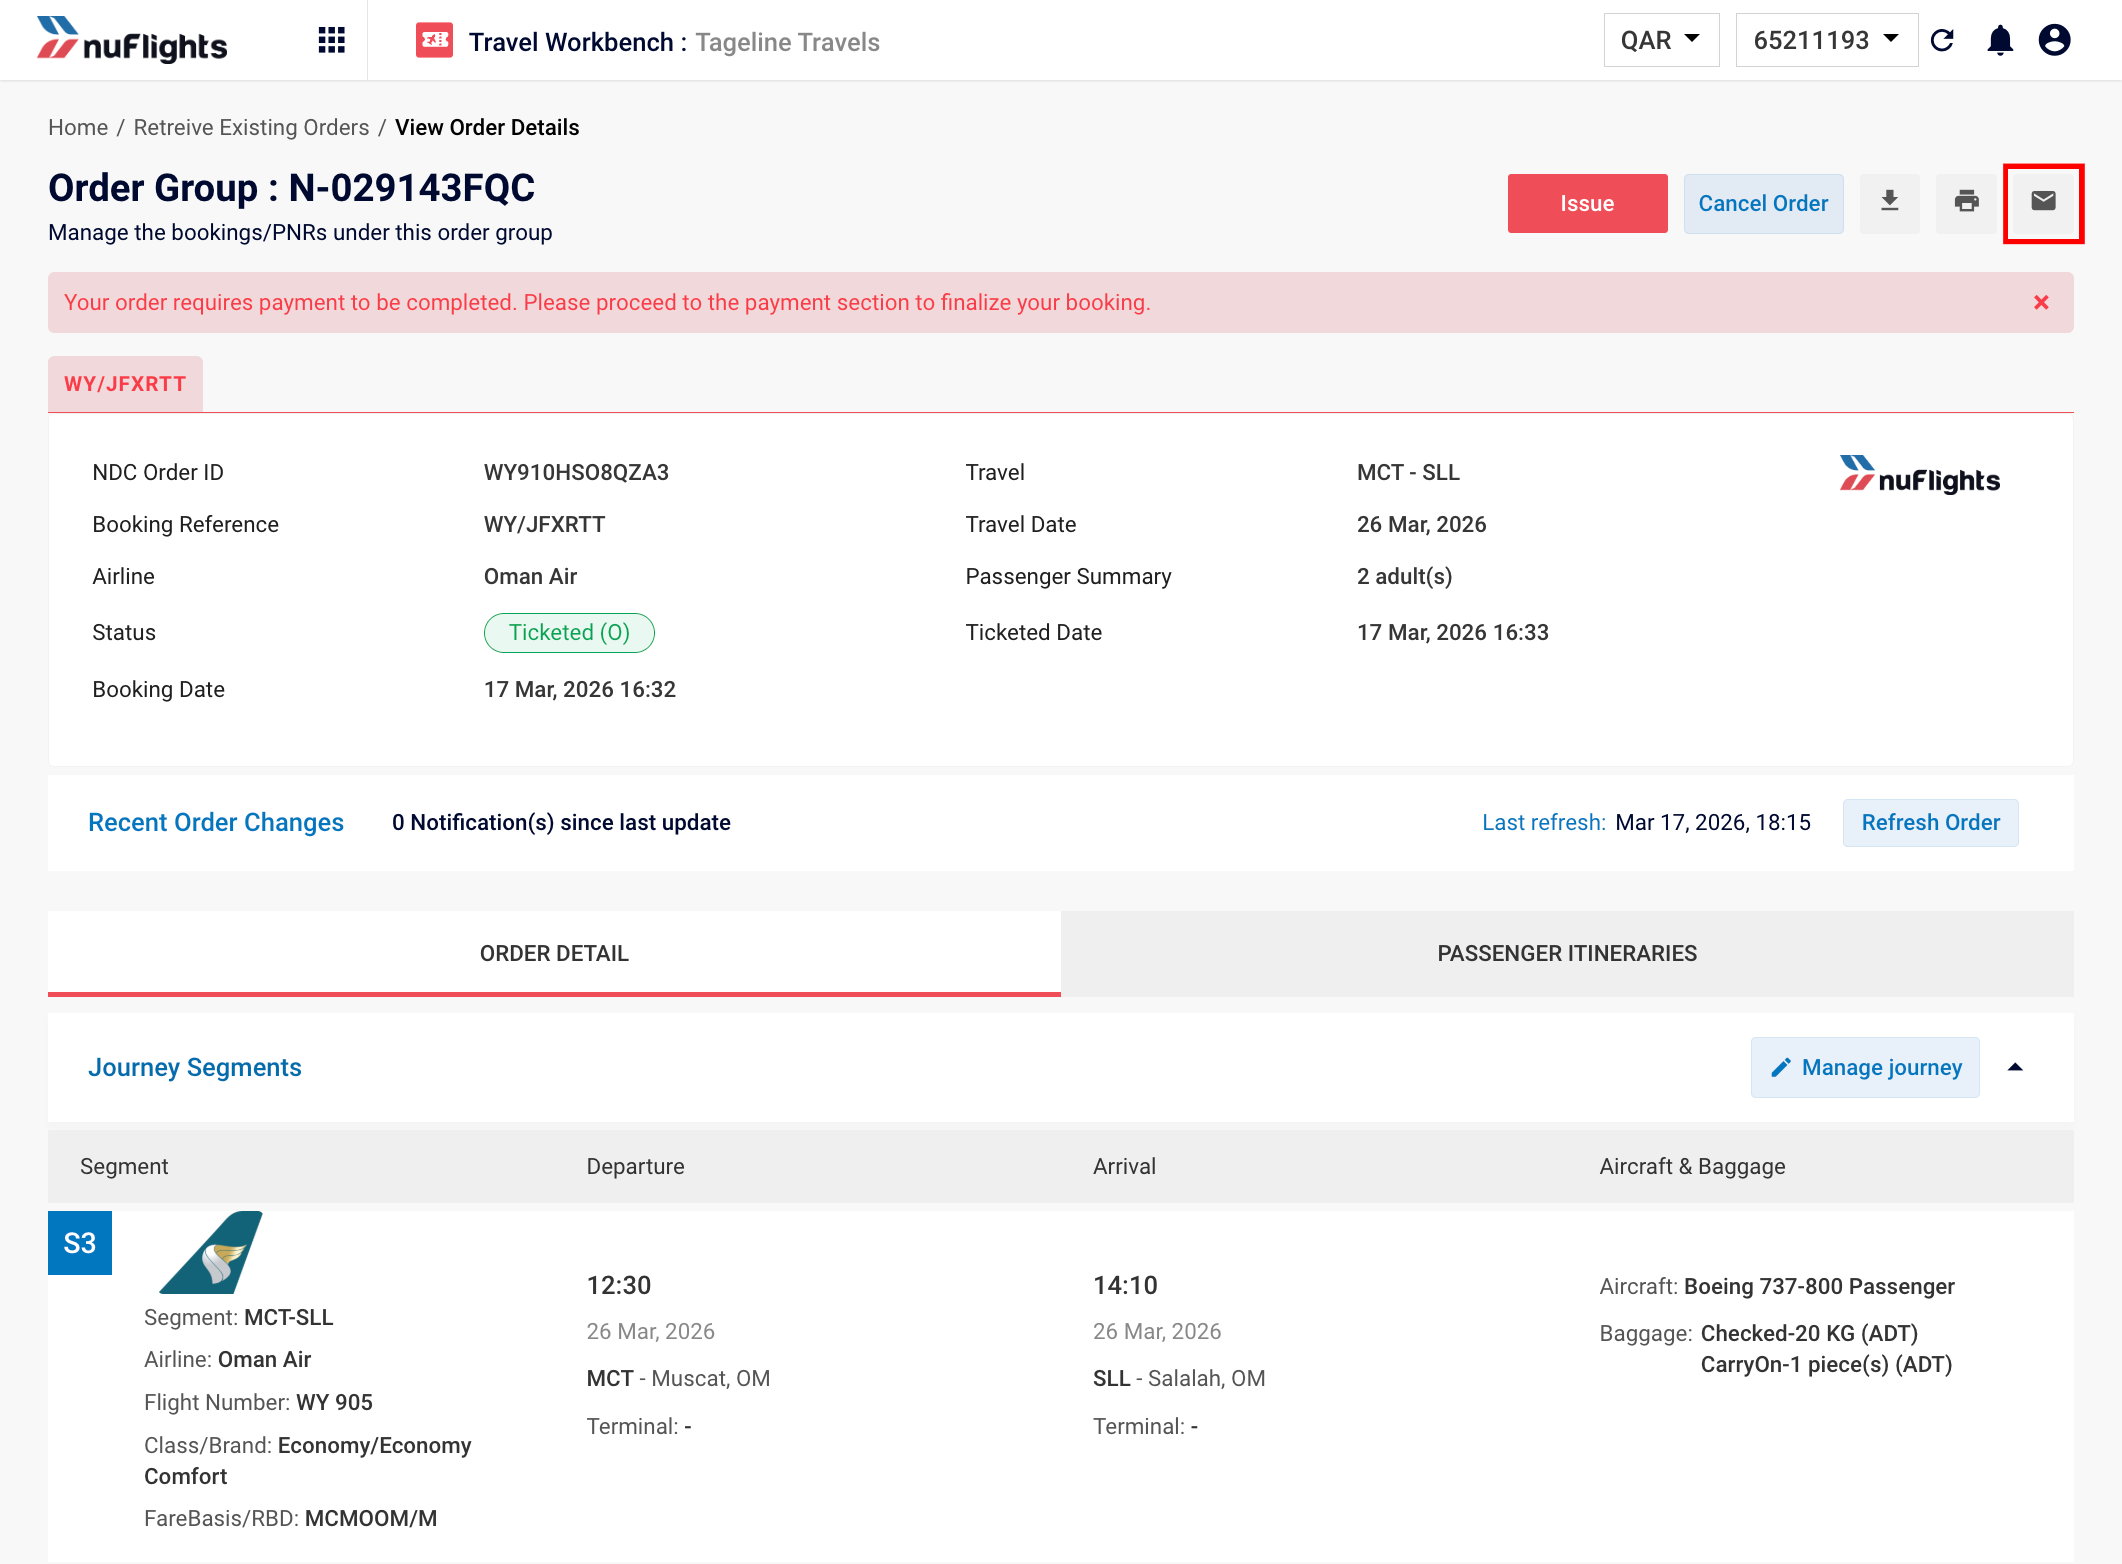
Viewing Order Details
After booking, the order summary includes:
- Order status -- Indicates the current state of the order (e.g. Booked, Ticketed).
- Segment details -- All flight segments in the itinerary.
- Passenger list -- Names and contact information for all passengers including the secondary contact if provided.
- Pricing breakdown -- Base fare, taxes, and total cost.
- Fare rules -- The rules associated with the booked fare.
Print Itinerary
You can easily generate a printed copy of the passenger itinerary. To do this, open the Order View and click on the Print Icon located at the top of the screen.
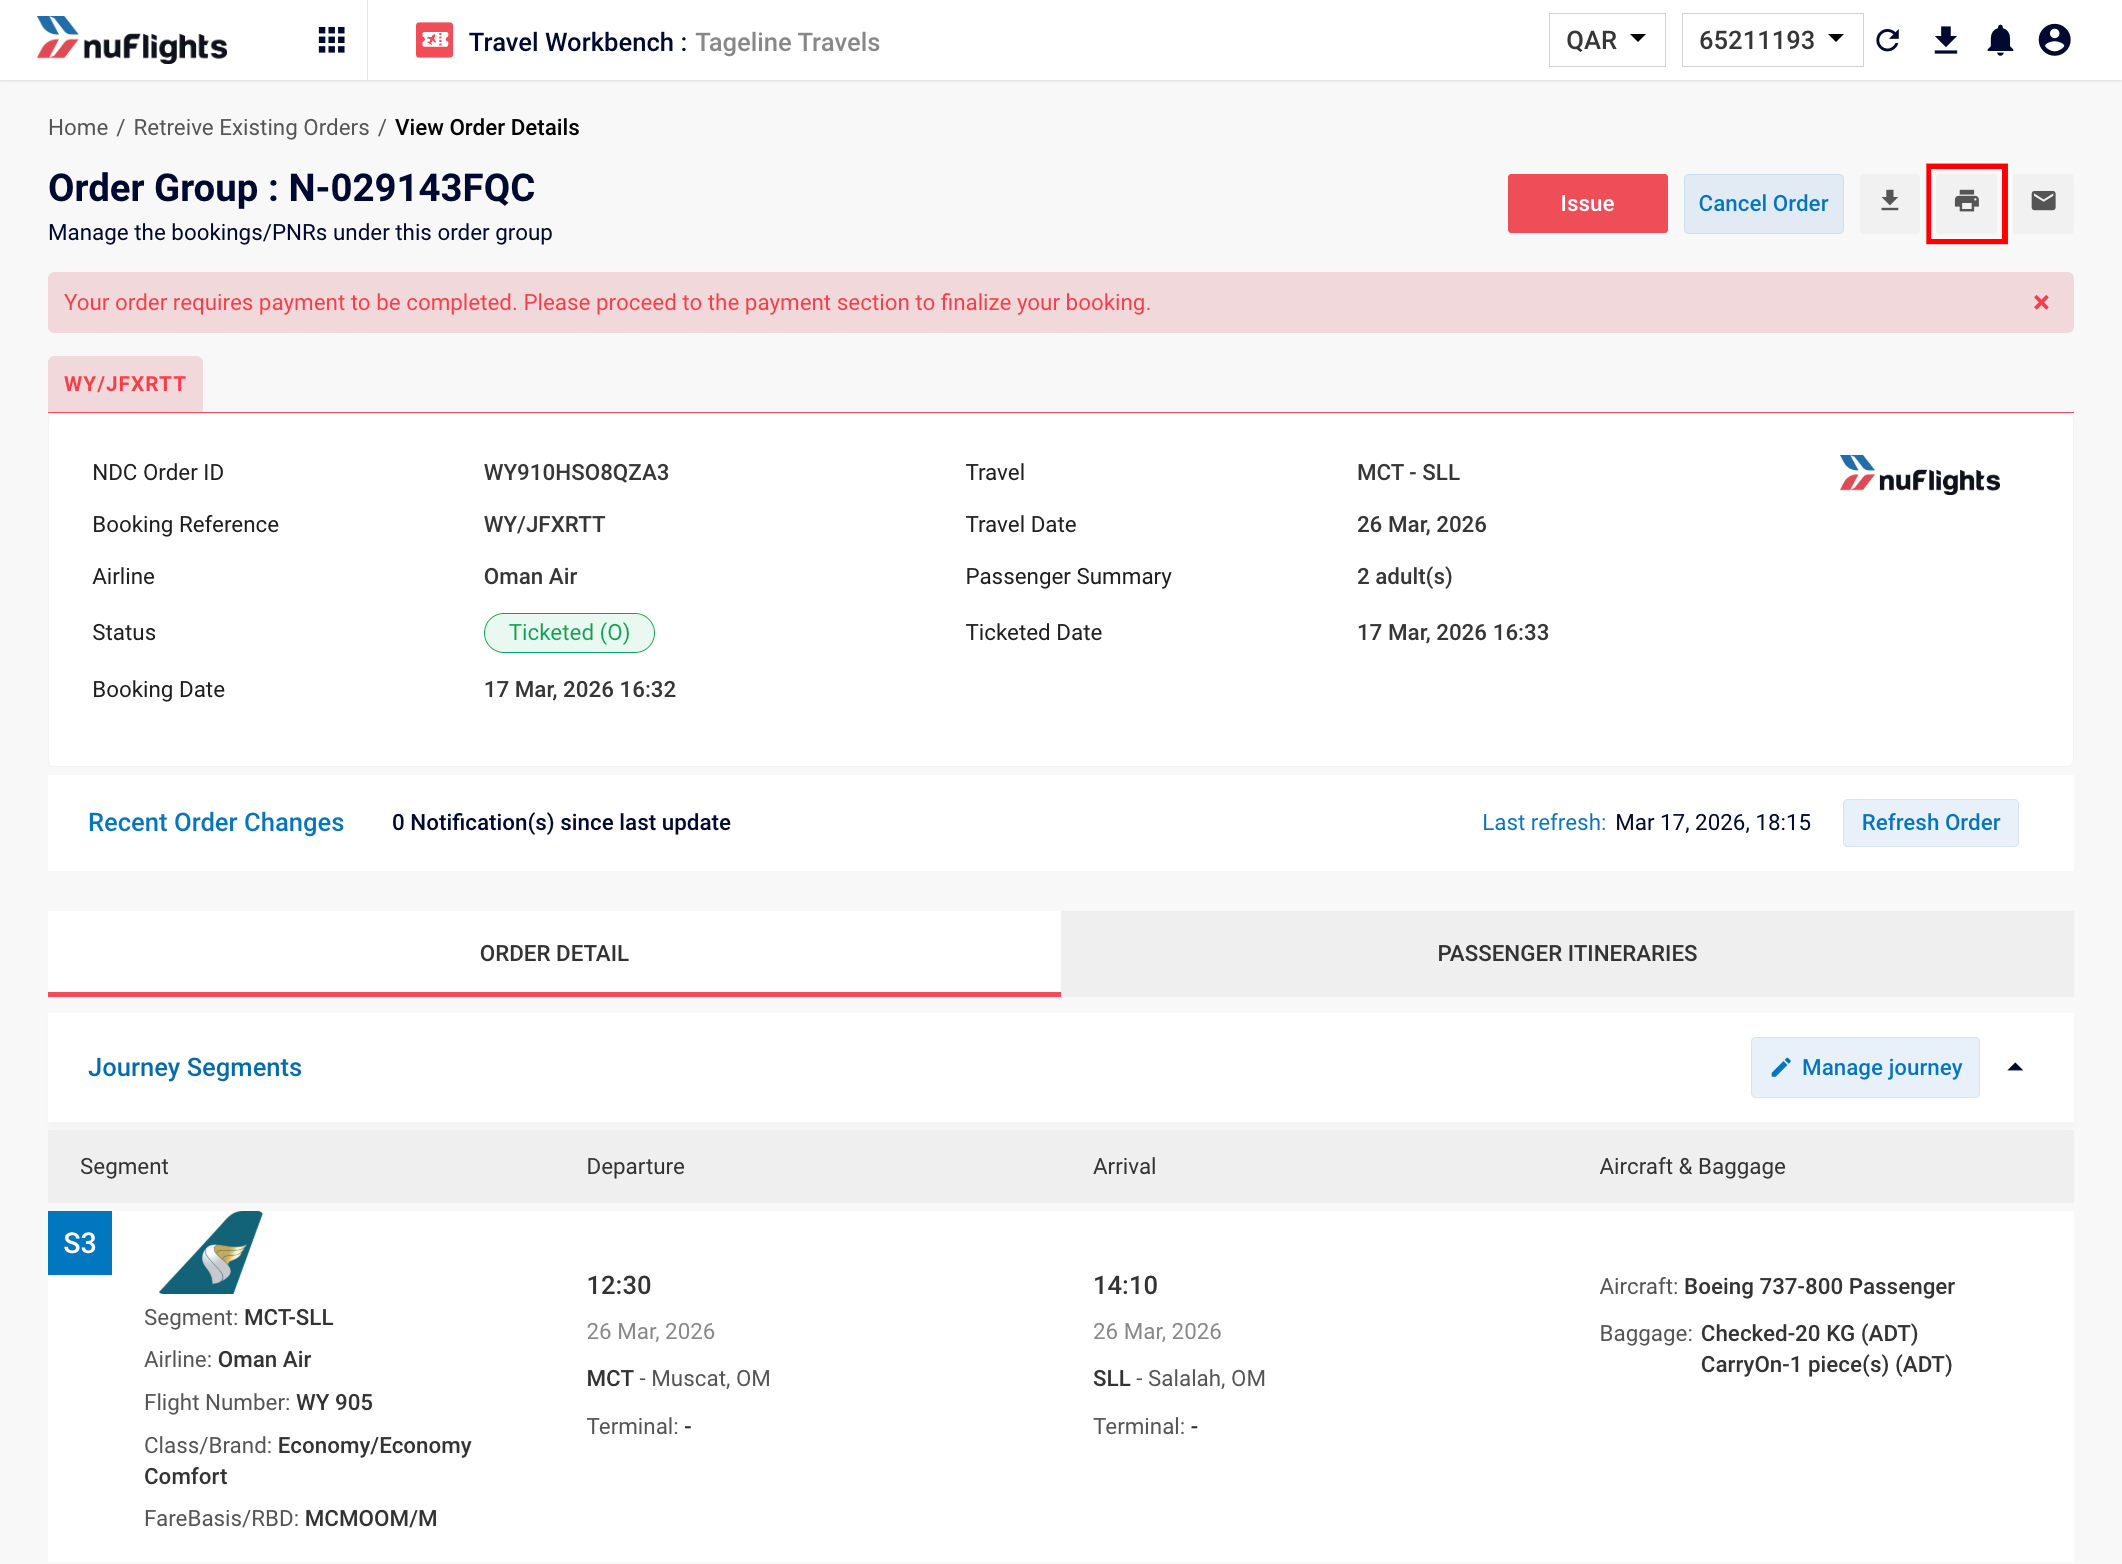
Print option in Order View
A pop-up will appear allowing you to select your printing preferences.
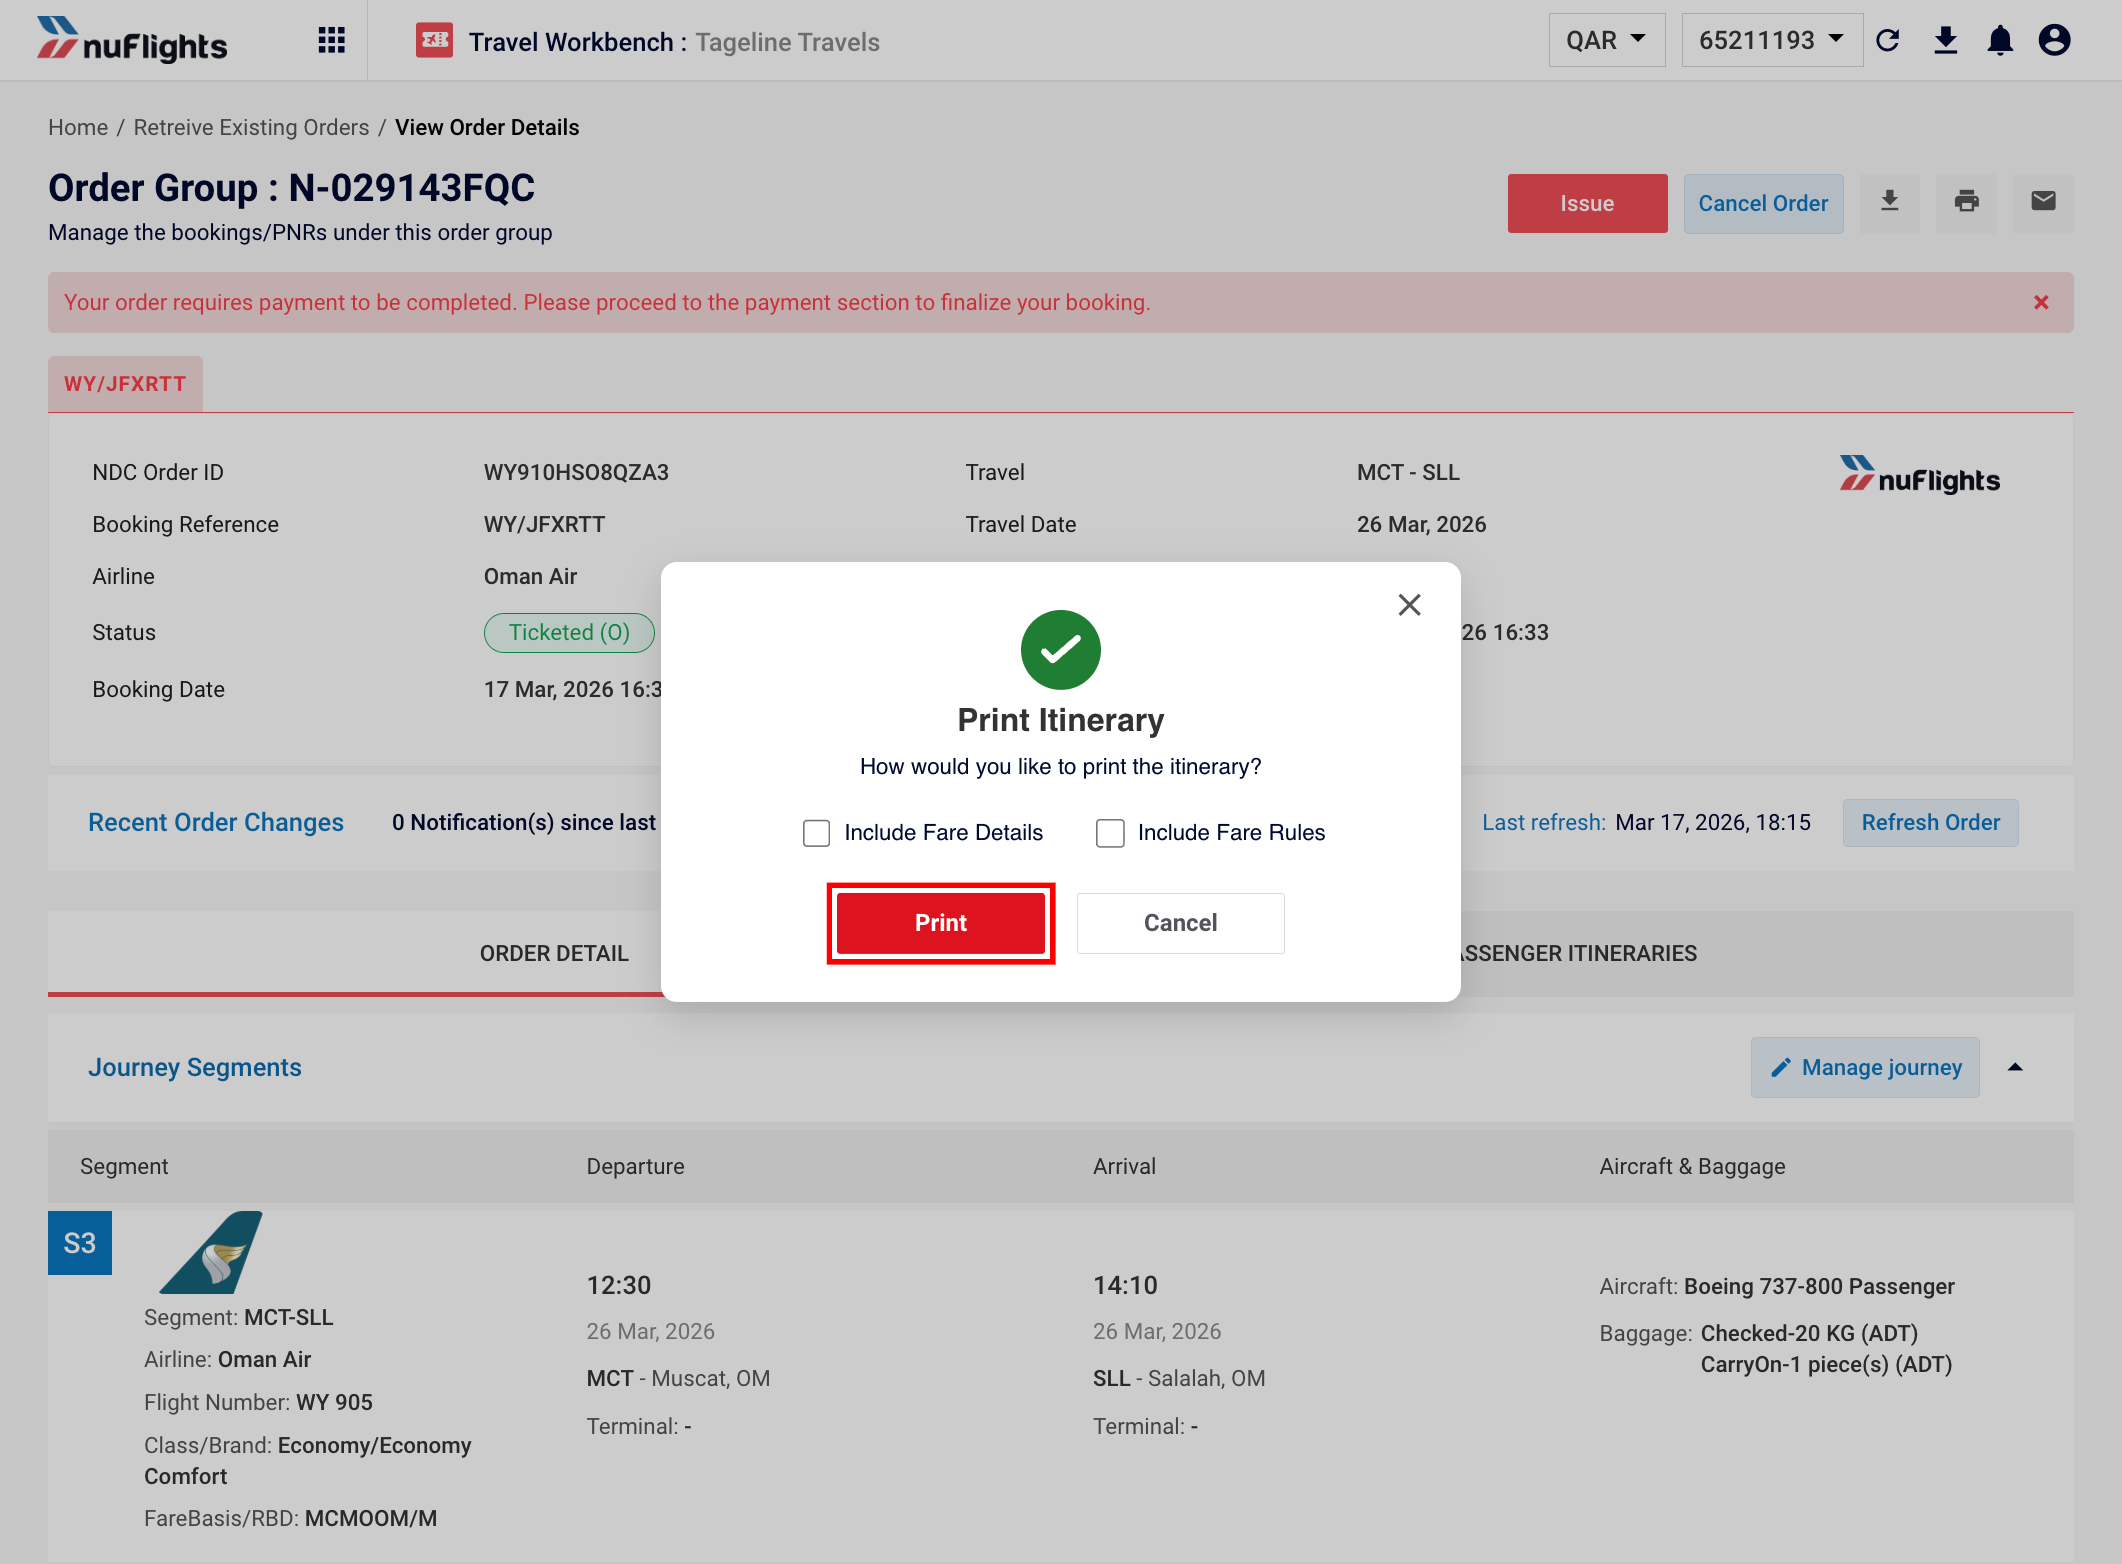
Pop-up confirming print
Once confirmed, this will generate a formatted, printable version of the itinerary for the passenger.
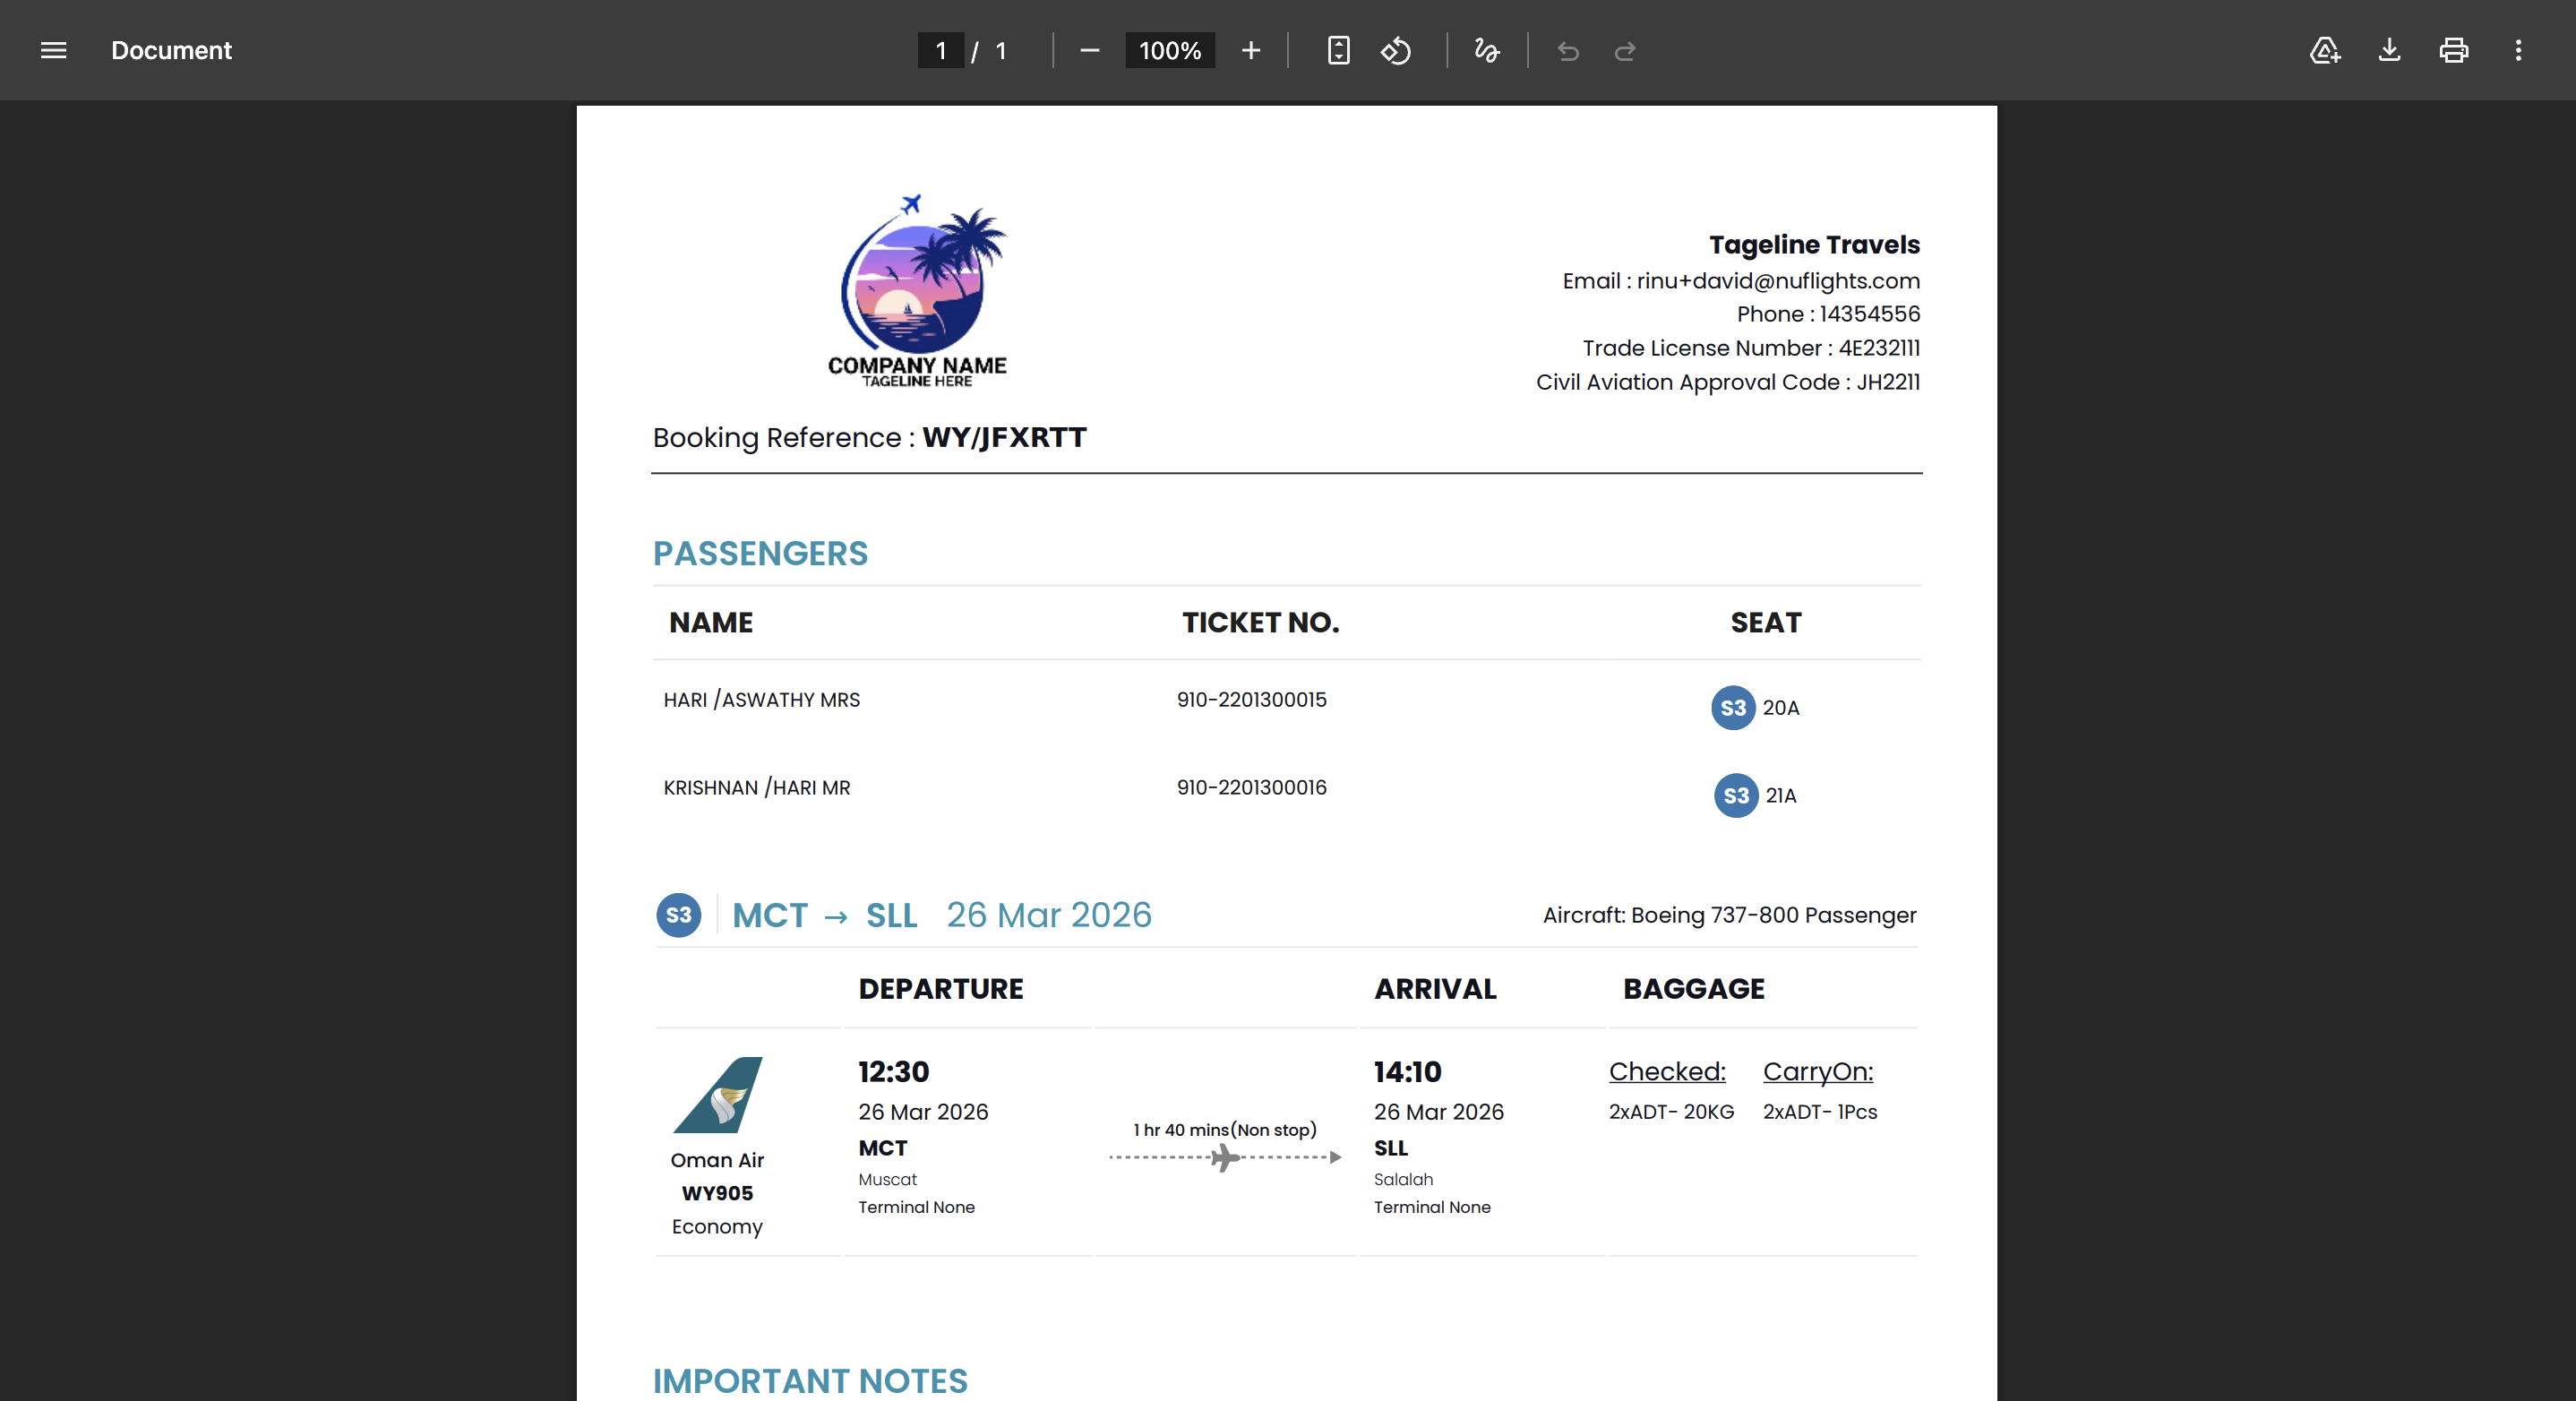
Itinerary PDF viewer
Email Itinerary
You can send a copy of the itinerary with an attached PDF directly to passengers and agents.
- From the Order View, click on the Email Itinerary option.
Email itinerary
- A pop-up window will appear. Select the email address to send the itinerary to.The list will have email IDs of all passengers and the secondary contact if provided.
- Check the box to copy the agent on the email.
- You can also manually add other email IDs to receive a copy.
- Click Send to dispatch the email.

Confirm Email itinerary
Email itinerary sent