

Local Inventory Management
Local Inventory is a specialized application for agencies that purchase bulk seats from airlines and wish to sell them systematically through NuFlights. This guide walks you through creating trip inventory, booking flights from that inventory, and managing the passenger manifest.
Accessing Local Inventory
- Click the Applications (grid) icon in the top header.
- Select Local Inventory from the available applications.
The Home page opens and displays the Upcoming Trips dashboard — a quick summary of all active trips showing the route, departure date, airline PNR, seats sold per day, available seats, and days to departure.
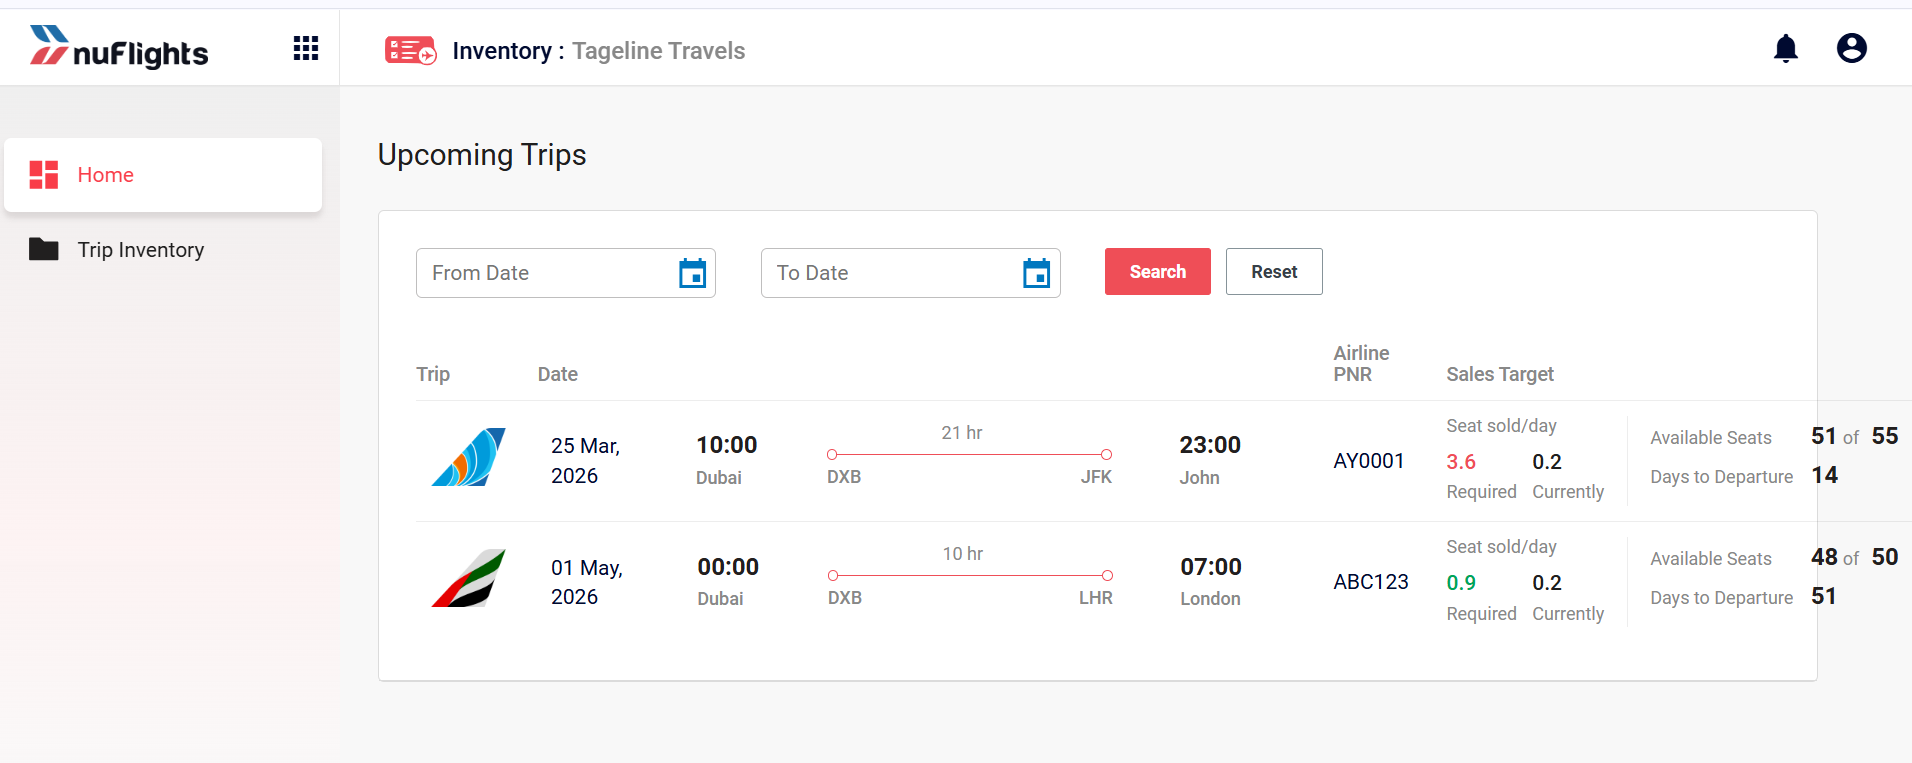
Local Inventory Home – Upcoming Trips
Managing Trip Inventory
Click Trip Inventory in the left sidebar to view and manage your bulk seat allocations. The inventory list is organised into three tabs:
- Active Inventory – Trips that are currently published and available for booking.
- Sold Out Inventory – Trips where all seats have been sold.
- Inactive Inventory – Trips that have been unpublished or cancelled.
Each row in the Active Inventory List displays the carrier logo, inventory number, trip date and route, airline PNR, flight number, seat count, consultant name, and status badge (PUBLISHED or DRAFT).
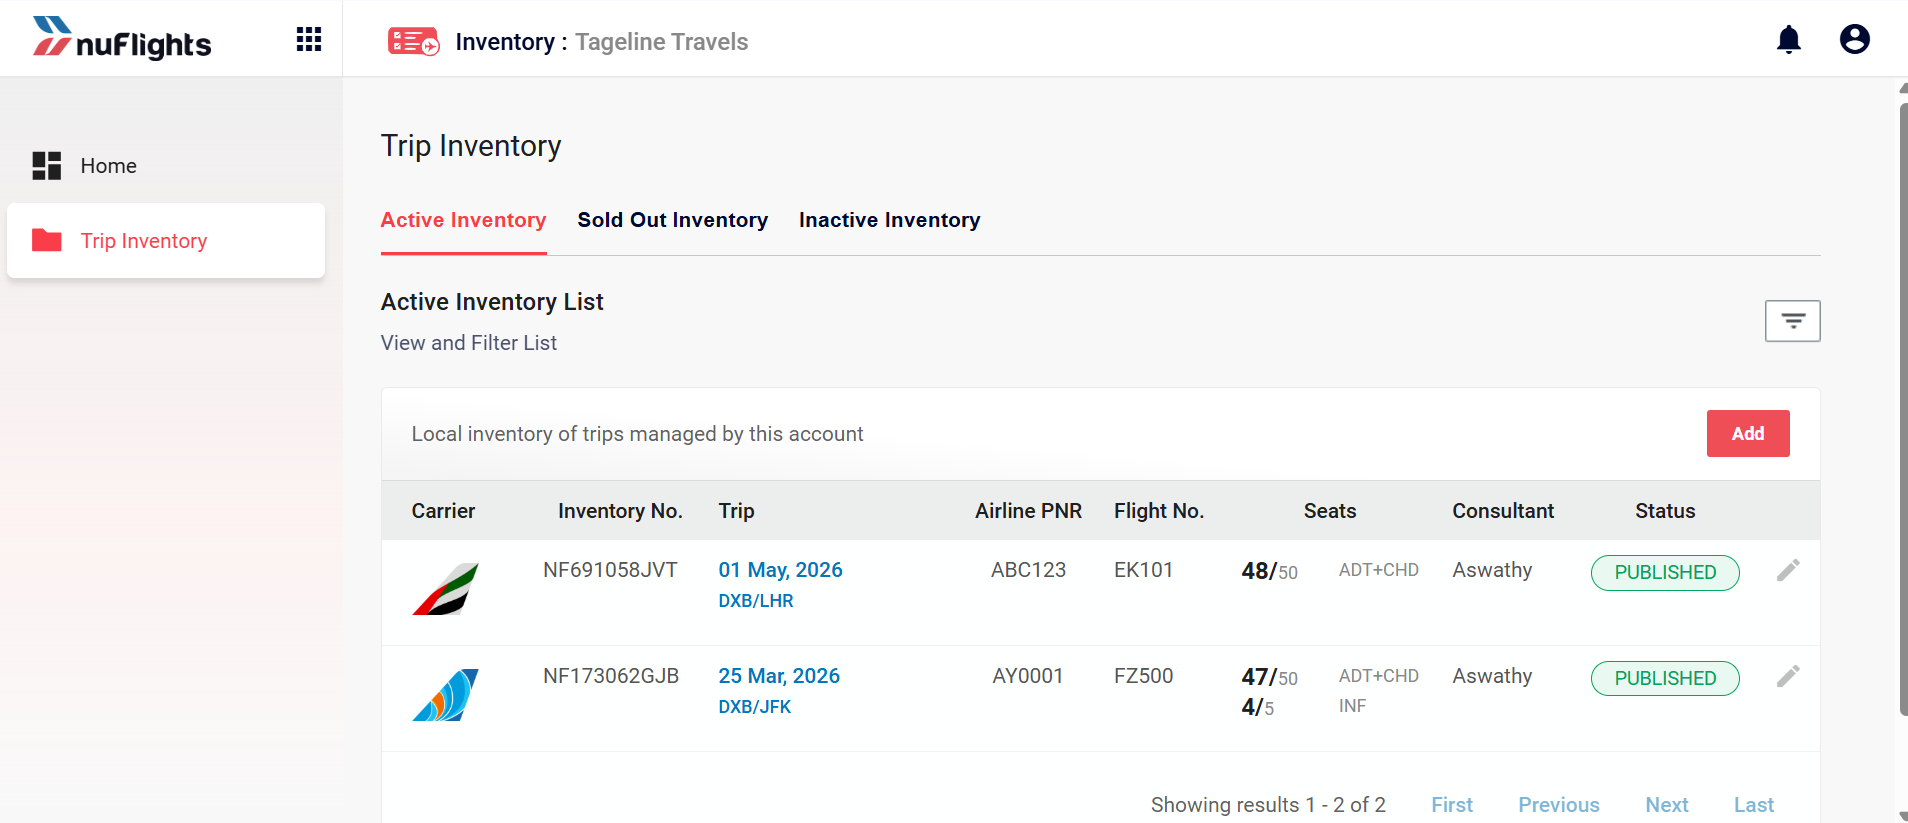
Trip Inventory List
1. Create a New Trip
- On the Active Inventory tab, click the Add button (top-right of the list).
- The New Trip form opens showing the Trip Detail section at the top.
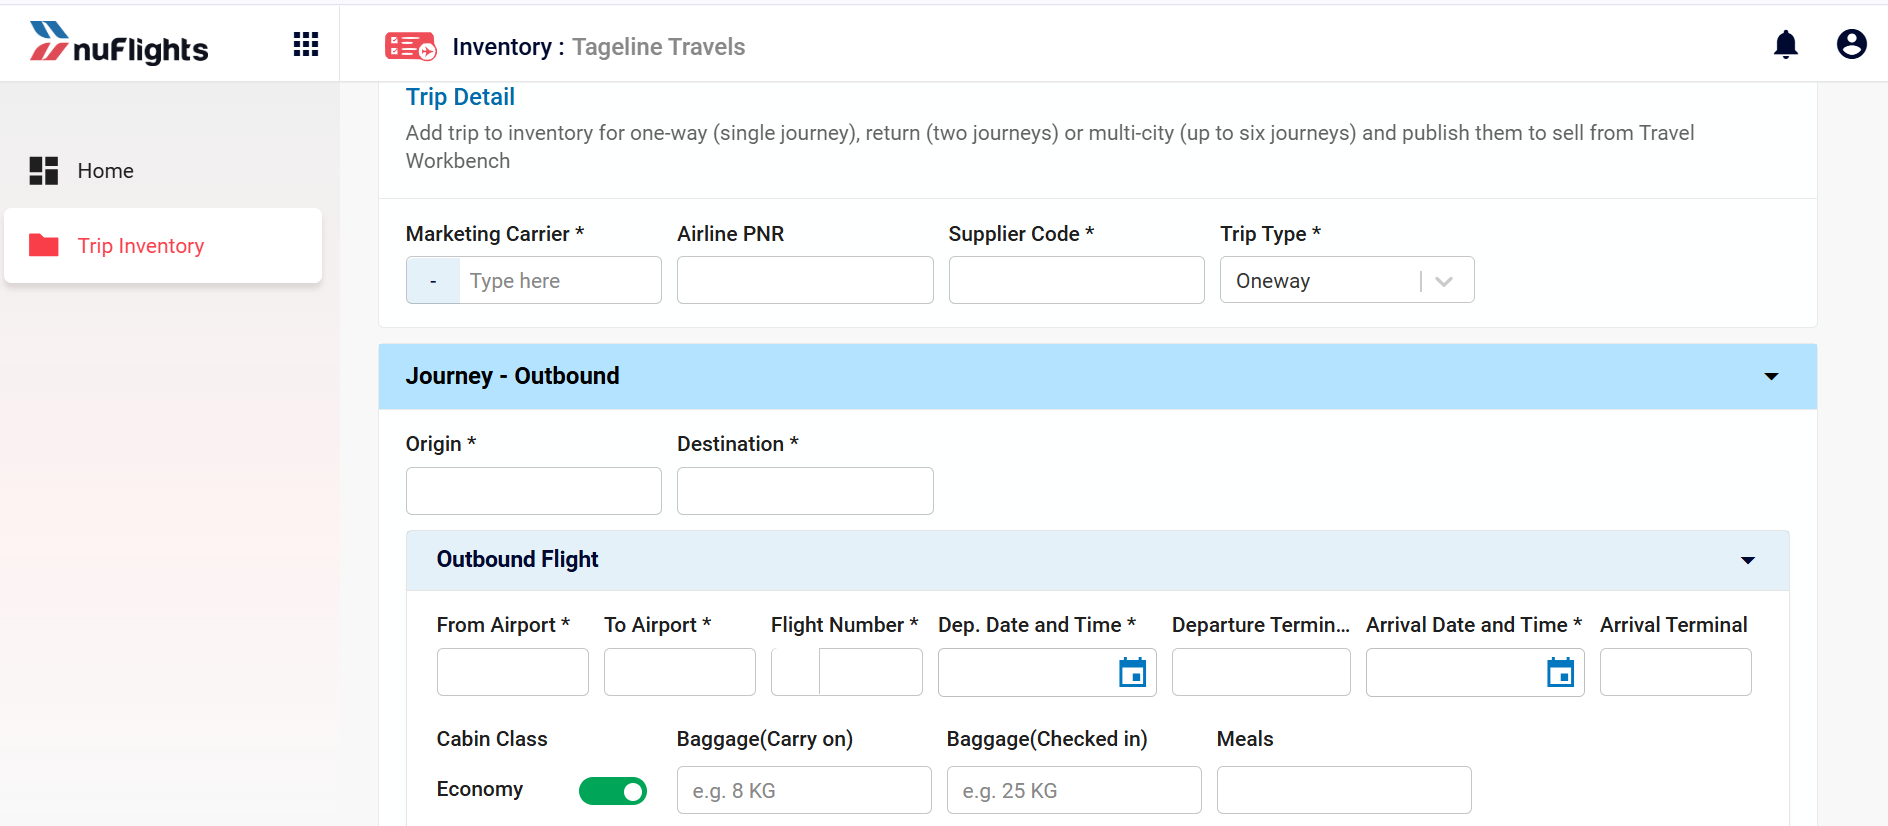
New Trip Form – Trip Detail and Journey Outbound
Fill in the following header fields:
| Field | Description |
|---|---|
| Marketing Carrier | The airline from which the seats were purchased (e.g., Emirates – EK). |
| Airline PNR | The booking reference provided by the airline for the bulk purchase. |
| Supplier Code | The internal code obtained from your invoice or supplier. |
| Trip Type | Select Oneway, Return, or Multi-city (up to six journeys). |
Under the Journey – Outbound section, enter the Origin and Destination airport codes (e.g., DXB to LHR).
Then expand the Outbound Flight panel and fill in:
| Field | Description |
|---|---|
| From Airport / To Airport | Airport codes for the leg of the journey. |
| Flight Number | The operating flight number (e.g., EK 101). |
| Dep. Date and Time | Departure date and time (use the calendar picker). |
| Departure Terminal | Terminal code at the origin airport. |
| Arrival Date and Time | Arrival date and time at the destination. |
| Arrival Terminal | Terminal code at the destination airport. |
For each Cabin Class (Economy, Business, First), toggle the class on and enter:
- Baggage (Carry on) – e.g., 8 KG
- Baggage (Checked in) – e.g., 25 KG
- Meals – specify if meals are included for that class.
Click + Add Flight at the bottom of the Outbound Flight panel if the journey involves multiple flight segments (e.g., a connecting flight).
2. Fare, Tax, and Refundable Rules Setup
Scroll down to the Fare Detail section. First, select the Currency from the dropdown.
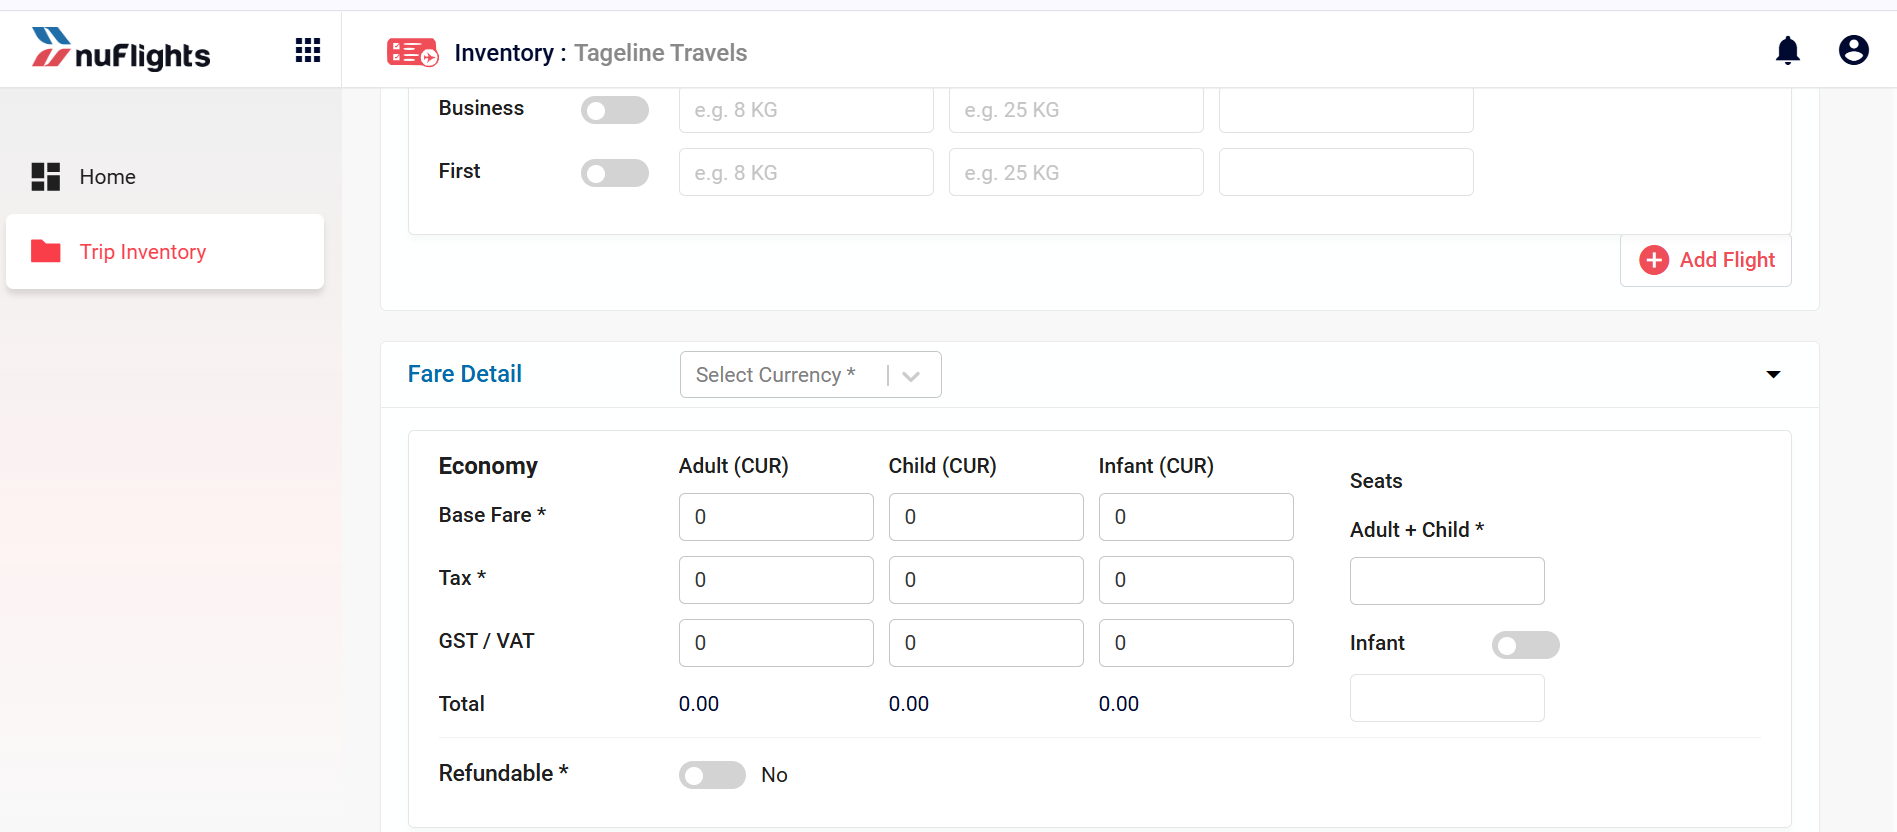
Fare Detail and Refundable Rules
For each cabin class (e.g., Economy), enter separate fare breakdowns across three columns — Adult (CUR), Child (CUR), and Infant (CUR):
| Field | Description |
|---|---|
| Base Fare | The base ticket price before taxes. |
| Tax | Applicable airport or government taxes. |
| GST / VAT | Goods and Services Tax or Value Added Tax, where applicable. |
| Total | Automatically calculated sum of Base Fare + Tax + GST/VAT. |
Seat Allocation
- Adult + Child: Enter the total number of seats purchased for adults and children combined.
- Infant: Toggle on and enter the permitted number of infant seats if applicable.
Refundable Rules
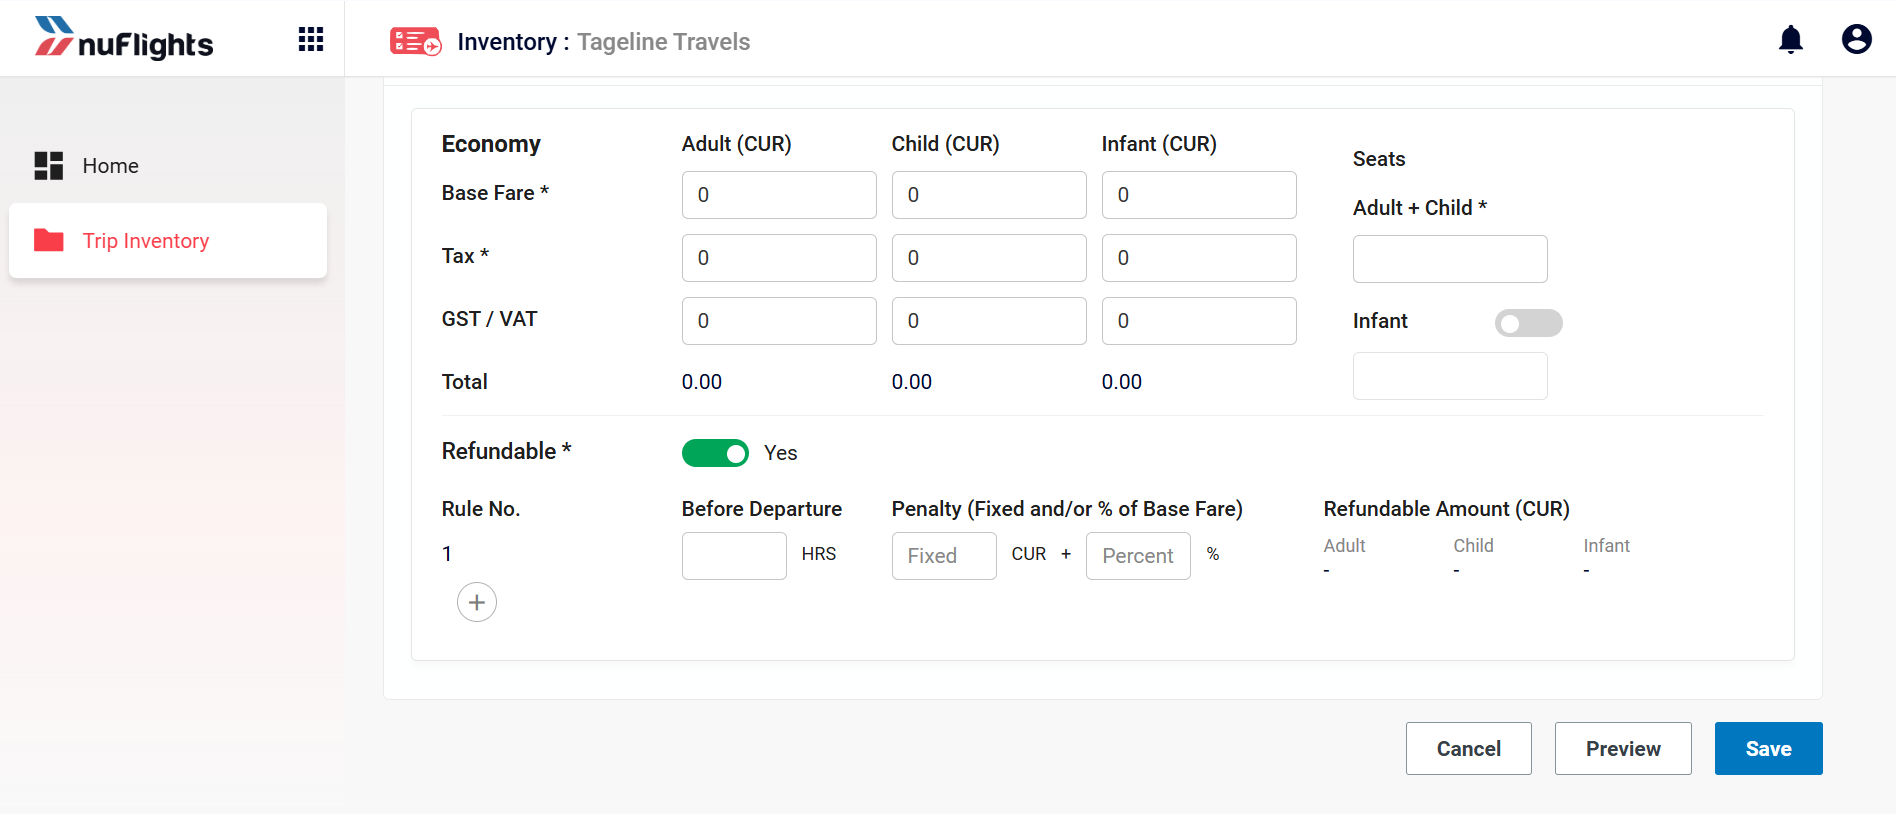
Refundable Rules and Save
- Toggle Refundable to Yes to reveal the refund rule section.
- For each rule, enter:
- Before Departure (HRS): The threshold in hours before departure (e.g., 24 HRS, 48 HRS).
- Penalty – Fixed: A fixed currency amount deducted as a cancellation fee.
- Penalty – Percent (%): A percentage of the base fare to be deducted.
- The system automatically calculates the Refundable Amount for Adult, Child, and Infant based on the penalty defined.
- Click + to add additional rules for different time windows.
You can apply both a fixed amount and a percentage simultaneously. The system combines both penalties when calculating the net refundable amount.
3. Save and Publish the Inventory
- Click Preview to review all trip, flight, fare, and refund details before committing.
- Click Save to store the inventory in Draft status. Drafts can be edited freely.
- When ready, use the Draft ↔ Published toggle on the Inventory Detail page to publish the trip and make it available for booking in Travel Workbench.
Once a trip is Published, its core details (carrier, PNR, fares, and flight schedule) cannot be modified. Verify all information carefully before publishing.
4. Viewing Inventory Details
Click an inventory row to open its Inventory Detail page. This page has two tabs at the top:
- Inventory – Shows the full summary of the trip including Inventory Item No., Airline PNR, Supplier Code, Airline Carrier, Travel route, Departure Date, Trip Type, Seat Remaining, Total Seats, and Creation/Last Update Date.
- Passenger Manifest (n) – Shows the list of all passengers booked on this trip (the count in brackets updates automatically).
The Draft / Published toggle is shown in the Inventory Details header. You can also Edit, Cancel, Print, or Email from this page.
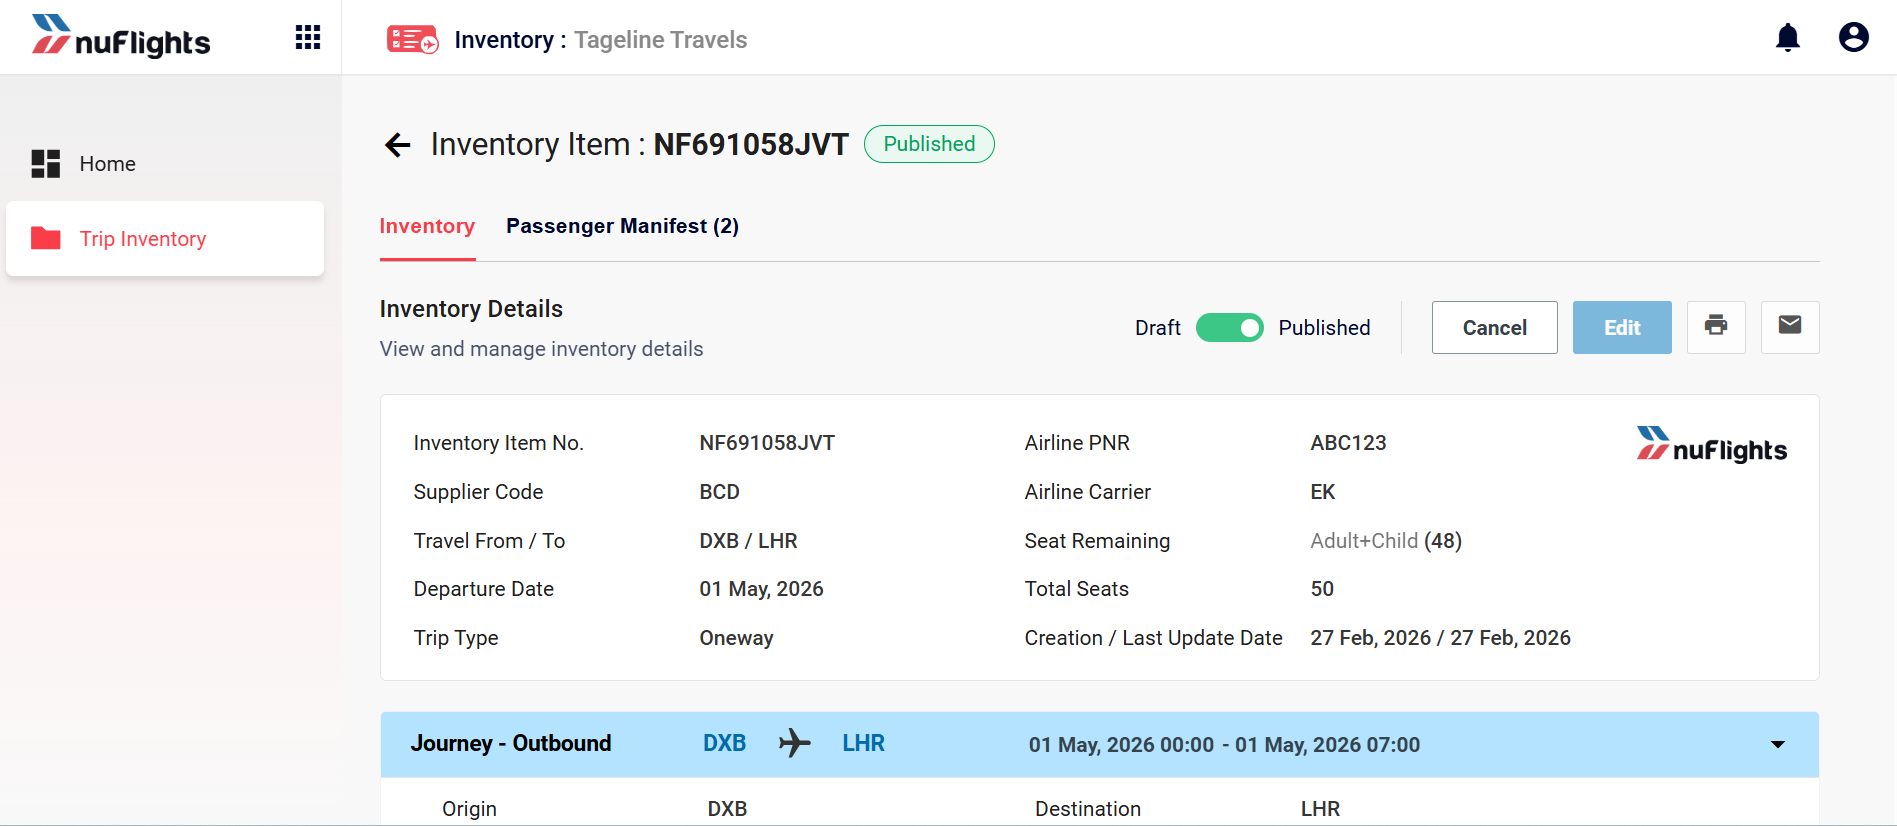
Inventory Detail – Summary and Journey
Expand the Journey – Outbound section to review the confirmed flight segment details.
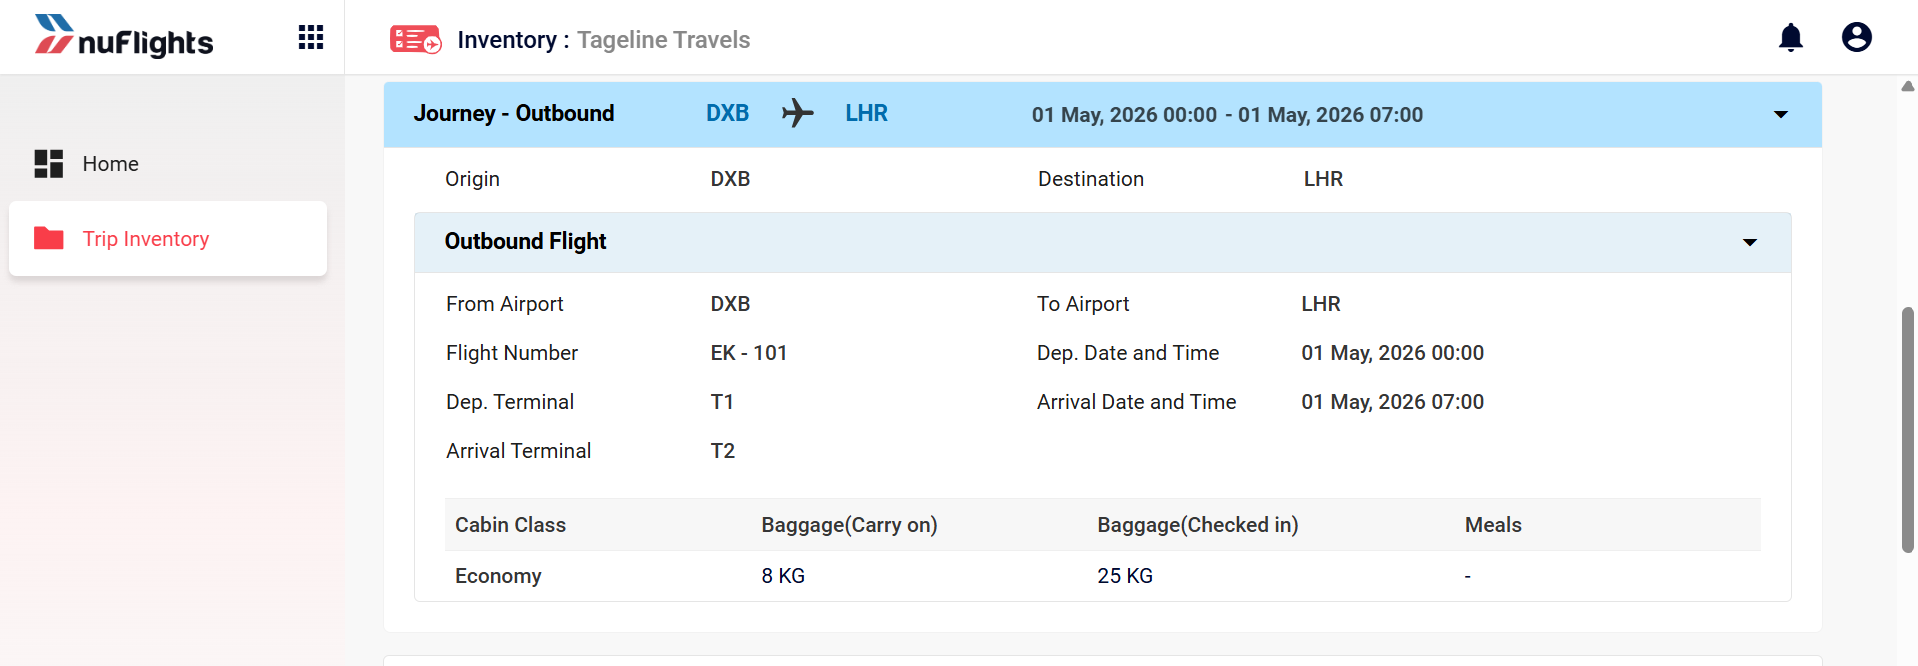
Inventory Detail – Outbound Flight Details
Scroll further to see Fare Details displaying the configured fares and refund rules in read-only form.
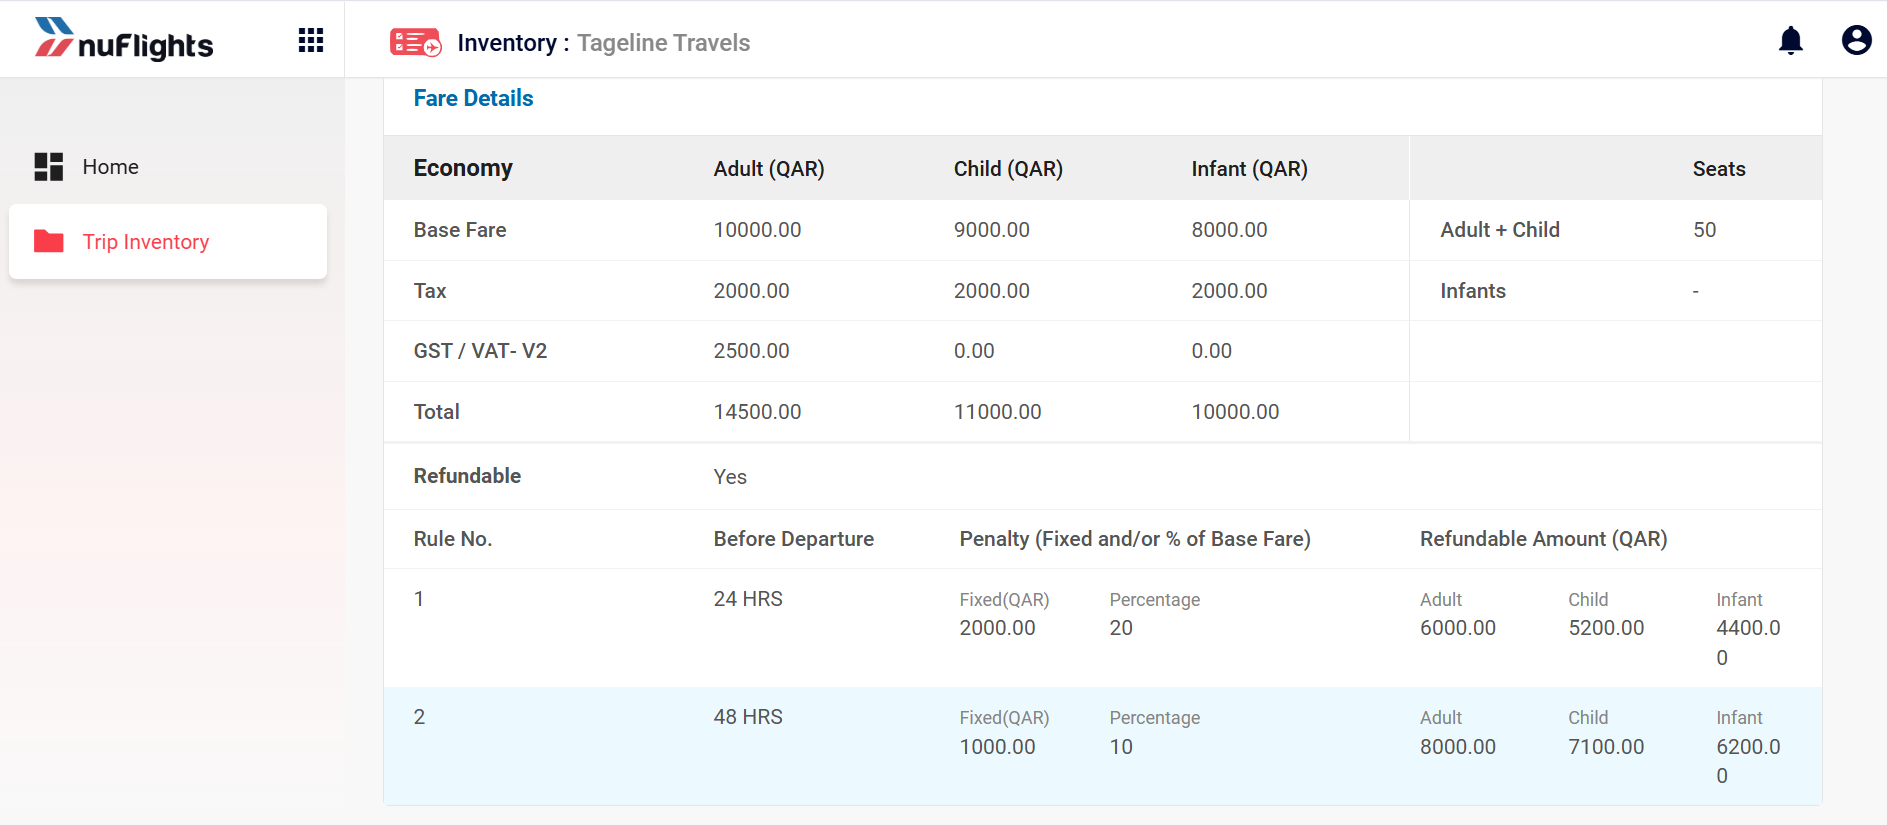
Fare Details View – Populated Data and Refund Rules
Subscriptions
To access Local Inventory offers, your agency must have an active Local Inventory Subscription on your NDC Connect account. This subscription links the NF LOCAL INV content provider to your agency, allowing Local Inventory flights to appear in your Travel Workbench search results.
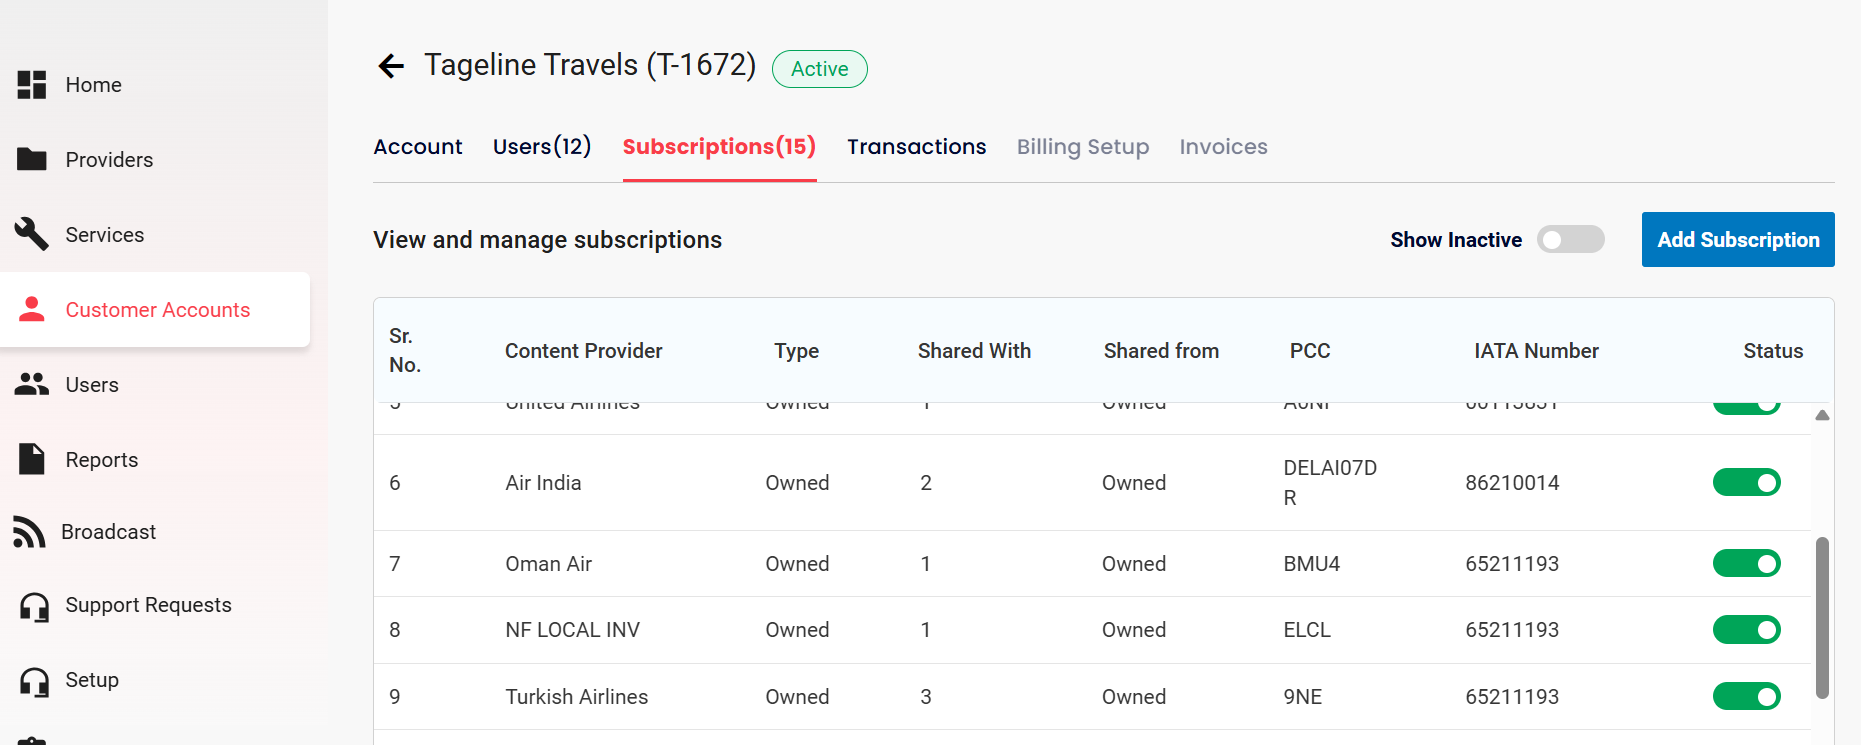
Subscriptions List – NF LOCAL INV Active
If you do not see NF LOCAL INV as an available airline option in the Select Airlines dropdown on Travel Workbench, it means the required subscription is not active. Please reach out to NuFlights Support to have this subscription added to your agency's account.
Booking from Local Inventory
Agents can search and book these seats through the Travel Workbench.
To learn how to search, book, and issue tickets for Local Inventory flights, please refer to the following Travel Workbench guides:
Passenger Manifest
The Passenger Manifest provides a consolidated view of all bookings for a specific trip. It is the primary tool for communicating passenger details to the operating airline.
Viewing the Manifest
- Go to Local Inventory → Trip Inventory and click on your published trip.
- On the Inventory Detail page, click the Passenger Manifest (n) tab to open the passenger list.
The manifest displays the following columns for every booked passenger:
| Column | Description |
|---|---|
| Booking Ref | The booking reference linking the passenger to the airline PNR (e.g., EK/ABC123), shown as a clickable link with the consultant name. |
| Name | Full name of the passenger in Last/First format. |
| Type | Passenger type: ADT (Adult), CHD (Child), or INF (Infant). For INF, this column also shows the name of the Associated adult. |
| Passport | Passport number and nationality code (e.g., No.: AA1625162 / Nationality: IN). |
| Contact | Passenger phone number and email address. |
| NF Ticket No. | The NuFlights-issued ticket number for this passenger (e.g., 176NO8F2H4C01). |
| Original Ticket No. | The airline-issued ticket number — to be filled in after the airline processes the booking. Leave blank until confirmed by the airline. |
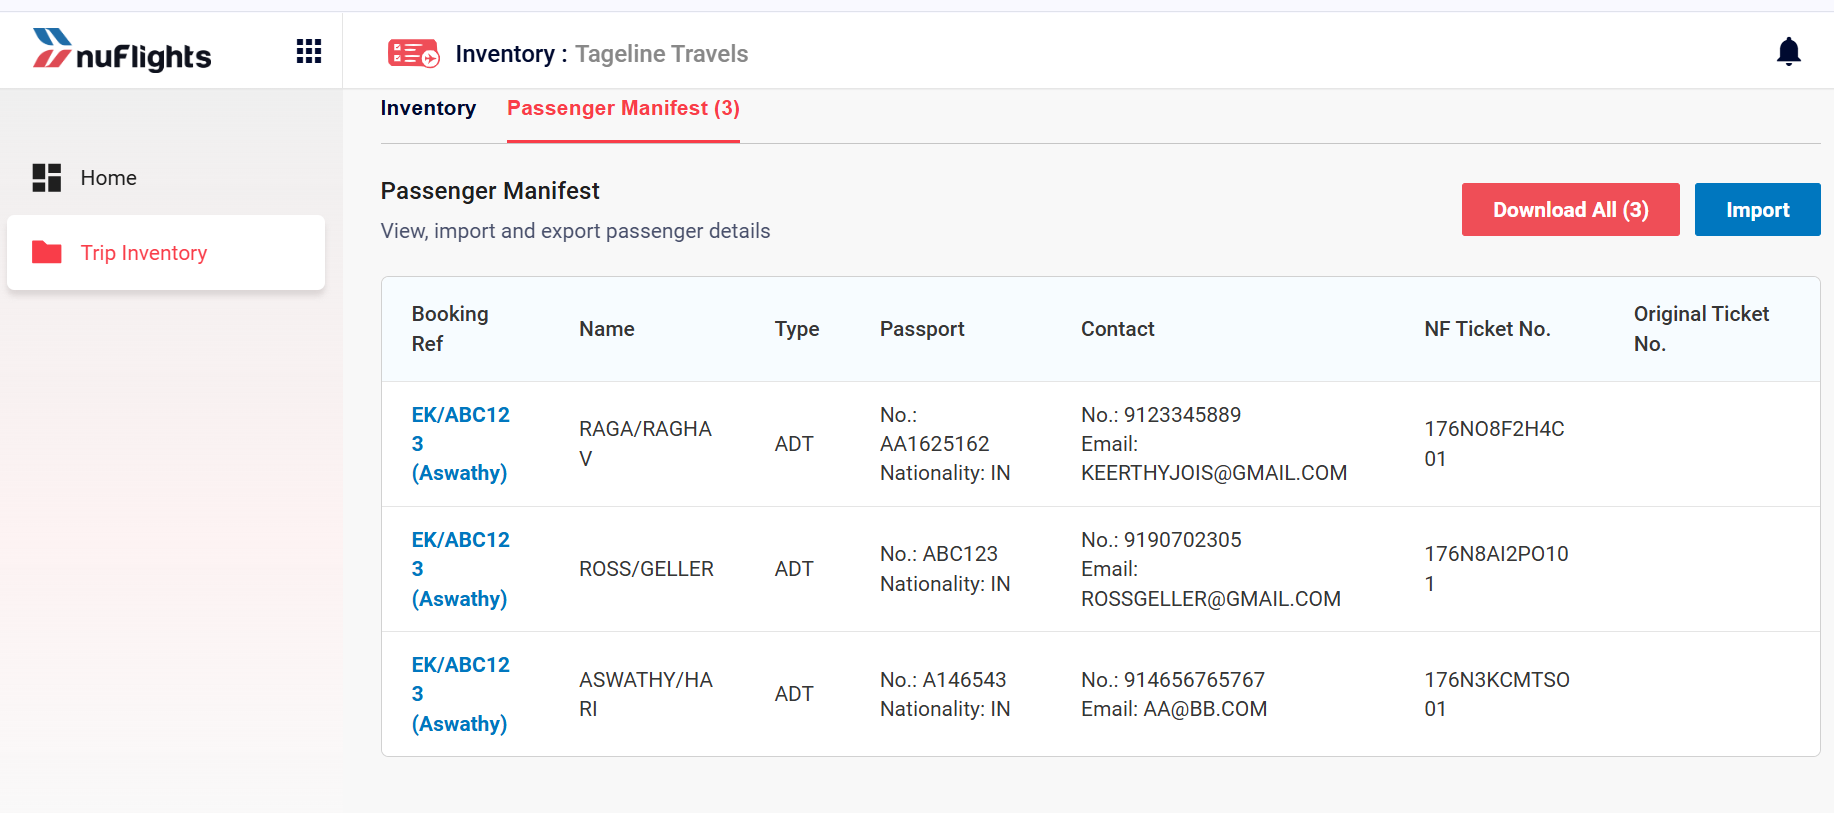
Passenger Manifest – All Bookings
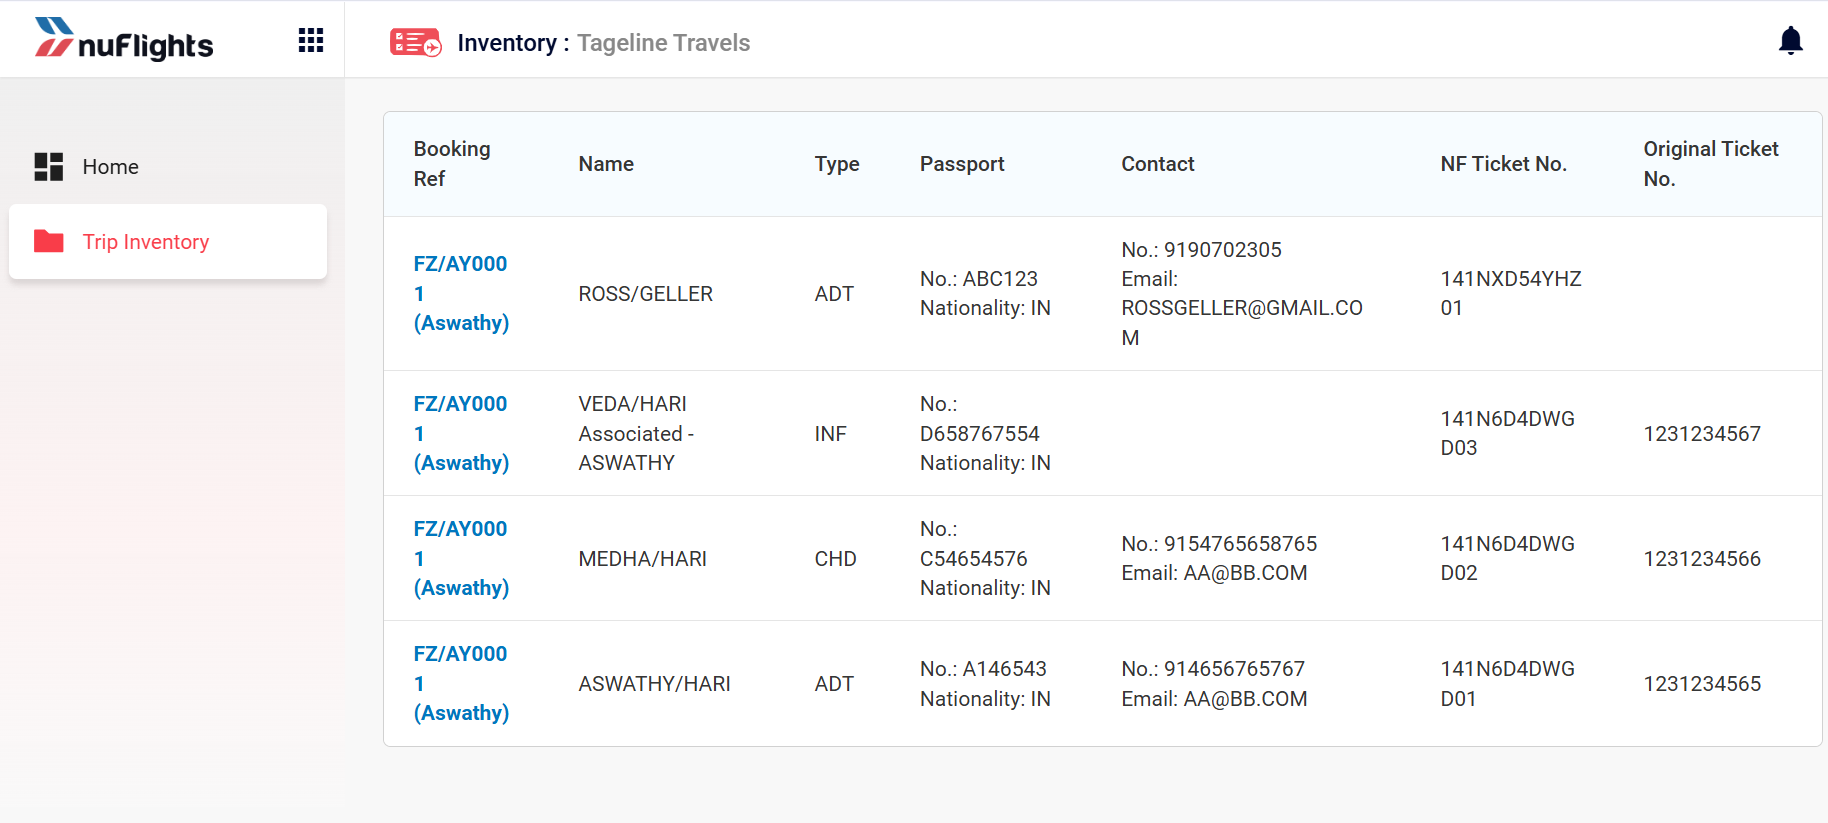
Passenger Manifest – INF with Associated Passenger
Passenger Types Explained
- ADT (Adult): Passengers aged 12 and above. Full fare applies.
- CHD (Child): Passengers aged 2–11. Child fare applies.
- INF (Infant): Passengers under 2 years of age. Infants travel on the lap of an associated adult. The Type field shows
INFalong with the associated adult's name.
Downloading and Importing the Manifest
- Click Download All (n) (top-right of the manifest) to export all passenger records as a CSV file. Share this file with the operating airline for check-in and seat assignment.
- Click Import to bulk-upload passenger data (e.g., Original Ticket No.) back into the manifest.
The downloaded CSV contains all columns including SL NO, Group Booking Ref, Fulfillment Order ID, Individual Booking Ref, Ticket Number, passenger name fields, Email, Contact No, Nationality, DOB, Type, Passport No, Passport Expiry, Associated Passenger, Passenger Booking Ref, and Passenger Ticket Number.

Downloaded Manifest CSV
Download and share the manifest with the airline well before the departure date. Since NuFlights tickets are not automatically synced back to the airline's GDS, the airline needs this file to recognise and seat the passengers correctly.
Optional Guidance
Filtering Your Inventory
On the Trip Inventory page, use the filter icon (top-right of the list) to narrow results. You can filter by:
- Origin / Destination: Airport codes.
- Date Range: Show only upcoming or past trips within a selected period.
- Airline Carrier / PNR: Narrow results to a specific airline or booking reference.
Multi-city and Return Trips
When creating a trip with Trip Type set to Return or Multi-city:
- Additional Journey panels (Inbound, or Journey 2 through 6) will appear automatically.
- Each journey must have its own flight segments, baggage configuration, and fare details filled in independently.
Manifest Management Best Practices
- Download and send the passenger manifest to the airline at least 48–72 hours before departure.
- If additional agents book seats after the initial submission, re-download the updated manifest and resend it to the airline.
- Keep a copy of the downloaded CSV for internal audit records.
- Use the Original Ticket No. column to record airline-issued ticket numbers once the airline confirms the booking.